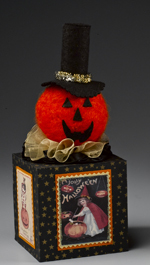
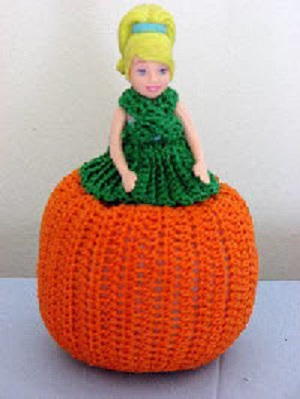
Needlefelted Pumpkin Cube
This adorable Halloween project combines two hot trends - needlefelting and paper crafts. Versatile STYROFOAM™ brand foam makes an ideal base for both techniques.

Materials:
- STYROFOAM™ Brand Foam:
- Ball, 3-1/2"
- Block, 18" x 4" x 4"
- Orange wool fiber
- Black wool felt
- Star-print decorative paper, 12" x 12"
- Cardstock: cream, orange
- Digital, vintage Halloween images
- Ribbon, 1-1/2" x 1 yd.: gold organza, black satin
- Gold chenille stem
- White/iridescent glitter glue
- Serrated knife
- Candle stub or paraffin
- Pencil
- Ruler
- Round wooden toothpicks, two
- Scissors: standard; scallop and pinking decorative-edge
- Needlefelting tool
- Sewing needle and black button thread
- Black-head corsage pins, seven
- Thick, white craft glue
- Computer and printer
Steps:
Note: Felting needles are extremely sharp; use caution. Follow manufacturer's instructions.
- Wax serrated knife with candle stub or paraffin; cut 4" cube from foam block. Set aside remainder of foam block for future project.
- Cut two 4 1/2" x 8 1/4" strips and one 3 3/4" square from star paper. Overlap and glue two short ends of 4 1/2" wide strips 1/4" to create one 4 1/2" x 16 1/4" strip. Score and fold paper strip 1/2" from top long edge to make sharp crease.
- Beginning and ending in center of one side of cube to prevent visible seams, wrap paper strip around four sides, allowing paper to extend 1/2" above top edge of cube; do not glue yet. Use fingers to crimp paper at cube corners; remove paper and crisply fold at crimp marks.
- Glue paper strip around cube sides, overlapping ends. Clip paper corners above foam and fold excess down to top of cube; glue to secure. Glue paper square to top of cube. Position cube with paper seam at center back.
- Print desired Halloween images onto cream cardstock and trim with pinking scissors. Mat image on orange cardstock and glue to block sides. Embellish images with glitter glue.
- Place small amount of orange wool fiber against foam ball and attach to surface using felting needle; follow manufacturer instructions to ensure safety. Continue felting fiber to foam until completely covered.
- Glue two toothpicks halfway into bottom of ball. Apply glue to free ends and insert into top of paper-covered cube; let dry.
- Cut one 2 1/2" x 9" strip from black wool felt and roll into a log shape for hat crown; glue edge. Use scallop scissors to cut a 3" circle from felt for brim; glue hat crown to center of brim. Cut small square from felt and glue to top of hat; trim edges even. Glue hat to head. Glue chenille stem around bottom of hat crown; trim excess.
- Cut face patterns from black wool felt and adhere to face as shown.
- Layer ribbons together and sew gathering stitch along one long edge. Pull up gathers tightly to create ruffle. Wrap ribbons around neck and tie off threads.
®™ Trademark of The Dow Chemical Company ("Dow") or an affiliated company of Dow.
For more project ideas, please see styrofoamstyle.com.
If you like this needlefelted craft you might also like the smiling snowman in a box!
Read NextCute Polly Pumpkin