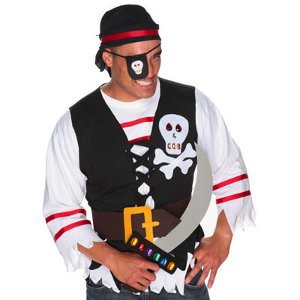
Shiver Me Timbers Pirate
Making a pirate costume is easy with this Shiver Me Timbers Pirate outfit from I Love to Create. Grab some old tee shirts and get creative! Pirate costumes can be easy, affordable, and comfy!

Materials:
- Stiff felt (gray, black, brown)
- Felt yardage (brown, 1/6 yard)
- Black fabric (24” square or you could use a black bandana)
- Ribbon (4 yards of 1” red grosgrain)
- Acrylic gems, assorted sizes and colors
- Small craft brush
- Low-tack masking tape
- T-shirts (white long sleeve, black)
- Felt sheets (white, black, gold)
- Sewing pins
- Pencil
- Elastic cording (black, 1 yard)
- Foil
- Cut and loop tape (black, 3”)
- Scissors
Instructions:
Head Scarf:
- Fold square in half diagonally. Apply a very thin bead of No-Sew Fabric Glue along three edges then press in place and let dry.
- Glue ribbon just above folded edge. Let dry.
- Place folded edge to front then tie a knot in back of head to hold in place.
Eye Patch:
- Cut out patch pattern, pin on piece of soft black felt and cut out. Fold in half and pin to secure.
- Cut out skull pattern from white felt then use No-Sew Fabric Glue to adhere in place on patch. Let dry.
- Add a dot of Jewel-It® on skull for each jewel. Press jewel into place and let dry.
- Remove pin then fold patch over elastic cording and glue patch together. Let dry. Tie cording to back of head, adjust patch then trim ends if needed.
Shirt and Vest:
- Use scissors to cut a zigzag edge around bottom hem of white shirt. Repeat step for sleeves, cutting about 4” up from cuff.
- Squeeze a small puddle of OK To Wash-It® onto foil. Measure and cut four ribbons to fit around sleeves, adding about a 1” overlap to each. Place ribbon on work surface then use craft brush to paint on a thin layer of glue to one side of ribbon. Press in place on sleeve about 2” up from cut edge and add another ribbon 2” above first, holding both with small piece of masking tape if needed until dry. Repeat for other sleeve.
- Cut two lengths of ribbon about 12” long. Glue one in place about 2” down from neckline then another about 2” below the first. Let dry.
- Cut sleeves from black tee just inside seam edge. Cut off 2” from bottom edge of shirt and set aside, then cut a zigzag hem. Cut up center front of shirt curving slightly at each side of neckline. Refer to photo. Cut three 1” slits along both sides of opening where shown. Cut hem section to create one long strip then thread back and forth through openings and tie a knot at end.
- Cut skull and bones from white felt sheet. Use OK To Wash-It® to glue in place on right side of vest. Use Jewel-It® to adhere gems in place on skull for face.
Belt:
- Pin buckle pattern pieces to gold felt and cut out.
- Cut a 4” wide strip the length of brown felt. Try on belt then cut to size, leaving a 5” overlap.
- Use No-Sew Glue to adhere buckle piece in place about 5” in from one end.
- Cut buckle end of belt in a point as shown.
- Use No-Sew® Glue to adhere cut and loop section on back toward end of belt and let dry.
Sword:
- Use pencil to trace pattern pieces onto felt, tracing and cutting number indicated on pattern.
- Use Fabric Fusion® to glue gray sword and brown handle pieces together.
- Apply glue to one side of black handle section, place sword and handle piece in place then glue other black section in place, sandwiching pieces within. Hold with tape if needed until dry.
- Use Jewel-It® Glue to hold adhere colored acrylic gems in place.