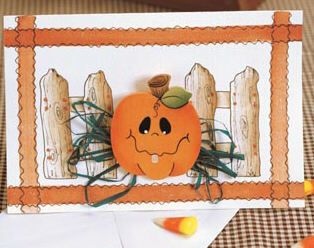
Pumpkin Halloween Card
Send your friends a happy pumpkin Halloween card this year. Using acrylics and woodcrafts you can have this card ready to send in 13 easy steps.

Materials:
- Americana Acrylics
- DA164 - Light Buttermilk
- Brush-On Sealers
- DS15 - Americana Satin Varnish
- Americana Multi-Purpose Sealer
- DS17 - Multi-Purpose Sealer
- Brushes - Synthetic Brushes for Acrylics: #2, #6, #8 & #14 Flats; #0 Liner; #4 Round
- 1 - 5" X 6-7/8" Greeting Card by Strathmore OR 140-lb. Watercolor Paper
- Percy Pumpkin Pin #23228, from Miller Woodcrafts, Inc., 10642 Pullman Ct., Rancho Cucamonga, CA 91730; (909) 948-9609
- #03 Pigma Micron Pen
- Water container
- Palette paper
- Light box or tracing and transfer paper
- Stylus
- Scotch drafting tape
- Hot glue gun & sticks
- Sandpaper
- Paper towels
- Tack cloth
- Green raffia
- Pattern
Steps:
Transferring Patterns
Lay tracing paper over pattern and draw the basic lines. Lay this tracing on the surface to be painted. Slip graphite paper between the tracing and the surface and secure. Trace with a pencil or stylus to transfer the design. Do not trace details until after basecoating has dried.
Preparation
- If using a light box, tape pattern to light box surface with drafting tape. Turn on light. Place open card on pattern, centering it. Tape it in place with drafting tape. Trace over pattern lines with Pigma Pen.
- If not using a light box, trace and transfer the pattern.
- Sand, tack and apply Multi-Purpose Sealer to pumkin pin.
Before painting each section on card, lightly dampen with water.
Card
- Use #8 flat brush to paint the border with Terra Cotta. When dry, paint again with Starlight Crystal.
- Do not paint the fence; just shade* with Earth Brown, using #14 flat brush. When dry, add dots of Terra Cotta for the nails.
Pin
- Basecoat stem with Shadow Tan, using #6 flat brush; shade with Earth Brown.
- Basecoat pumpkin with Sunset Orange; use #14 brush to shade with Terra Cotta.
- Paint eyes Lamp Black, using #2 flat brush. Add highlight dot of Light Buttermilk to each eye. Paint tooth with Light Buttermilk. When dry, paint again with Starlight Crystal.
- Use #6 brush to basecoat the leaf with Meadow Green; shade with Hunter Green.
- Using liner, outline all with Lamp Black.
Finishing Instructions
- Apply Satin Varnish to pumpkin.
- Hot glue pin back to pumpkin and pin it to the card.
- Make a bow with the raffia and hot glue it to the back of the pumpkin.
Techniques
Shading: Use the floating method, dipping the brush into water or Brush 'n Blend Extender. Lightly press on a paper towel until sheen leaves the bristles. Dip one corner of brush into paint; stroke back and forth on palette, blending until color spreads evenly halfway across the width of the brush.
Read NextMake Your Own Wand DIY