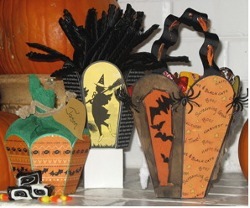
Halloween Candy Cauldrons
Transform these petal pots into spooky boxes of goodies for the kids or to display your Halloween treats at the costume party, from C&T Publishing.

Materials
- Ready-to-Go® Blank Board Petal Pots– Assorted pack of 3
- 9 qty cardstock ½” x 1” rectangles
- Scissors
- Paper Adhesive
Pumpkin Party Favor
- (The 3.5” petal pot is also available in a pack of 3 Ready-to-Go® Blank Board Mini Petal Pots)
- Paper for side panels-Halloween theme
- Green crepe paper 10” x 20”
- Wire or pipe cleaner
- Die cut leaf or brown paper
Witches Licorice Holder
- 2 contrasting themed papers
- Black chalk ink or marker
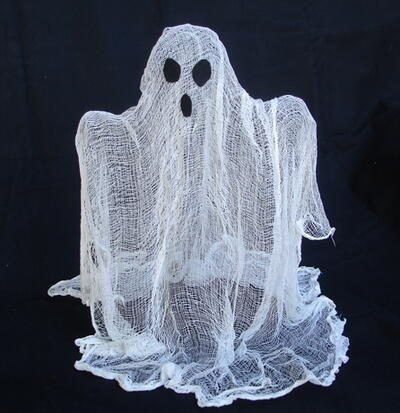
Trick or Treat Pot
- Paper for side panels – Halloween theme – 6” x 9”
- Brown grocery bag or brown paper – 6” x 9”
- Window background paper 3” x 6” each, 3qty
- Black ink chalk & marker
- Ribbon approx. 13”
- 6 black plastic spiders
- Gauze
- Felt, black, white, gray
- Buttons – 2 qty (optional)
Steps:
- Secure bottom. Fold all the ½” x 1” cardstock rectangles at 90° angles.
- Space 3 evenly and glue to the inside bottom and sides of each petal pot. Keep the corner tight where they meet.
- Create side panel stencils. For each size pot, lay paper over one side of pot. Rub a pencil along the edges to create the pattern. Using scissors, cut 1/16” inside the line. This will create 3 different size stencils (3.5”, 5.25”, 6.75”).
- Using appropriate colored chalk ink and/or marker, cover all side seams, and edges of pots (bleed color ¼” onto sides panels).
Pumpkin Party Favor
- Using the 3.5” stencil, trace and cut out 6 side panels out of the Halloween paper.
- Glue the 6 panels onto the sides of the pot using a paper adhesive.
- Put paper adhesive on the inside bottom of pot. Press the center of the green crepe paper into the pot. Let dry.
- Shape the paper up the sides so that the side seams meet evenly with a 1-2” overlap. Put paper adhesive along the top inside edge of the pot and press the green crepe paper along the inside. Let dry.
- After filling with goodies gently bring all edges of crepe paper together and gently twist creating the top and stem of the pumpkin. Option: Punch a small hole into the stem of the leaf. Thread a pipe cleaner through the hole and attach the leaf with recipient’s name.
Witches Licorice Holder
- Using the 5.25” stencil, trace 3 side panels onto the back of each contrasting paper. Cut out and adhere to sides of pot in an alternating fashion.
(Hint – The witch images were sized on a computer and printed to size of petal pot panels. The ghost story paper was created by downloading the story and changing the type to Old English, then reversed to white on black.
Trick or Treat Pot
- Use the 6.75” stencil to trace 3 side panels onto the backside of the Halloween paper. Cut out with scissor.
- Repeat on the “window background” and “brown” papers.
- Using paper adhesive attach the Halloween paper and the window background paper in an alternating fashion.
- Create the windows by cutting a vertical line into the center of the brown paper. Tear along all edges of cut creating a thin oval. Roll back the edges and tear where necessary creating the shape of window desired. Rub black chalk ink all over the front and on the rolled edges. Adhere over the window background paper.
- Create 3-d characters for each window:
Bats – cut black felt into varying sized bat shapes. Glue them in place allowing large one to be half out of the window giving it depth.
Ghost – cut white felt into a ghost shape, cut a second identical shape out of gray for the shadow. Sew on buttons for eyes. Glue the ghost in a rippling effect to create the 3-d. Allow the top to stick out while the bottom appears to be coming from behind the window.
Mummy – Make a mummy shape out of cardstock. Wrap in gauze. Bend one leg and arm. Glue in place so it appears to be climbing out the window.
- Attach handle by folding over edges ¼” and gluing to interior edge with a strong adhesive.
- Attach spiders onto panel corners with glue.