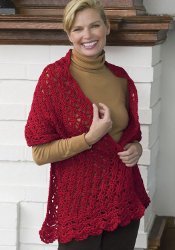
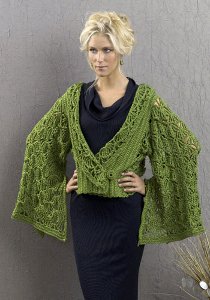
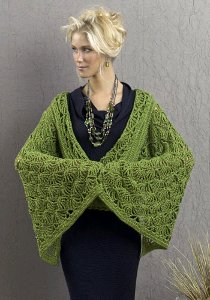
Geisha Jacket
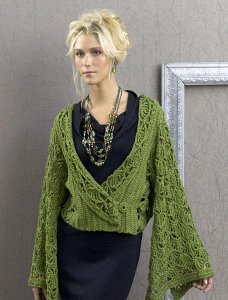
Use this crochet jacket pattern to make your own geisha jacket. This crochet sweater features a wrap front and roomy sleeves for a geisha-like effect.

Materials:
- Naturally Caron.com Country, 75% Microdenier Acrylic/25% Merino Wool): 21 (24, 24, 24, 27) oz, Shown in: #0012 Foliage
- One size US H-8 (5 mm) crochet hook, or size to obtain gauge.
- Stitch markers
- Buttons or large snaps, and matching sewing needle and thread (optional)
- Yarn needle
- Pattern


Instructions:
SIZES
S (M, L/1X, 1X, 2X/3X)
FINISHED MEASUREMENTS:
Bust 41 (42 1/2, 51, 53, 58 1/2)"/104 (108, 129.5, 134.5, 148.5) cm
Length 18 (18 1/2, 19, 19 1/4, 19 1/2)"/45.5 (47, 48.5, 49, 49.5) cm
Note: Measured flat, wet-blocked.
GAUGE
In linked double crochet, 21 ldc and 14 rows = 6"/15 cm;
In sleeve stitch pattern, 2 fans = 6"/15 cm and 4 rows = 5 1/4"/13.5cm.
STITCHES USED
Chain (ch), double crochet (dc), half double crochet (hdc), single crochet (sc), slip stitch (slip st), treble crochet (tr)
SPECIAL TERMS
Fsc: Foundation single crochet (This technique creates a foundation chain and a row of single crochet stitches in one, for a sturdy elastic neckline) –
Step 1:Place a slip knot on hook, ch 2, insert hook in second ch from hook and draw up a loop; yarn over and draw through one loop on hook (the "chain"); yarn over and draw through 2 loops on hook (the "single crochet").
Step 2:The following stitch is worked under the forward 2 loops of the stem of the previous stitch (into the "chain"). Insert hook into the face of the "chain" and under the nub at the back of the "chain", draw up a loop, yarn over and draw through one loop on hook (the "chain"), yarn over and draw through 2 loops on hook (the "single crochet"). Repeat for the length of foundation.
ldc: Linked double crochet—
To work first ldc after starting a new row: Insert hook in 2nd ch from hook (2nd ch of turning ch), yarn over and draw up a loop (this replaces first yarn over of a dc), insert hook in next st, yarn over and draw up a loop, complete as for dc.
To work next ldc: Insert hook in horizontal loop at the middle front of the ldc just made, yarn over and draw up a loop, insert hook in next st, yarn over and draw up a loop, complete as for dc.
trtr: Triple treble crochet—Yarn over 4 times, insert hook in indicated st and draw up a loop, [yarn over and draw through 2 loops on hook] 5 times.
quadtr: Quadruple treble crochet—Yarn over 5 times, insert hook in indicated st and draw up a loop, [yarn over and draw through 2 loops on hook] 6 times.
fan: Triple treble fan—Trtr in indicated stitch, (ch 1, trtr in same stitch) 6 times.
NOTES
- Jacket is worked side to side in two pieces, "Right Front and Back" and "Left Front and Back", with minimal shaping to create shoulder slope. The two pieces are seamed at the center back.
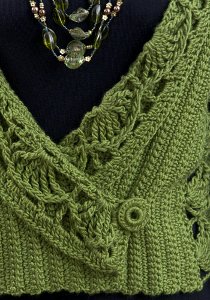
- The lace panels disguise the simple drop-shoulder sleeve construction.
- Jacket has built-in back neck shaping.
- The foundation row of each piece falls at each shoulder edge. The front and back are worked on one side of the foundation row in linked double crochet, and the lacy sleeves are worked onto the other side of the foundation row.
- Jacket may be closed with buttons or with side ties.
- For best drape and proper sleeve length, it is important that the taller stitches (dc, tr, trtr, quadtr) reach their full height. After a yarn over, take care to draw the loop all the way through the stitch or loops on hook making a taller loop. This will result in a taller, less bulky stitch. Use these approximate stitch heights as a guide: dc = 3/4"/2cm; tr = 1"/2.5cm; trtr = 1 3/4"/4.5cm; quadtr = 2 1/4"/5.5cm.
RIGHT FRONT AND BACK
Note: There is no right side or wrong side until the sleeve is added.
- Foundation Row: Fsc 121 (123, 125, 127, 129), turn.
- Row 1 (WS): Ch 3 (counts as first ldc throughout), ldc in second st from hook and in each remaining st across, turn—121 (123, 125, 127, 129) ldc.
- Row 2: Ch 3, ldc in each st across, turn. Place marker in center (61st (62nd, 63rd, 64th, 65th) st.
- Rows 3–8 (8, 9, 9, 10): Repeat Row 2, working 2 ldc in marked st, move marker up as each row is worked keeping marker in or near center st, turn—127 (129, 132, 134, 137) sts.
Back
- Row 9 (9, 10, 10, 11): Ch 3 (counts as first ldc), ldc in next 61 (62, 64, 65, 67) sts; leave remaining sts unworked, turn—62 (63, 65, 66, 68) ldc.
- Rows 10 (10, 11, 11, 12)–15 (16, 17, 18, 18): Ch 3, ldc in each st across, turn. Fasten off.
Right Front
- Row 9 (9, 10, 10, 11): Sk 7 (4, 5, 3, 4) unworked sts of Row 8 (8, 9, 9, 10) after Back, join yarn with slip st in next st; ch 3, ldc in each st to end of row, turn—58 (62, 62, 65, 65) ldc.
- Row 10 (10, 11, 11, 12): Ch 3, ldc in each st to last 5 sts; leave last 5 sts unworked, turn—53 (57, 57, 60, 60) ldc.
- Row 11 (11, 12, 12, 13): Sk first st, slip st in next 5 sts, ch 3 (counts as ldc with last slip st made as base), ldc in each st to end of row, turn—48 (52, 52, 55, 55) ldc.
- Repeat last 2 rows 3 (4, 4, 4, 4) times—18 (12, 12, 15, 15) ldc.
- Repeat Row 10 (10, 11, 11, 12) 1 (0, 0, 1, 0) time—13 (12, 12, 10, 15) ldc.
- Repeat Row 2, 0 (1, 0, 1, 1) time(s). You should have a total of 18 (20, 20, 22, 22) rows. Do not fasten off, work lacy panel and sleeve with separate ball of yarn. Later the Shawl Collar will be worked beginning with this yarn.
LACY RIGHT SIDE PANEL AND SLEEVE
Note: Take care to work all slip sts and chains at normal gauge, not too tightly.
- Row 1: With right side of piece facing, join yarn with slip st in first st of unworked side of foundation row (at lower back corner); ch 3 (counts as first dc), working into 3 strands of foundation sts (to form a strong shoulder edge),*sk next 4 sts, fan in next st, sk next 4 sts, dc in next st; repeat from * across, turn—12 fans.
- Row 2 (WS): Slip st in each trtr, ch-sp, and dc across, turn—169 slip sts.
- Row 3: Ch 7 (counts as trtr, ch1), [(trtr, ch 1) twice, trtr] in first st, *sk next 6 sts, sc in next st (above 4th trtr of fan), sk next 6 sts, fan in next st (above dc); repeat from * across to last fan, sc in st above last fan, [(trtr, ch 1) 3 times times, trtr] in last slip st; turn. Note: Henceforth the 4th tr of a fan will be referred to as the 'top of fan.'
Sizes L (1X, 2X) only: - Row 4: Ch 1, sc in first st, fan in next sc, *sc in top of next fan, fan in next sc; repeat from * across, sc in ch-7 sp, turn
Size L only: - Row 5: Ch 3, dc in first st, [ch 4, sc in top of next fan, ch 4, (dc, ch 2, dc) in next sc] 3 times; begin sleeve: ch 5, [(trtr, ch 1) twice, trtr] in same st as dc just made, [sc in top of next fan, fan in next sc] 5 times, sc in top of next fan, [(trtr, ch 1) 3 times, quadtr] in next sc; leave remaining sts unworked, turn.
- Row 6: Ch 1, sc in first st, fan in next sc, *sc in top of next fan, fan in next sc; repeat from * across to ch-5 sp, sc in ch-5 sp; leave remaining sts unworked, turn.
Size 1X only: - Row 5: Ch 3, dc in first st, [ch 4, sc in top of next fan, ch 4, (dc, ch 2, dc) in next sc] twice; ch 4, sc in top of next fan, begin sleeve: [fan in next sc, sc in top of next fan] 7 times; leave remaining sts unworked, turn.
Size 2X only: - Row 5: Repeat Row 3.
Sizes S (M, 2X) only: - Row 4 (4, 6): Ch 1, sc in first trtr, [ch 4, (dc, ch 2, dc) in next sc, ch 4, sc in top of next fan] 3 (3, 2) times, begin sleeve: [fan in next sc, sc in top of next fan] 6 (6, 8) times; leave remaining sts unworked, turn.
All sizes: - Row 5 (5, 7, 6, 7): Ch 9 (counts as quadtr, ch 1), [(trtr, ch 1) twice, trtr) in first sc, [sc in top of next fan, fan in next sc] 5 (5, 5, 6, 7) times, sc in top of next fan, [(trtr, ch 1) 3 times, quadtr) in next sc; leave remaining sts unworked, turn.
- Row 6 (6, 8, 7, 8): Ch 1, sc in first st, fan in next sc, *sc in top of next fan, fan in next sc; repeat from * across, sc in ch-9 sp, turn.
- Row 7 (7, 9, 8, 9)–17 (17, 17, 16, 17): Repeat last 2 rows 5 (5, 4, 4, 4) times, then repeat Row 5 (5, 7, 6, 7) once more.
Size 1X only: - Fasten off and re-join yarn to beginning of row.
All sizes: - Row 18 (18, 18, 17, 18): Ch 1, sc in quadtr, *ch 2, sk next trtr, hdc in next ch-sp, ch 2, tr in next sc, ch 2, sk next 2 trtr, hdc in next ch-sp, ch 2, sk next trtr, sc in next trtr; repeat from * across, working last sc in ch-9 sp, turn.
- Begin Cuff, and Edge One Side of Sleeve
- Row 19 (19, 19, 18, 19): Ch 3, 3 dc in first sc, 3 dc in each ch-2 sp across, end with 5 dc in last sc; edge one side of sleeve: pivot to work in ends of rows along side edge, *8 dc in end of next quadtr row, dc in end of next sc row; repeat from * to last quadtr row of sleeve, work (3 hdc, 5 sc, slip st) in end of next quadtr row, slip st in end of next sc row.
- Fasten off.
- Join Side Seams and Underarm
- With WS of piece facing and RS of Front and Back lower lace corners held together, join yarn with slip st in first st of Row 4 (4, 5, 5, 6) of sleeve (beginning of sleeve).
Sizes L (1X) only: - Ch 1, dc in first st of opposite corner (unworked st of Row 4).
Sizes S (M, 2X) only: - Slip st in first st of opposite corner (unworked st of Row 3 (3, 5), ch 4, dc in next sc of Row 3 (3, 5), ch 1, sc in next ch-2 sp of Row 4 (4, 6), dc in same st as last dc made.
All sizes: - *Ch 4, sc together top of next fan and sc at top of next fan of opposite side, ch 4, dc in next sc, ch 1, sc in next ch-2 sp of Row 4 (4, 5, 5, 6), dc in same st as last dc made; repeat from * across remaining unworked sts of Row 3 (3, 4, 4, 5) to beginning of sleeve (underarm); ch 1, *slip st together one loop only of next st of each sleeve edge to be seamed, ch 1, sk next st of each edge; repeat from * across first 27 sts of first edged sleeve, leave rest of sleeve unseamed (or as desired). Do not fasten off.
- Edge Remaining Side of Sleeve, and Finish Cuff
- Turn sleeve RS out, working in ends of rows along unedged side of sleeve, (dc in end of next sc row, 8 dc in end of next ch-9 sp row) across, end with 2 dc in sc at corner, sk ch-3 sp; join with slip st in top of first dc; finish cuff: ch 6, sc in 3rd ch from hook, ldc in join, dc in each dc across, end with 2 dc in third dc of corner, ch 3, slip st in front loop of dc before last dc and one loop of body of last dc made. Fasten off.
LEFT FRONT AND BACK
Work same as Right Front and Back except fasten off Left Front at end of last row; do not fasten off Left Back at end of last row. Seam together last row of both Back pieces. Fasten off. Wet-block seam to lie flat if necessary.
LACY LEFT SIDE PANEL AND SLEEVE
With right side of piece facing, join yarn with slip st in first st of unworked side of foundation row (at lower front corner).Work same as Lacy Right Side Panel and Sleeve.
SHAWL COLLAR
Note: The V-neckline shaping has small "steps" where sts were slip stitched over or were left unworked. The first stitch following a "step" is called a "decrease" in Row 1.
- Row 1: With yarn still attached to Right Front, work along V-neckline as follows: *ch 1, sk next decrease, (dc, ch 2, dc) in next st, ch 2, sc in st just before next decrease; repeat from * 4 more times (to last decrease of Right Front), ch 2, (dc, ch 2, dc) in st after last decrease, ch 2, sk next 3 sts, dc in each st across shoulder to to last st of shoulder (to Back); in last st of shoulder and end of first row of Back, work dc2tog, 2 dc in end of each row across to last row of Back; in last row work of Back and first st of Left shoulder dc2tog; work Left Front shoulder and neckline the same as for Right Front; end with slip st in top of last row of Front, turn.
- Row 2: Ch 2, dc in first ch-1 sp, sk next ch-2 sp, *fan in next ch-2 sp, sk next 2 ch-sps, dc in next ch-2 sp, sk next 2 ch-sps; repeat form * across to shoulder, continue fan pattern skipping 3 dc after each fan and each dc across to ch-sps of other Front V-neck; continue fan pattern in first ch-sp and work remainder of Front like the first Front. If one ch-sp remains after last dc, leave it unworked. If 2 ch-sps remain, sk 1 ch-sp, (fan, dc) in the last ch-sp. If 3 or more ch-sps remain, distribute the last fan and dc evenly over these ch-sps, turn. Note: It is important that the row begins and ends with a dc, and that fans and dc's alternate across the row.
- Row 3: Slip st in each trtr, ch-sp, and dc across, turn.
- Row 4: Ch 7 (counts as tr, ch 3), *sk next 3 sts, hdc in next st, ch 3, sk next 2 sts, sc in next st (above 4th trtr of fan), ch 3, sk next 2 sts, hdc in next st, ch 3, sk next 3 sts, tr in next st (above the dc), ch 3; repeat from * across, omit last ch-3. Fasten off.
- Row 5 (RS): With RS facing, join yarn with slip st in beginning ch-2 of Row 2 of Collar; working along ends of rows of Collar, ch 2, slip st in nearest ldc of last row of Front, turn, 2 dc in same ch-2 sp as join, 6 dc in ch-7 sp at beginning of Row 4, ch 3, slip st in dc just made (take care to insert hook under 2 loops of the dc), 4 dc in same ch-7 sp, 4 dc in each ch-3 sp across, end with 4 dc in last ch-3 sp, ch 3, slip st in dc just made; working along ends of rows of Collar, work 6 dc around post of tr, 5 dc around post of last dc of Row 2 of Collar, slip st in nearest ldc of last Row of Front, turn.
- Row 6: *Slip st in next dc, ch 1, sk next dc; repeat from * across, end with slip st in nearest ldc of Front. Fasten off.
FINISHING
Dampen garment with cool water and block overnight; this is especially beneficial for the sleeves.
Kimono-style Belt (optional)
- Chain 6.
- Row 1: Dc in 4th ch from hook, ldc in each remaining ch across, turn.
- Row 2: Ch 3 (does not count as st), ldc in first ldc (so that turning ch does not count as a st), ldc in each remaining st across, turn.
- Repeat last row 35 more times. Do not fasten off.
- Last Round: *Ch 1, slip st in end of next row edge or st, hdc in end of next row or st; repeat from * evenly spaced around all edges of belt. Fasten off.
- Wet block belt to lie flat. Sew a strand of yarn to the inside of Right Front side panel, for securing Left Front edge inside jacket before closing Right Front. Weave belt through side panel of Left Front and ch-sp of Right Front collar edge; tie ends together to close jacket.
Button of Snap Closure (optional)
- Sew button, or one half of snap closure, centered on Left Front, opposite ch-sp of Right Front collar edge. Sew other half of snap closure on WS behind Right Front collar edge.
- Using yarn needle, weave in ends.
Read NextSimply Savvy Crochet Ruana Pattern
Your Recently Viewed Projects

Thanks for your comment. Don't forget to share!
princess6860504
Jul 27, 2017
What an impressive piece of work this would be if I were to make this and wear it myself. I fall into the plus size category, so I wear the 1X size. And I am so happy that this beautiful geisha sweater comes in my size! There are not many plus sized patterns made available to us. I love that the pattern is listed right on this page so I don't have to battle with pop-ups and slow loading of websites- happens sometimes. All in all, this is definitely a challenge for me but I think I could do it!
bestwitch68 446672 3
Jan 13, 2015
I'm having trouble with row 2 of lace side panel I cannot get 169 slip stitches at all ...... Can anyone help ?
Member 0358935
Sep 25, 2014
I made this jacket last year out of Country yarn I'd bought up and stashed when Caron discontinued it Every time I wore it people raved about it being gorgeous and the reactions ranged from disbelieving to highly impressed when I admitted that I made it I was afraid that the pattern was above my skill level but truthfully it wasn't as difficult as I thought it would be Certainly the finished sweater looks much more impressive than the effort I put into it Of course the first thing you notice are the beautiful sleeves and collar but the linked double crochet gives it a lovely texture that is subtle and refined And I really love the yarn it has just enough wool to make it look expensive and remain soft and drapey My only complaint is that the width grew on me over time to the point that I was…Read More tying the belt behind my back instead of at the side Then I lost weight and now I could wrap it around me twice I'm thinking about reclaiming the yarn and remaking it in a smaller size I definitely miss wearing it and the ego-boosting compliments
FaveCrafts Editor JL
Sep 26, 2014
Hi there - Thanks so much for sharing! Sounds amazing - you should post a picture of the finished project on our Facebook page, we're love to see it! - Julia from FaveCrafts
nratchett1 3786964
Jul 18, 2013
This is beautiful! If you look at traditional kimonos, the sleeves are long, as they are open underneath the sleeve, which makes this proportionate for a shrug-type jacket. I love it. It is a little beyond my expertise to make at this time, but I'm saving the pattern.
horsefanb 5249644
Apr 15, 2013
Can somebody please explain how to do the part that says: "working into 3 strands of foundation sts (to form a strong shoulder edge)" How would I go about doing this?
Cewen1522 6635015
May 03, 2013
When you go into the st go under three loops instead of the usual two. I
avalonmystcreation s 0438466
Mar 29, 2013
This is absolutely exquisite piece honouring an Eastern cultural tradition. Perhaps your readers should look at a traditional costume before commenting on proportions or impracticality. Thank you for sharing innovative designs that cross cultural borders. Keep them coming!
amberworkman 05626 31
Feb 15, 2013
Too many complaints about the sleeves. Go look at a furisode kimono worn by geishas so you can understand why the sleeves are so large.
annick1960
Jun 21, 2012
The sleeves are way too long, especially in comparison with the body of the jacket. It looks disproportioned.
ashby 9946565
Jan 17, 2012
Hi -Something is wrong -all I get when I try to print pattern is pictures -no words-only underlined words print -like -underarm -& body overnight for Geisha Jacket .
JennyBee1
Jan 18, 2012
@ashby 9946565, We suggest that you highlight the text, then right-click on it. You'll get a window that gives you the option to "copy." Do that, and then paste the text into a word document. You should be able print that document that way. --editors of FaveCrafts
ttemansell 0929501
Dec 20, 2011
I really liked the look of the Geisha jacket and consider myself an intermediate skill level, however I had to go to a professional for help with starting the lace. Now I am at point 19 and am totally confused. The professional was unable to help as well. Points 19 and 21 through 24 are impossible for us to figure out. Can you clarify how to join the sides and finish the sleeve? again when I got to the point 19 (where you join the side and front lower lace)
smartin4
Jul 01, 2012
Hey! I have a question, since you were able to start the lace patterns, do you think you can help me because I am rather confused with those directions as well. Please and thank you =)
jonjanet 0701963
Dec 14, 2011
HELP! I'm confused! How is there 2 row 9? Do I make this same sequence 4 times? I was able to learn how to do the Foundation Chain and the LDC on youtube and I'm doing well, but I just can't figure out how I can go from 9-11 and then back to 9 again...stumped. Thanks for your help! I am hoping to have this for myself for a Christmas present...I've been crocheting for the family and so now it's my turn. LOVE this pattern! Thanks again for your help!
jonjanet 0701963
Dec 14, 2011
Ok, it helps to look at the pattern, huh? smh...any further guidance or pointers to look out for to get through this would be very helpful. Thanks again!
editorKS
Dec 15, 2011
We're glad you found the pattern link, jonjanet 0701963! If you have any other specific questions about the pattern, your best bet is to contact the pattern designer directly (specified in the byline). You can also try posting questions on our Facebook page at www.facebook.com/favecrafts and perhaps a fellow crocheter can help! Good luck! --Editors of FaveCrafts
Carol Rhoton
Dec 13, 2011
How much yarn does this Geisha Jacket take?
editorKS
Dec 14, 2011
Hi, Carol. The amount of yarn required probably depends on the size of the jacket you are making. If you have specific questions about this pattern, I recommend contacting the pattern designer directly (specified in the byline). Thanks! --Editors of FaveCrafts
tigercub
Oct 22, 2011
To crhorton 3871066: This looks like an advaned pattern to me. Gorgeous !
Wendyyn
Jul 20, 2011
i learned simple crochet from my grandmother years ago... and it has been years since i have tried to crochet. My mother has become an enthusiast again, making a beautiful afgan for me for Xmas which has rekindled my interest... She has given me some beaaaauuutiful yarn and i have been looking for a project pattern... This pattern is GORGEOUS!!!!! I SO hope i can figure out how to make it!!! Is there help offered here online if i run into difficulty???
JessiCAN
May 18, 2011
@crhoton 3871066: This pattern was rated intermediate by the designer. Hope this helps! -- Editors of FaveCrafts
crhoton 3871066
May 17, 2011
How would you rate the difficulty of this jacket? Beginners, Intermediate, Advanced, etc.
Report Inappropriate Comment
Are you sure you would like to report this comment? It will be flagged for our moderators to take action.
Thank you for taking the time to improve the content on our site.