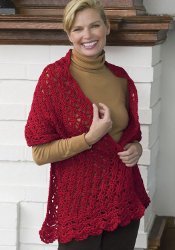
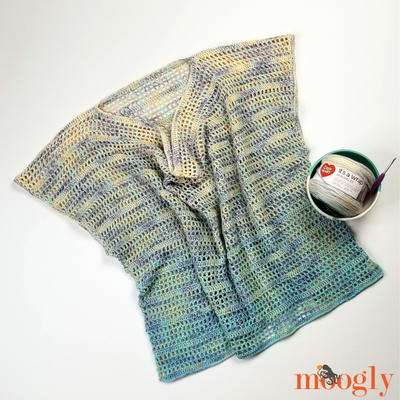
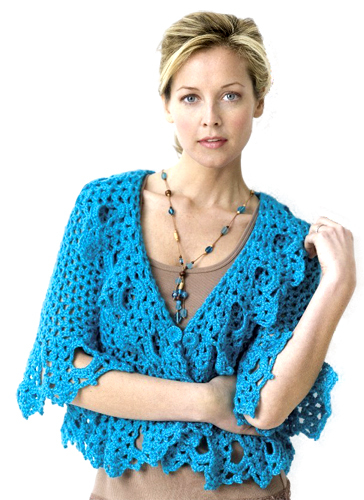
Coldwater Creek Style Cardigan
Create an elegant cardigan for work or play with this intermediate crochet pattern. This crochet cardigan pattern features a V-stitch design, open lace trim, and bone rings to close it. This cardigan instantly makes a simple outfit look more elegant, which makes it perfect for wearing to the office. It would be a great crochet accessory to bring to a friend's outdoor wedding for when the evening gets chilly. Your pals will be asking you where you got this chic sweater - and where they can get their own!

MATERIALS: Small (Medium, Large, X-Large, 2X-Large)
- Caron International's Simply Soft Brites (100% acrylic; 6 oz/170 g, 330 yds/302 m): 3 (3, 4, 4, 5) skeins in #9608 Blue Mint
- Crochet Hook, size US I-9 (5.5 mm), or size to obtain gauge
- Crochet Hook, size US G-6 (4 mm) for buttons only
- Split ring markers or scraps of contrasting yarn for markers
- 2 plastic bone rings, 3/4”/2 cm in diameter for buttons
- Yarn needle
FINISHED MEASUREMENTS: Small (Medium, Large, X-Large, 2X-Large)
Chest/Bust 36 (40, 44, 48, 52)”/91.5 (101.5, 112, 122, 132) cm
GAUGE:
Using I-9 (5.5 mm) hook, 12 Base ch/sc = 4”/10 cm
In V-stitch pattern, 4 V's and 6 rows of V's = 4”/10 cm as crocheted.
Note: Fabric will grow slightly in length and skinny out for finished measurements.
SPECIAL TECHNIQUES:
Base Chain/Single Crochet (Base ch/sc)
Note: This technique creates a foundation chain and a row of sc at the same time.
First Stitch: Begin with a slip knot; ch 2, insert hook into second ch from hook, *yo and pull up a loop, yo and draw through one loop (this is the chain), yo and draw through 2 loops (this is the sc).
Next Stitch: Note: The next st is worked under the forward 2 loops of the stem of the previous st (the chain) made when working the st. Insert hook into the bottom of the previous st, under 2 loops, repeat from * of first st.
Repeat this step for number of sts indicated in instructions.
To Add Stitches with Base ch/sc: At end of a row, do not turn; ch 1, insert hook under 2 strands of stem of st just made, yo and draw up a lp, yo and draw through one lp on hook, yo and draw through 2 lps on hook; make additional base ch/sc as needed.
V-stitch (V) - (Dc, ch 2, dc) in same st or sp
V-stitch in V-stitch (V in V) - V in ch-2 space of next V
shell - (2 dc, ch 2, 2 dc) in same st or space
ABBREVIATIONS:
t-ch turning ch
STITCHES USED:
ch Chain st
dc Double crochet
sc Single crochet
sl st Slip stitch
V V-stitch

INSTRUCTIONS:
Sweater is made from the neck down, with increases at four corners to create raglan-type shaping at the arm.
Base ch/sc 33 (33, 33, 33, 37) to measure approx 11 (11, 11, 11, 12)” stretched.
Row 1: Ch 5 (counts as dc, ch 2), dc in 1st sc, [skip next sc, V in next sc] 7 (7, 7, 7, 8) times, skip next sc, Sizes S and M make V in next sc; Sizes L, XL and 2XL make (V, ch 2, V) in next sc for center back increase, [skip next sc, V in next sc] 8 (8, 8, 8, 9) times, turn – 17 (17, 19, 19, 21) ch-2 spaces.
Row 2 (inc): Ch 5, (dc, ch 2, V) in 1st ch-space for corner, V in each of next 3 V's, (V, ch 2, V) in next V for corner, V in each of next 7 (7, 9, 9, 11) ch-2 spaces, (V, ch 2, V) in next V for corner, V in each of next 3 V’s, (V, ch 2, V) in t-ch space for corner, turn – 25 (25, 27, 27, 29) ch-2 spaces.
Mark the ch-2 space at center of each corner, move or wrap markers up as you go.
Separate instructions for sizes follow.
SIZE S:
S Row 3: Ch 5, dc in 1st ch-sp, V in each V and corner ch-2 space across, end with dc in t-ch space, ch 2, dc in 3rd ch of t-ch, turn – 25 V's.
S Row 4 (inc): Ch 5, dc in 1st ch-space, *V in each V to next corner V, (V, ch 2, V) in corner V; rep from * 3 times, V in each V across, end with dc in t-ch space, ch 2, dc in 3rd ch of t-ch, turn – 33 ch-2 spaces.
S Row 5: Ch 5, V in 1st ch-space, V in each V and corner ch-2 space across, end with V in t-ch space, ch 2, dc in 3rd ch of t-ch, turn – 35 ch-2 spaces.
S Row 6 (inc): Rep S Row 4 – 43 ch-2 spaces.
S Row 7: Rep S Row 3.
S Row 8: Ch 5, V in 1st ch-space, V in each V across, end with V in t-ch space, ch 2, dc in 3rd ch of t-ch, turn – 45 ch-2 spaces.
S Row 9 (inc): Rep S Row 4 – 53 ch-spaces.
S Row 10: Rep S Row 3 – 53 V's.
SIZE M:
M Row 3 (inc): Ch 5, dc in 1st ch-space, *(V, ch 2, V) in next corner ch-2 space, V in each V to next corner; rep from * 2 times, (V, ch 2, V) in last corner ch-2 space, end with dc in t-ch space, ch 2, dc in 3rd ch of t-ch, turn – 33 ch-2 spaces.
M Row 4: Same as S Row 3 – 33 V's.
M Row 5 (inc): Ch 5, V in 1st ch-space, *V in next V to next corner V, (V, ch 2, V) in corner V; rep from * 3 times, V in next V to end, end with V in t-ch space, ch 2, dc in 3rd ch of t-ch, turn – 43 ch-2 spaces.
M Row 6: Same as S Row 3 – 43 V's.
M Row 7: Ch 5, dc in 1st ch-space, V in each V across, end with dc in t-ch space, ch 2, dc in 3rd ch of t-ch, turn.
M Row 8 (inc): Rep M Row 5 – 53 ch-spaces.
M Row 9: Same as S Row 3 – 53 V's.
M Row 10 (inc): Same as S Row 4 – 61 ch-spaces.
M Row 11: Same as S Row 3 – 61 V's.
SIZES L, XL, and 2 XL:
L/XL/2XL Row 3-9: Same as M Rows 3-9, with 2 (2, 4) additional V's in each row – 55 (55, 57) V's.
L/XL/2XL Row 10: Ch 5, dc in 1st ch-space, V in each V across, end with dc in t-ch space, ch 2, dc in 3rd ch of t-ch, turn.
L/XL/2XL Row 11: Same as M Row 5 – 65 (65, 67) ch-spaces.
L/XL/2XL Row 12: Same as S Row 3 – 65 (65, 67) V's.
SIZE 2XL ONLY:
2XL Row 13: Ch 5, V in 1st ch-space, V in each V across, end with V in t-ch space, ch 2, dc in 3rd ch of t-ch, turn – 69 V's.
ALL SIZES:
53 (61, 65, 65, 69) V's. Join fronts and back with additional sts at underarms, complete neck shaping as follows:
Joining Row: Ch 5, V in 1st ch-space, V in next 5 (6, 7, 7, 8) V's to next corner V, *V in
corner V, Base ch/sc 5 (5, 5, 11, 11) for underarm, skip 11 (13, 13, 13, 13) V's of armhole, V in next corner V*, V in next 15 (17, 19, 19, 21) V's to next corner V, rep from * to * for other underarm, V in next 5 (6, 7, 7, 8) V's, V in t-ch space, ch 2, dc in 3rd ch of t-ch, turn.
BODY:
Fill in V stitch patt across underarm sts as follows:
Row 1: Ch 3, dc in 1st ch-space, V in next 7 (8, 9, 9, 10) V's to underarm, *[skip next 2 sc, V in next sc] 1 (1, 1, 3, 3) times, skip rem 2 sc of underarm*, V in next 17 (19, 21, 21, 23) V's to underarm, rep from * to *, V in each of next 7 (8, 9, 9, 10) V's, end with dc in t-ch space, dc in 3rd ch of t-ch, turn – 35 (39, 43, 47, 51) V's plus edge sts.
Row 2: Ch 3, dc in 1st dc, V in each V across, 2 dc in top of t-ch, turn.
Rep Row 2 for 3 (3, 4, 4, 4) more times, or to desired length before bolero front shaping.
Note: If you add rows here, do it in multiples of three rows, to maintain correct multiples for lace trim.
Shape bolero fronts as follows;
Cut-away Row 1: Ch 4, V in each of next 35 (39, 43, 47, 51) V's, tr in top of t-ch, turn.
Cut-away Row 2: Sl st in next dc and ch-space of V, ch 4, V in each of next 33 (37, 41, 45, 49) V's, tr in last V, turn.
Cut-away Row 3: Sl st in next dc and ch-space of V, ch 4, V in next 31 (35, 39, 43, 47) V's, tr in last V, do not turn.
EDGING:
Rotate and work sc around front and neck edges as follows:
Rnd 1: Ch 1, 4 sc in each of next 2 tr row edges, 4 (5, 4, 4, 3) sc in next tr row edge, 2 sc in each of next 16 (17, 19, 19, 20) dc row edges, sc in each of next 33 (33, 33, 33, 37) base ch of neck, 2 sc in each of next 16 (17, 19, 19, 20) dc row edges, 4 (5, 4, 4, 3) sc in next tr row edge, 4 sc in each of next 2 tr row edges, sl st in beg dc of bottom – 121 (127, 133, 133, 139) sc (a multiple of 6, plus 1.) Fasten off.
LACE TRIM:
Work trim around entire outer edge of jacket in joined rounds, turning at the end of each rnd. Turn, join yarn with sl st in ch-space of V at lower edge, center of back. Make a rnd of V's, having a multiple of 2 V's around as follows:
Rnd 1: Ch 3, V in each of next 15 (17, 19, 21, 23) V's, V in 1st sc, [skip next 2 sc, V in next sc] 40 (42, 44, 46) times, V in each of next 15 (17, 19, 21, 23) V's, dc in same space as beg, ch 1, sc in top of beg ch, turn – 72 (78, 84, 88, 94) V's.
Rnd 2: Ch 3, dc in same space, *ch 2, sc in ch-space of next V, ch 2, shell in ch-space of next V; rep from * 35 (38, 41, 43, 46) times, except omit last shell, instead end with 2 dc in same space as beg, ch 1, sc in top of beg ch, turn – 36 (39, 42, 44, 47) reps.
Rnd 3: Ch 3, dc in same space, *ch 3, sc in next ch-2 space, sc in next sc, sc in next ch-2 space, ch 3, shell in ch-space of next shell; rep from * around except omit last shell, instead end with 2 dc in same space as beg, ch 1, sc in top of beg ch, turn.
Rnd 4: Ch 3, dc in same space, *ch 3, sc in next ch-3 space, sc in next 3 sc, sc in next ch-3 space, ch 3, shell in ch-space of next shell; rep from * around except omit last shell, instead end with 2 dc in same space as beg, ch 1, sc in top of beg ch, turn.
Rnd 5: Ch 3, dc in same space, *ch 1, dc in next ch-3 space, ch 5, dc in next ch-3 space, ch 1, shell in ch-space of next shell; rep from * around except omit last shell, instead end with 2 dc in same space as beg, ch 1, sc in top of beg ch, turn.
Rnd 6: Ch 3, dc in same space, *ch 3, sc in next ch-1 space, 7 hdc in next ch-5 space, sc in next ch-1 space, ch 3, shell in ch-space of next shell; rep from * around except omit last shell, instead end with 2 dc in same space as beg, ch 1, sc in top of beg ch, turn.
Rnd 7: Ch 2, dc2tog in same space for beg cluster, ch 3, sl st in top of cluster for picot, *ch 4, sc in next ch-3 space, ch 4, skip next 3 hdc, sc in next hdc, ch 3, sl st in top of sc for picot, ch 4, sc in next ch-3 space, ch 4, dc3tog in ch-space of next shell for cluster, ch 3, sl st in top of cluster for picot; rep from * around except omit last cluster and picot, instead sl st in top of beg cluster. Fasten off.
SLEEVES:
At underarm, working in opposite direction as sts of armhole, join with sl st in 3rd (3rd, 3rd, 6th, 6th) base ch at center of underarm ch.
SIZES S, M, and L Rnd 1: Ch 3, skip next 2 ch of underarm, V in next dc row edge, V in next 11 (13, 13) V's of armhole, V in next dc row edge before underarm ch, skip next 2 ch, dc in same ch as beg, ch 1, sc in top of beg ch, turn – 14 (16, 16) V's.
SIZES XL and 2XL Rnd 1: Ch 3, skip next 2 ch of underarm, V in next ch, skip next 2 ch, V in next dc row edge, V in next 13 V's of armhole, V in next dc row edge before underarm ch, skip next 2 ch, V in next ch, skip next 2 ch, dc in same ch as beg, ch 1, sc in top of beg ch, turn – 18 V’s.
ALL SIZES Rnd 2: Ch 3, V in next 13 (15, 15, 17, 17) V's, dc in same space as beg, ch 1, sc in top of beg ch, turn – 14 (16, 16, 18, 18) V's.
Taper sleeve as follows:
Rnd 3 (dec): Ch 3, dc in next V, V in next 12 (14, 14, 16, 16) V's, dc in same space as beg, ch 1, sc in top of beg ch, turn.
Rnd 4: Ch 3, V in next 12 (14, 14, 16, 16) V's, skip next 2 dc, dc in same space as beg, ch 1, sc in top of beg ch, turn – 13 (15, 15, 17, 17) V's.
Rnd 5: Ch 3, V in each V, end with dc in same space as beg, ch 1, sc in top of beg ch, turn.
Rnd 6 (dec): Ch 3, dc in next V, V in next 11 (13, 13, 15, 15) V's, dc in same space as beg, ch 1, sc in top of beg ch, turn.
Rnd 7: Ch 3, V in next 11 (13, 13, 15, 15) V's, skip next 2 dc, dc in same space as beg, ch 1, sc in top of beg ch, turn – 12 (14, 14, 16, 16) V's.
Rnd 8: Rep Rnd 5 once more, or to desired sleeve length before lace trim.
Rnd 9-14: Same way as body trim Rnds 2-7 on 6 (7, 7, 8, 8) reps. Fasten off.
Make other sleeve same way. Weave ends, lightly steam block lace trim.
FINISHING:
Make a double-button link for front closure. Note: To crochet over a bone ring, make sc by inserting hook in next sc and into center of ring each time.
BUTTON: (1”/2.5 cm in diameter, make 2)
Rnd 1 (RS): Using smaller hook, working firmly, leaving several inches tail, ch 2, 6 sc in 2nd ch from hook, sl st in beg sc, bringing tail to RS of work – 6 sc.
Rnd 2 (RS): Hold a bone ring in back of work, ch 1, 3 sc in each sc, working over bone ring each time, sl st in beg sc. Fasten off, leaving several inches tail – 18 sc.
RS of work is back of button. Thread ending tail on yarn needle, stitch into center of button, knot two tails together tightly.
To connect 2 buttons for double-button link: Using one tail from one button, ch 4, using one tail from second button, sl st back in each ch, knot together 2 tails at back of each button. Fasten off. Weave ends into WS center of each button.
There is no obvious RS or WS of jacket; it’s your choice which side you want to be the “public” side. Fold the collar back, using the rnd of sc as a guide, locate corresponding dc edge row spaces in left and right fronts as buttonholes, position closure as desired.

See this pattern and more in 23 Free Flower Crochet Patterns and Other Girly Crochet Projects.
Read NextCupcake Tee Crochet Shirt
Your Recently Viewed Projects
Thanks for your comment. Don't forget to share!
huittka 8954546
Oct 21, 2018
I have attempted this two different times. This is a very beautiful jacket. I have a hard time following. I am not sure what tr means. Are there videos? Pictures? I would love to add this to my collection.
Editor Dana
Oct 22, 2018
Hi there! Unfortunately I wasn't able to find any additional photos or videos for this pattern. tr means treble crochet, and there are videos for how to do that stitch on YouTube! I hope that helps, and I apologize that there aren't additional resources available for this project.
Delphine Bryant
Aug 07, 2018
This is a lovely lacy jacket. From the attention to details on the sleeves to the ruffle collar. I am happy to see that this project can be made for sizes up to 2x. Sometimes we larger size girls get left out of the fashion. I love this one. I am going on line now to make the purchase for the pattern. Thanks for the free pattern.
Morehouse17
Jul 21, 2018
Sometimes I pass up on a pattern because of the color and sometimes I want to make a project because of the color. This is a beautiful lacy jacket. The color is perfect and the design is stunning. Now, if my design will just work out so that I can have this lacy jacket for myself. With only written directions I know this will be a challenge but I am up for it.
kansasgal000 37361 28
Apr 27, 2016
This is an easy pattern. Cut and paste your size directions to a document. All you have to do with this project is lay it out flat on a table as you go along. Remember this is from the top down. Count your V's etc.
klsnyder90 3417253
May 04, 2015
I would love to make this cardigan. I have tried to crochet Doris Chan's patterns in the past and I cannot follow her directions. Her creations are just beautiful, but the instructions lose me. I stopped and started one cardigan 7 times before it came out right and it still was not like it should have been. Unless you are good at "winging it", I wouldn't try. Some people instinctively know what to do when they don't "get" a pattern.
makingknotswithsti cks 3028970
Jun 04, 2015
Hi klsnydner90 I too tried Doris Chan's patterns from her book and I got completely lost - there was too much "referring back to previous instructions," etc. But just to let you know, I have started working on this Coldwater Creek Style Cardigan and it's going pretty well. I was so leery of the pattern because of my previous experience with Chan's designs that I chose to work in some really unappealing acrylic I had in my stash. I'm not finished yet, but I'm starting to think I should have started with better yarn - the pattern is working pretty well.
gracefullikeagazel le
Feb 06, 2014
Wow the comments are worrisome. I wanted to make this as a "chin up!" gift for my mom who is fighting her third cancer in 17 years. I need some advice: Is this project worth the time and expense? Is the pattern as "non-friendly" as the comments would suggest? What are the main trouble spots and did anyone successfully complete the cardigan? Thank you (=
Rdcarr
Oct 06, 2013
Is there a detail information someplace for the lightweight zen jacket? I don't understand row 11 and have pulled the stitches out and restarted this project three times because my mother wants it badly, but I'm not sure how to skip 6 shells pick back skip and repeat asterisk to asterisk because the armholes will be off and each side will be out of sync. Is there a picture, or graph or video or something Thank you
sweetgrammy23 0910 310
Sep 21, 2013
I have been trying this pattern. I seem to have mor v's than written. I also am very unsure about the joining at armhole
caroltheteach 2671 787
Apr 22, 2013
I thought the way the directions were done was very confusing. I had to go back to med. size to do 2XL and ended up having to redo my first 6 rows because of the confusion as to what to do at the beginning of each row. When it said to add 4 V's for 2 XL, that's what I did only to find I had too many. After 2 weeks of frustration, I've finally figured out what you are talking about. Not very crochet friendly patter, but quite lovely.
MarisPurple
Apr 12, 2013
Having trouble right off the bat with the count. Is the base ch/sc for size large incorrect at 33? If I v in every other stitch plus add one for middle increase, it leaves a total of 17 v's - not 19.
emmabarton
Apr 08, 2013
Thank you for making a pattern for larger women! Most I like end at a size Large!
pnkmoyer
Jan 20, 2013
Doris Chan always uses foundation sc for her projects. See her blog site at dorischancrochet.com for directions. aor find how to Fsc with help from youtube.com I typed in Fsc for some videos
mcrae2662 8105757
Jun 11, 2011
I cannot figure out how to make the base chain/single crochet stitch. Do you have an illustration? Both stitches are not destinctive enough to recognize where one ends and the other begins. Thanks
highpockets42 1059 459
Jan 08, 2012
If you go to youtube.com and type in base chain/single crochet you will get a video that shows you exactly how to do it.
Report Inappropriate Comment
Are you sure you would like to report this comment? It will be flagged for our moderators to take action.
Thank you for taking the time to improve the content on our site.