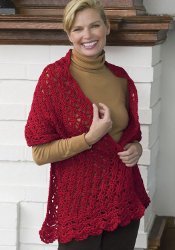
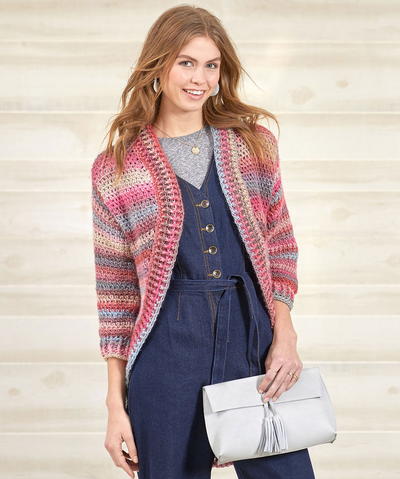
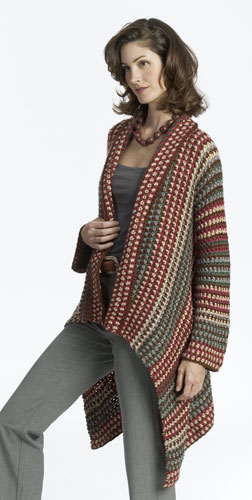
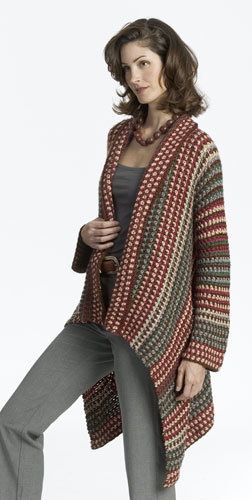
Asymmetry Jacket
This intermediate crochet pattern from Caron Yarns creates a long jacket with a fashionable asymmetrical hem. This jacket crochet pattern also features a great pattern of colorful stripes, making it a very flattering piece for all body types. This sweater is great to have with you on cool fall nights, or something quick and fashionable to throw on for a run out to the grocery store or farmer's market. You're sure to get lots of great compliments on this fashionable wardrobe staple.
Materials:
- 2 (2, 2, 3, 3, 3) balls Caron Simply Soft Yarn in Chocolate (A)
- 1 (1, 2,2, 2, 2) balls of Caron Simply Soft Yarn in Raspberry (B)
- 1 (1, 2,2, 2, 2) balls of Caron Simply Soft Yarn in Bone (C)
- 1 (1, 2,2, 2, 2) balls of Caron Simply Soft Yarn in Dark Sage (D)
- 1 (1, 2,2, 2, 2) balls of Caron Simply Soft Yarn in Grey Heather (E)
- US J-10 (6 mm) crochet hook or size to obtain gauge
- Split ring stitch markers or scraps of yarn
- Yarn needle
Gauge: In foundation single crochet, using US J-10 (6 mm) hook, 12 sts = 4"/10 cm. In mesh pattern, using US J-10 (6 mm) hook, 13 sts and 14 rows = 4"/10 cm.
Finished Measurements:
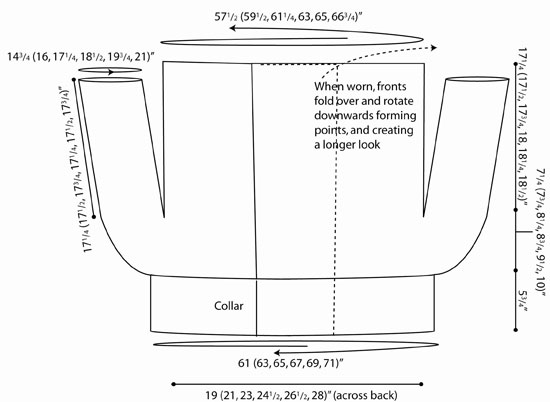
When worn, the fronts rotate around and down forming long points. There is a lot of stretch and overlap in the fronts.
- Back Width: (measured at underarm) 19 (21, 23, 24 1/2, 26 1/2, 28)
- Bust: (estimate = 2 times back width) 38 (42, 46, 49, 53, 56)"
- Length: 30 (31, 32, 33, 34, 34 1/2)"
Special Terms:
- Fsc: Foundation single crochet (This technique creates a foundation chain and a row of single crochet stitches in one)
- Step 1: Place a slip knot on hook, ch 2, insert hook in 2nd ch from hook and draw up a loop; yarn over and draw through one loop on hook (the "chain"); yarn over and draw through 2 loops on hook (the "single crochet").
- Step 2: The following stitch is worked under the forward 2 loops of the stem of the previous stitch (into the "chain"). Insert hook into the face of the "chain" and under the nub at the back of the "chain", draw up a loop, yarn over and draw through one loop on hook (the "chain"), yarn over and draw through 2 loops on hook (the "single crochet"). Repeat for the length of foundation.
- sc2tog: Single crochet 2 together – Insert hook in next stitch, yarn over and pull up a loop, (two loops on hook), insert hook in next stitch, yarn over and pull up a loop, yarn over and draw through all three loops on hook.
Notes:
- Gauge is measured with garment slightly stretched; it is a "hung" gauge that results with the weight of the completed garment.
- To change color at the end of a row: Work last sc of row to last yarn over, yarn over with new color and draw through all loops on hook to complete stitch. Pick up new color from underneath old color as you ch 1 to begin next row, wrapping the carried strand for neatness. You will be working with only three colors at any time. Carry one unused strand up each side as you work, cutting and joining colors according to separate sequences.
- To change color at the end of a right side round: Work last ch 1 in old color, drop old color to wrong side of work, insert hook in first sc, yarn over with new color and draw through all loops on hook to complete joining slip st, turn. To change color at the end of a wrong side round: Work last ch 1 in old color, turn, drop old color to wrong side of work, reach back and insert hook in first sc, yarn over with new color and draw through all loops on hook to complete joining slip st. Pick up new color from underneath carried strands as you ch 1 to begin next round, wrapping for neatness. Remember to keep all carried strands on the wrong side of the piece (inside sleeve).
Instructions:
Small (Medium, Large, X-Large, XX-Large, XXX-Large)
Color Sequence
- This is a long sequence, but it is made up of three-row color repeats. A is the main color, used every third row. The other colors are used either three or five times, and then swapped out.
- Work 1 row of each color as indicated: [A, B, C] 3 times, [A, B, D] 2 times, [A, E, D] 3 times, [A, C, B] 3 times, [A, C, E] 2 times, [A, D, E] 3 times
Work begins with a long scarf that becomes the shawl collar. The shoulders are then "grown" by increasing at two corners centered at the back while continuing to work the long fronts. The body is then formed by joining the piece at the underarms and leaving armholes open for sleeves. The body is worked even to desired length.
Collar
The foundation will be slightly more relaxed than remainder of the collar, so the edge can expand as it rolls over for a shawl collar.
- With A, Fsc 183 (189, 195, 201, 207, 213) to measure approx 61 (63, 65, 67, 69, 71)"/155 (160, 165, 170, 175.5, 180.5)cm, change to B.
- Row 1: With B, ch 1, sc in first sc, [ch 1, skip next Fsc, sc in next Fsc] across, turn; change to C—92 (95, 98, 101, 104, 107) sc.
- Rows 2–20: With new color, [ch 1, sc in next ch-1 space] across, end with ch 1, sc in last sc, turn; change to next color in Color Sequence.
Shoulders
Shoulders are now "grown" by making two corner increases equally spaced from center of back neck. Mark the ch-1 space at center of each corner, move markers up as work progresses.
- Row 21: With new color, [ch 1, sc in next ch-1 space] 42 (43, 44, 45, 46, 47) times, ch 1, (sc, ch 1, sc) in next ch-1 space (corner made), place marker in last ch-1 made, [ch 1, sc in next ch-1 space] 5 (6, 7, 8, 9, 10) times, ch 1, (sc, ch 1, sc) in next ch-1 space (corner made), place marker in last ch-1 made, [ch 1, sc in next ch-1 space] 42 (43, 44, 45, 46, 47) times, end with ch 1, sc in last sc, turn; change to next color in Color Sequence—94 (97, 100, 103, 106, 109) sc.
- Rows 22–44 (46, 48, 50, 52, 54) (pattern increase): With new color, *[ch 1, sc in next ch-1 space] to next marked corner ch-1 space, ch 1, (sc, ch 1, sc) in corner ch-1 space; rep from * once more; [ch 1, sc in next ch-1 space] across, end with ch 1, sc in last sc, turn; change to next color in Color Sequence—140 (147, 154, 161, 168, 175) sc. Remove markers.
- Row 45 (47, 49, 51, 53, 55): With new color, [ch 1, sc in next ch-1 space] across, end with ch 1, sc in last sc, turn; change to next color in Color Sequence.
Joining
The back section (between corners) will now be joined to each front section, skipping armhole stitches.
- Row 46 (48, 50, 52, 54, 56) (joining row): With new color, [ch 1, sc in next ch-1 space] 32 times, skip next 23 (25, 27, 29, 31, 33) ch-1 spaces (for armhole), ch 1, place marker in last ch-1 space made (for underarm), [sc in next ch-1 space, ch 1] 30 (33, 36, 39, 42, 45) times, place marker in last ch-1 space made (for underarm), skip next 23 (25, 27, 29, 31, 33) ch-1 spaces (for armhole), [ch 1, sc in next ch-1 space] 31 times, end with ch 1, sc in last sc; change to next color in Color Sequence, turn—94 (97, 100, 103, 106, 109) sc.
Body
- Row 47 (49, 51, 53, 55, 57): With new color, [ch 1, sc in next ch-1 space] to marked ch-1 space, ch 1, sc in marked ch-1 space at underarm, [ch 1, sc in next ch-1 space] to next marked ch-1 space, ch 1, sc in marked ch-1 space at underarm, [ch 1, sc in next ch-1 space] across, end with ch 1, sc in last sc; change to next color in Color Sequence, turn.
- Rows 48 (50, 52, 54, 56, 58): With new color, [ch 1, sc in next ch-1 space] across, end with ch 1, sc in last sc; change to next color in Color Sequence, turn. Do not remove or move markers.
- Repeat last row 58 (59, 60, 61, 62, 63) more times or to desired length, changing colors per Color Sequence, end by working a row with A. Fasten off all colors.
Sleeves
Sleeves are worked in joined rounds, back and forth. So far, there is no obvious right side or wrong side. Make that decision now and as you work the sleeves you will carry unused strands of colors up the wrong side (inside of sleeve). To avoid big holes at the underarms, begin each sleeve with a sc2tog that bridges the gap.
- With same color used in joining row, and moving in the opposite direction of armhole stitches, join yarn with slip st in the sc row edge just before the marked ch-1 space at underarm, inserting hook under two strands of row edge.
- Round 1: Ch 1, sc2tog over same row edge and row edge on other side of marked ch-1 space, [ch 1, sc in next ch-1 space] 23 (25, 27, 29, 31, 33) times around armhole, end with ch 1; join with slip st in first sc; change to next color in Color Sequence, turn—24 (26, 28, 30, 32, 34) sc.
- Round 2: With new color, [ch 1, sc in next ch-1 space] around, end with ch 1; join with slip st in first sc, turn.
- Repeat last round 58 (59, 60, 58, 59, 60) more times or to desired length, changing colors per Color Sequence, end by working a row with A. Fasten off all colors.
Finishing
- Using yarn needle, weave in ends.
Read NextSimply Savvy Crochet Ruana Pattern
Your Recently Viewed Projects
Thanks for your comment. Don't forget to share!
princess6860504
Jul 27, 2017
These types of sweaters are still so trendy and in fashion right now. This is a piece of apparel that anyone can wear. In fact, if you want to make this much, much easier and less time consuming for you, just stick to one color yarn. You should have a waterfall cardi in black and one in a heather gray for a fashion must. I'm not keen on the striping. I think it's a bit much. But I will congratulate the designer for a job well done writing the pattern in great detail and explaining how it all comes together as you go along. Sometimes we need to have it explained to us so that we can envision how it will all come together!
flowergirl
May 30, 2017
This jacket has that waterfall touch that I love. It's great to throw on any outfit and it keeps you warm and cozy.
barbary69 8911644
Jan 19, 2017
This is absolutely lovely However it would cost 239 to make it with senior discount even here in Canada. I cannot rate it over a 1 based on that alone.
Kim Guzman
Jan 19, 2017
The materials information was copied incorrectly. It should be ounces, not balls of yarn. So, when it says 6 balls of yarn, it's really only one ball of yarn.
Editor Dana
Jan 20, 2017
Thank you both so much for your helpful comments! I've updated the pattern with the correct number of skeins of yarn. Have a great day! -Dana from FaveCrafts
areecie4u 5953057
Feb 10, 2016
It's a beautiful jacket and is working up great. But I can't seem to figure out how to join the front to the back to make the arms eye. I think I need a visual - the diagram doesn't look like what I crocheted so far. Help!
Kaylee
Feb 11, 2016
Hi areecie4u 5953057! For specific pattern questions, we recommend contacting the design, in this case Caron, with any specific patterns. They should be able to help you. You can also ask our active Facebook group to see if they've created this pattern before. Hope that helps! - Kaylee, Editor of FaveCrafts.com
AFC Editor Annalis a
Jan 29, 2016
I really like sweaters like this because they are an instant outfit. Since they are such stand-out pieces, you never have to wonder if you have put together a stylish outfit. This one is gorgeous!
cab1087 7165261
Jul 22, 2014
for row 2 it is sc ch1 all the way across it says to count the sc not the chains. All rows at least in the collar are the same length
Lisa
Mar 01, 2014
Is there something wrong here? It seems kind of insane to need 66 balls of yarn to make an extra large, that's over 20,000 yards and even with simply soft being so reasonably priced, this would still be very expensive to make for a single project.
Lisa
Mar 01, 2014
This was bothering me, so I looked it up. Its not balls as stated here, its ounces, so not 66 balls, 11 balls-66 ounces and they are 6 oz. balls. Big difference! I wondered because I used other Caron patterns and they were in ounces.
blueraven60
Oct 15, 2015
I went right to Caron's site. It is 11 balls. I hate errors like this. http//www.yarnspirations.com/asymmetrical-jacket.h == tml
FaveCrafts Editor JL
Oct 16, 2015
The amount of yarn depends on the desired size of the jacket. For a small or medium-sized jacket, you will need 6 balls of yarn total. For a large jacket you will need 10 balls and for an extra large (or larger) jacket, you will need 11 balls of yarn. - Julia from FaveCrafts
barbary69 8911644
Jan 19, 2017
makes sense now. it would have cost far too much. now down to around 38 bucks in Canada. was 239 before fixing
zookid35 5335571
Aug 29, 2013
I like this jacket but would do it in one color but really find the yardage amounts odd.
cmoorecole
Aug 20, 2013
doesn't anyone else wonder why sizes small and med. require 2 and a quarter lbs of yarn and suddenly the large and larger and largest all require more than 4 pounds? How could a large suddenly require nearly twice as much yarn as a Med.??? This sounds very fishy and if I make this sweater, I intend to buy the yard a few skeins at a time and see how it goes. If this thing turned out anywhere close to 4lb when worked up, I'd probably never wear it - too heavy and too warm....
kmoore1234 2767596
May 24, 2013
is there a site i can go to , to see how the foundaion row is done?
nanceann
May 23, 2013
This is in an email I received as What to do with your scrap yarn. I don't believe this is done with scrap yarn.
imaiowagal
Dec 02, 2012
I've just started this pattern this evening, when reading it I guess Im not understanding it: # 2 Row 1 I understand the first part ch1, skip next Fsc, sc in next Fsc across; but then it saya change to c and do (#) sc. I doesn't say this is row 2or ch 1 and also, its only about 1/2 of the length. won't this make it crooked... NOT UNDERSTANDING, what is further confusing # 3 is Row 2. Please anyone wih any suggestions, I love this pattern and want to make it for Christmas!
sehrishs 3800038
Nov 11, 2013
I am making it too and I have the exact same problem egarding row 2 and three and yes while changing to C we do not know wether to work along the previous chain or to work in the chain-one direction without turning???? I am on this part and working on row 10 and it is half of the length.I too have problem wth this one. If you have found the solution yet please respond back.
Porky duck
May 24, 2011
This would be great for my for my "first day of school" outfit. I would be perfect for the weather and style here.
sehrishs 3800038
Nov 11, 2013
have you made it? or left because og the ambiguity in the instructions?
CassandFay
Apr 16, 2010
What an unusual design! I think I would be tempted to tie the front together. It reminds me of a back-to-front Snuggie. Reverse it and it could be worn to sit on the couch and read, knit or crochet. More useful than one would think at first glance and I like the bright colours.
JTanner
Apr 01, 2010
This Jacket pattern is beautiful, I have yet to make it, but I am sure that it will be beautiful.
Report Inappropriate Comment
Are you sure you would like to report this comment? It will be flagged for our moderators to take action.
Thank you for taking the time to improve the content on our site.