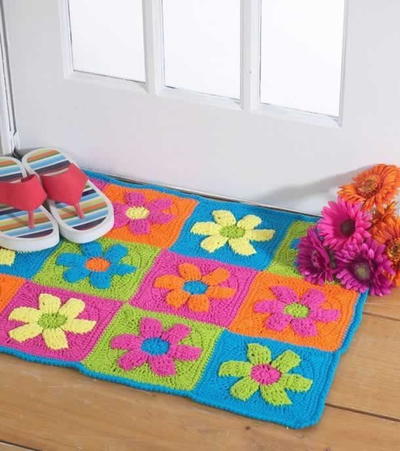
Bright Flower Rug
Crochet a funky flower rug with this free pattern from Bernat Yarns. This easy to make rug will add a burst of bright color and a fun, youthful touch to any room in your house.
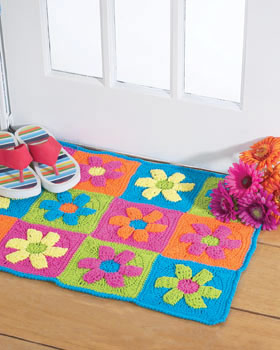
Measurement: Approx 23 x 31" [58.5 x 78 cm]
Materials:
- Bernat Handicrafter Cotton (Solids: 50 g/1.75 oz) or yarn of your choice.
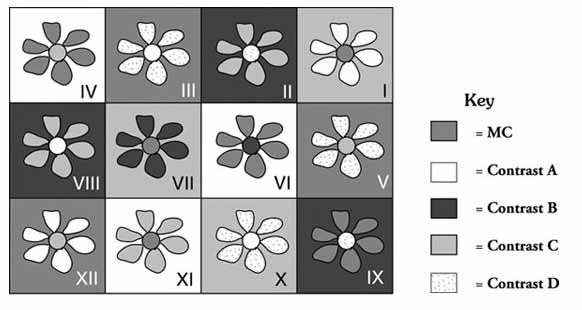
Main color (MC) (13742 Hot Blue) 3 balls.
Contrast A (13712 Hot Green) 3 balls.
Contrast B (13628 Hot Orange) 3 balls.
Contrast C (13740 Hot Pink) 3 balls.
Contrast D (56 Yellow) 2 balls. - 5 mm (U.S. H/8) crochet hook or size needed to obtain gauge.
Gauge: 14 sc and 16 rows = 4" [10 cm].
Pattern:
Motif
With color 1, ch 2.
1st rnd: 6 sc in 2nd ch from hook. Join with sl st to first sc.
2nd rnd: Ch 3 (counts as dc). 2 dc in same sp as last sl st. 3 dc in each sc around. Join with sl st to top of ch 3. 18 dc. Fasten off.
3rd rnd: Join color 2 with sl st to front loop only of any dc. **Ch 3 (counts as dc). 1 dc in same sp as last sl st. 1 dc in front loop only of next dc. 2 dc in front loop only of next dc. 5 dc for petal. Turn.
Next row: Ch 3 (counts as dc). 1 dc in each dc of petal. Turn.
Next row: Ch 3 (counts as dc). (Yoh and draw up a loop in next st. Yoh and draw through 2 loops on hook) 3 times. Yoh and draw through all loops on hook – dc3tog made. 1 dc in last dc. Fasten off, leaving a long end.**
***Rejoin color 2 with sl st to front loop of next unworked sc of 2nd rnd. Rep from ** to ** once.***
Rep from *** to *** 4 times more. 6 petals.
4th rnd: Join color 3 with sl st to rem back loop of any dc of 2nd rnd. Ch 3. 1 dc in same sp. 2 dc in each rem back loop around. Join with sl st to top of ch 3. 36 dc.
5th rnd: Ch 3. 1 dc in same sp as last sl st. *1 dc in next dc. 2 dc in next dc. Rep from * to last dc. 1 dc in last dc. Join with sl st to top of ch 3. 54 dc.
6th rnd: Ch 3. 1 dc in next dc. *2 dc in next dc. 1 dc in each of next 3 dc. 2 dc in next dc. 1 dc in each of next 2 dc. Rep from * to last 3 dc. 1 dc in each of last 3 dc. Join with sl st to top of ch 3. 68 dc.
7th rnd: Ch 1. 1 sc in same sp as last sl st. 1 sc in each of next 5 dc. *1 hdc in each of next 3 dc. 1 dc in each of next 2 dc. 5 tr in next dc for corner. 1 dc in each of next 2 dc. 1 hdc in each of next 3 dc.** 1 sc in each of next 6 dc. Rep from * twice more, then from * to ** once. Join with sl st to first sc.
8th rnd: Ch 1. 1 sc in each st around, working 3 sc in corners. Join with sl st to first sc. Fasten off.
Using yarn ends from each petal, sew around outer edges of petals.
Motif I
Work as for Motif using MC for color 1, A for color 2 and C for color 3.
Motif II
Work as for Motif using D for color 1, C for color 2 and B for color 3.
Motif III
Work as for Motif using A for color 1, D for color 2 and MC for color 3.
Motif IV
Work as for Motif using C for color 1, MC for color 2 and A for color 3.
Motif V
Work as for Motif using C for color 1, D for color 2 and MC for color 3.
Motif VI
Work as for Motif using B for color 1, MC for color 2 and A for color 3.
Motif VII
Work as for Motif using MC for color 1, B for color 2 and C for color 3.
Motif VIII
Work as for Motif using A for color 1, C for color 2 and B for color 3.
Motif IX
Work as for Motif using D for color 1, MC for color 2 and B for color 3.
Motif X
Work as for Motif using A for color 1, D for color 2 and C for color 3.
Motif XI
Work as for Motif using MC for color 1, C for color 2 and A for color 3.
Motif XII
Work as for Motif using C for color 1, A for color 2 and MC for color 3.
Sew Motifs tog as shown in diagram.
Edging: 1st rnd: Join MC with sl st in any corner of Rug. Ch 1. 3 sc in same sp. Work sc evenly around, working 3 sc in corners. Join with sl st to first sc.
2nd rnd: Ch 1. Working from left to right, instead of from right to left as usual, work 1 reverse sc in each sc around. Join with sl st to first sc. Fasten off.
Read NextHow to Make a Jute Rug
Your Recently Viewed Projects
Thanks for your comment. Don't forget to share!
jthurston338 30421 47
Aug 04, 2018
I was wondering if there is anyway someone to teach me how to crochet for free?
Editor Dana
Aug 06, 2018
Hi there! I've found the easiest way to learn for free is by watching YouTube videos! I love that you can pause and repeat sections of the video as many times as you like. If you search in YouTube "How to Crochet", an excellent video by Naztazia comes up. I hope that helps!
Member 4837589
Oct 21, 2014
I am about to make this rug (I will need to go DOWN a few sizes in my hook choice to make the rug fit where I want to put it).... but what is a size 7 crochet hook? There is NO U.S. equivalent to a size 7 (the size goes from a 6.5, which is a K to 8.0, which is is an L hook)....?
FaveCrafts Editor JL
Oct 22, 2014
Hi there - Thanks so much for point this out. You actually need a 5 mm (U.S. H/8) crochet hook. I have corrected the pattern to reflect this. Thanks again! - Julia from FaveCrafts
catherinekay
Feb 19, 2014
I am in the process of making this rug (bought the kit at yarnspirations.com) and for the life of me cannot get it to look like the picture. I would not rate this as easy, but intermediate and found the pattern confusing. My thought right now is to scrap the rug and use the yarn for something else!
gillivan 1799773
Oct 08, 2012
Hi, is there any possibility to make this type of flower rug at home, if yes please help me, i always wanted do make one of these rug http://www.rugsandblinds.com/rug/floral-rugs-dhajam-brown-and-yellow-10226
rayirma 0049957
Jul 24, 2011
I do not understand what Yoh is done. It ways Yoh & draw through 2 loops on hook 3 times, Yet there should be a loop left on hook, I can't understand how this is done.
thinkjesus1st
Sep 27, 2012
you asked what YOH is - yarn over hook you should have a loop left on your hook like normal right are you putting the hook into your chain first then yoh THESE ARE RIGHT FROM BERNAT COM - Crochet Abbreviations alt alternate ing pat pattern approx approximately rem remain ing beg beginning rep repeat ch chain reverse sc reverse single crochet cm centimeter s rnd s round s cont continue ity RS right side dc double crochet sc single crochet dcbp Yoh and draw up a loop around post of next st at back of work inserting hook from right to left Yoh and draw through loops on hook twice - dcbp made Sl st Slip stitch Dcfp Yoh and draw up a loop around post of next st at front of work inserting hook from right to left Yoh and draw through loops on hook twice - dcfp made…Read More sp s space s dec decrease ing st s stitch es dtr double treble tog together Dtrfp Yoh times and draw up a loop around post of next stitch at front of work rows below inserting hook from right to left Yoh and draw through loops on hook times tr treble crochet g gram s WS wrong side hdc half double crochet Yoh yarn over the hook inc increasing mm millimeter s oz ounce s
gagnonmandy 477744 6
Jun 21, 2011
I found a video that a handyman used 100% silicone adhesive...put thick beading around the perimeter edges and zig zagged through the middle and then used a spatula to smooth it out. He let it cure overnight and it left it just tacky enough that it didn't slip anymore.
Crafter 15364
Jun 21, 2011
Would, Two sided carpet tape be the answer? I sed the two sided tape and stabelized the Rug. May have repeat the technic,if the Rug has gone thrue the washing machine. Hope it work's for you to?
litsister03 241621 7
Feb 06, 2011
Hello, i made one for my bathroom too but i was wondering how to attach it to a non-slipping rug,, Do you sew it on or glue it, Please give me an idea, thank you.
Report Inappropriate Comment
Are you sure you would like to report this comment? It will be flagged for our moderators to take action.
Thank you for taking the time to improve the content on our site.