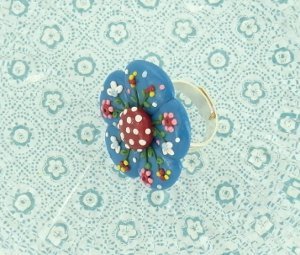
Wonderland Ring
Take a little trip down the rabbit hole with this Wonderland Ring. With cute flowers decorating this adorable ring, you'll be wishing you were in Wonderland in no time. Perfect for girls of all ages, this ring is surprisingly easy to make and even more fun to wear. Great for matching with a simple outfit or a summer dress, this clay jewelry project will have you in the mood for sunshine and warm weather in no time!

Materials:
- 1 block Sculpey® III: White - 2 oz
- 1 block Sculpey® III: Turquoise - 2 oz
- 1 block Sculpey® III: Sky Blue - 2 oz
- 1 block Sculpey® III: Dusty Rose - 2 oz
- 1 block Sculpey® III: Red - 2 oz
- 1 block Sculpey® III: Yellow - 2 oz
- 1 block Sculpey® III: String Bean - 2 oz
- 1 block Sculpey® III: Leaf Green - 2 oz
- Sculpey® Clay Tool Starter Set
- Sculpey® Etch ‘N Pearl
- Sculpey® Push Mold-Flowers & Leaves
- Sculpey® Glossy Glaze 1 oz
- Craft Knife
- Paint Brush
- Flat Ring Base
- Clear, fast setting glue
Getting Started:
- Do not use unbaked clay on unprotected furniture or finished surfaces. Start with clean hands and work surface area. Good work surfaces include wax paper, metal baking sheet, or disposable foil. Knead clay until soft and smooth. For best results, clean your hands in between colors. Shape clay, pressing pieces together firmly. Bake on oven-proof glass or metal surface at 275 °F (130 °C) for 15 minutes per 1/4" (6 mm) thickness. For best baking results, use an oven thermometer. DO NOT USE MICROWAVE OVEN. DO NOT EXCEED THE ABOVE TEMPERATURE OR RECOMMENDED BAKING TIME. Wash hands after use. Baking should be completed by an adult. Begin by preheating oven to 275 °F (130 °C). Test temperature with oven thermometer for perfectly cured clay. For best results, condition all clay by running it through the clay dedicated pasta machine several passes on the widest setting. Fold the clay in half after each pass and insert the fold side into the rollers first.
Instructions:
-
Cut out a small square of parchment paper to set your flower on. It’s nice to have your piece on a little square that you can rotate will working. Take a 1/4 bar of Turquoise and roll the clay into a 1/2” thick x 3” L snake and then cut 5 equal sized pieces. Roll these into balls. Spritz your leaf and flower mold with a little water to prevent sticking. Press a ball of clay into the small rose petal mold. Repeat process until you have 5 petals made. Press these five petals together to make a flower. There will be a small hole in the center.

-
Condition a small amount of Leaf Green clay. Roll it out into a very thin snake (approx 2.5” L x 1 mm thick). Cut 10 small strips approximately 1/4” long. Attach two little stems to each flower petal pressing them on from the center up. Try to get them to curve a bit. Condition some String Bean clay. Make a very thin, thin snake (approx. 1mm thick x 1” L). Cut 15 tiny equal sized pieces and roll these into ovals for the leaves. Using the needle tool press a crease into each leaf as you place it onto the stems. Attach 3 little leaves per flower petal. Place them in different locations on the stems.

-
Make a small flattened ball of Red clay (approx. 7/16”) for the center of your flower. Roll a very thin snake of white clay and cut out lots of little equal sized pieces. Roll these into tiny balls and attach to your Red flower center. Once the center of the flower is covered with white dots, press it into the center of your flower.

-
Make three small red balls (approx. 1/8”) and press these onto the tops of 3 flower stems. Surround each of these with 6 tiny Dusty Rose colored balls (approx. 1 mm) each. Use the end of the etch and pearl tool and press a dot in the Red centers. Using White clay, make 9 small ovals. Using the needle tool add a crease line into each. Add these to 3 stems. Using Sky Blue, make 3 tiny balls (approx 1/16”) and add them to the center of the White Flowers. Using the etch n pearl tool, make 3 little dots in the center of each of these. Using Red clay make 8 tiny balls (approx 1/16”). Using Yellow clay make 10 very tiny balls (approx 1/16”). Attach these to the remaining stems.

-
If desired add random tiny balls (approx 1/16”) to the background using the Dusty Rose, White and Sky Blue.
- Bake according to directions above. Allow to cool. Apply glaze using a paintbrush, allow to dry completely.
Read NextEmbroidered Clay Jewellery
Your Recently Viewed Projects

Thanks for your comment. Don't forget to share!
DMGhot4g12 5378654
Mar 24, 2014
Look's beautiful... I'll have to try it. Does anyone know where you can find Sculpey?
Report Inappropriate Comment
Are you sure you would like to report this comment? It will be flagged for our moderators to take action.
Thank you for taking the time to improve the content on our site.