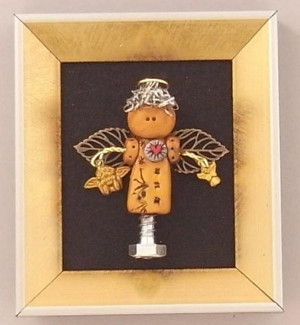
Angel of Crafting
Let this Angel of Crafting from Polyform watch over you as you work. This tutorial on how to make your own angel out of household materials is easier than it looks. Made with various odds and ends, this crafty angel is perfect for creative hearts. Hang this cute guardian above your workspace, or take her with you wherever you go by using her as a necklace charm. Whenever you're feeling uninspired, the Angel of Crafting will lift your spirits.

You can find this project, as well as many other Polymer clay tutorials, in our free eBook, 24 Polymer Clay Tutorials: Polymer Clay Jewelry, Decor and More!

Materials:
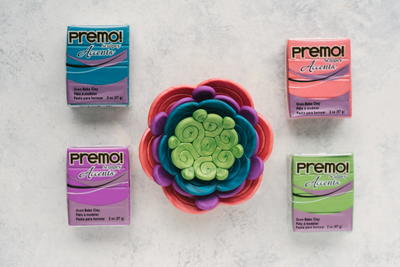
- Premo! Accents: Gold - 2 oz-- 1 block
- Premo! Accents: Silver - 2 oz-- 1 block
- Premo! Sculpey®: Pomegranate - 2 oz-- 1 block
- Clay Conditioning Machine
- Sculpey® 5-in-1 Tool Kit
- Sculpey® Super Slicer
- Sculpey® Bake & Bond
- 2 - 2" lengths of 20 gauge gold-tone craft wire
- 3” length of 20 gauge gold tone craft wire
- 6” length of 24 gauge annealed steel wire
- 2 - 1” Brass Filigree Leaves
- 1 1/8” Hardware Screw
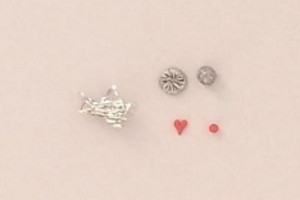
- Small Bunch of Kitchen Steel Wool
- 2 Angel charms
- 2 Tiny glass marbles, (or two seed beads of your choice of size and color)
- Dark Burnt Umber acrylic paint
- One piece of black stiff felt cut to fit inside of back of frame, (we used a piece 2 5/8” by 3 1/8”)
- Frame-size of your choice. We used a frame with outer measurements of 3 1/2” wide by 4”. Inside measurements of 2 5/8” by 3 1/8”.
- Needle nose pliers
- Needle nose tweezers
- Wire cutters
- Scissors
- Paintbrush
- Pencil
- Sponge or soft rag
- Ruler
Instructions:
Do not use unbaked clay on unprotected furniture or finished surfaces. Start with clean hands and work surface area. Good work surfaces include wax paper, metal baking sheet, or disposable foil. Knead clay until soft and smooth. For best results, clean your hands in between colors. Shape clay, pressing pieces together firmly. Bake on oven-proof glass or metal surface at 275 °F (130 °C) for 30 minutes per 1/4” (6 mm) thickness. For best baking results, use an oven thermometer. DO NOT USE MICROWAVE OVEN. DO NOT EXCEED THE ABOVE TEMPERATURE OR RECOMMENDED BAKING TIME. Wash hands after use. Baking should be completed by an adult.
-
Begin by preheating oven to 275 °F (130 °C). Test temperature with oven thermometer for perfectly cured clay. For best results, condition all clay by running it through the clay dedicated pasta machine several passes on the widest setting. Fold the clay in half after each pass and insert the fold side into the rollers first.
-
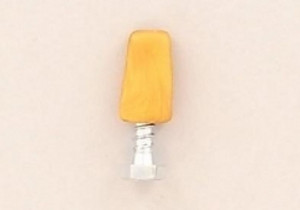
Using Gold clay form a ball about 5/8” in diameter, and gradually shape into a rectangle measuring about 7/8” long by 1/2” wide and 1/4” deep.
-
Take the screw and in a winding motion, screw it into the bottom of the rectangle about 1/2 half of the way, (leaving about 5/8” showing).
-
Using Gold clay form the head shaping a ball about 1/2” in diameter. Lay it on your work surface and press to flatten just slightly. Apply Bake & Bond to the top of the rectangle and gently press the head onto the body.
-
Shape two small pea sized pieces of Gold clay (approx. 1/4” diameter), slightly flatten and after applying a dab of Bake & Bond onto both press them firmly onto the rectangle to make shoulders.

-
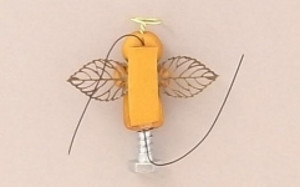
To make the halo, take the 3” piece of wire and bend it in half, forming a circle by twisting the wire around the end of the Needle tool from the 5 in 1 Tool Set and twisting the ends until they meet and are wound together. A needle nose pliers is helpful to finish winding them together to a point. Push the halo partially into the back top of the head leaving enough room to apply her steel wool hair under the halo. You can bend the halo to a right angle after the piece is baked. Smooth the angel’s head and face if needed.
-
To make her arms, take one of the 2” pieces of gold tone wire, and bend it in half and cross the ends to make a smallish loop to which you add the charm, making sure that it is hanging with its front faced forward. Use needle nose pliers to grab the loop and twist the ends with your hands. Wind the ends to a neat point with the pliers. Repeat with the other 2” wire adding the second charm.
-
Apply a dab of Bake & Bond to the point of the “arms” and push the arms into the shoulders about ½ of the length of the arms, (leaving about ½” of the arms showing). Position the arms the way you like, though you can adjust them after baking.
-
Using the Clay Conditioning Machine on the #6 setting, roll out a sheet of Gold clay.
-
Using the Rigid Blade from the Super Slicer Set, cut a piece of clay 1 1/8” long by 3/8” wide. Turn the angel over and apply Bake and Bond on an area of about 1 1/8” long by 3/8”, starting at about the middle of the head and down the back.
-
Lay the 6” length of annealed 24 gauge steel wire centered on the back of her head and back.
-
Place the two filigree leaves centered, and over the “shoulders”. Then attach the flat piece of clay on the middle of the back of the piece over the wire and ends of the leaves. Press slightly and smooth edges to attach firmly.
-
Turn the entire piece over and place onto your baking surface. Smooth out any imperfections on the front of her face/head, shoulders, and body with your fingertips.
-
To add the eyes, take your needle nose tweezers and place each glass marble in the middle of her face and using the tip of your tweezers, or your fingers, press them into the clay, almost flush with the surrounding clay.
-
Add a generous amount of Bake & Bond to the top of her head and add the steel wool for her hair.
-
Take a tiny piece of silver clay, (approx. 1/8”) and form a small ball. Lay it on your work surface and press almost flat. Using the blade from the 5 in 1 Clay Tool Set, gently press several lines from the middle of the circle to the outer edge making a starburst pattern.
-
Add a bit of Bake & Bond over your angel’s heart area. Gently press the round piece of silver clay onto the body.
-
To form the heart, take a tiny piece of the Pomegranate clay, roll it into a ball, (approx. 1/16”) and then roll one end into a point to form a teardrop shape. Lay it on a flat surface, and use the blade from the 5 in 1 Clay Tool Set to make an indentation to form a heart. Place a tiny bead of Bake & Bond in the center of the silver circle. Press very gently to attach and center the heart.
-
Using the Needle Tool from the 5-in-1 Clay tool Set, pierce the shoulders to make tiny holes to look like rivets.
-
You can add texture to the rest of her body by using the 5 in 1 Clay Tool Set to carve interesting designs into the clay.
-
Bake as directed above.
-
Using your paintbrush, apply the Dark Burnt Umber Acrylic Paint to the body and shoulders of your angel.
-
Quickly, before the paint dries, use a dampened sponge, or soft rag to remove the paint from the surface of the clay but leaving paint in the cracks, crevices, stamped and carved areas. This will add depth and accent the textures of your piece.
-
The wire ends on the back of the angel will need to go through holes in the felt, and then twisted together on the other side of the felt to fasten the piece to it.
-
Center your angel on the pre-measured piece of stiff black felt.
-
Tip the piece enough to mark the felt under the angel with a pencil where the holes should be. You can measure with a ruler before attaching to make sure the piece will be centered properly.
-
Using the Needle Tool from the 5-in-1 Tool Set, poke two holes in the felt where you marked with your pencil, for the wires to thread through. Once the wire is placed through the holes make sure the angel is lying flat on the felt. Turn the entire piece over and bend the wires to meet, and twist them to fasten the angle to the felt. Make sure the wire ends are laying flat too.
- Add the felt to the frame and replace the back of the frame and secure.
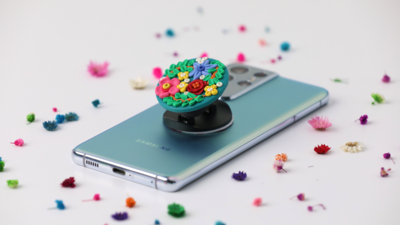
Read NextCustomized Pop Socket For Your Phone


Thanks for your comment. Don't forget to share!
Ask93 7929298
Mar 03, 2016
I like this project a lot. There is an extensive list of supplies, though. What can I use if I don't have the 5 in one tool? I know I don't have that. Nor do I get what it is and how I could use a substitute. It might be fun to make a whole bunch of these.
vbillmeier 7131064
Dec 08, 2012
Cute Idea.I'd love to make one for myself and my mother who is an sangel collecter.
Report Inappropriate Comment
Are you sure you would like to report this comment? It will be flagged for our moderators to take action.
Thank you for taking the time to improve the content on our site.