This project was submitted by one of our readers, just like you.
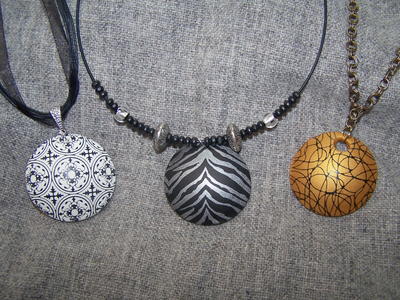
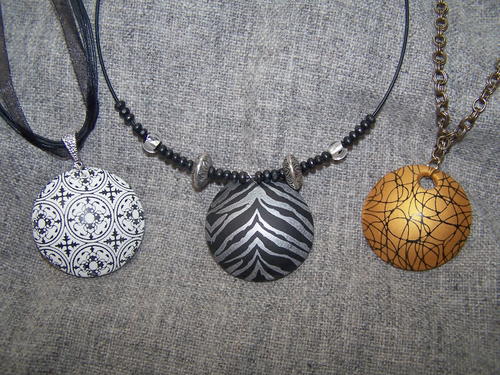
Screen-Print Pendants

Screen-Print Pendants
"Sculpey's Souffle is the perfect polymer clay for jewelry making!! It is a soft, pliable clay that is a joy to work with. It is lightweight yet very strong. Sculpey's screen print kit makes the painting process so easy a beginner can get great results...no painting experience is required! The pendants make wonderful gifts for the ladies on your list and would be hot sellers at craft shows. The pendants look great on a simple ready-made necklace or dressed up with coordinating beads from your bead stash."
Project TypeMake a Project
Bead TypeMiscellaneous
Time to CompleteIn an evening
Bead Technique UsedStrung
Bead Project TypeNecklace

Materials List
-
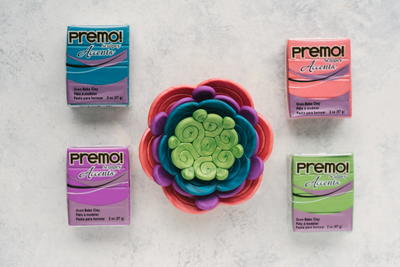
Premo Sculpey Soufflé (Polymer Clay): One 2 oz. block each 6001 Igloo, 6042 Poppy Seed,
Premo Sculpey Accents: One 2 oz. block 4417 Antique Gold
- Premo! Sculpey Clay Tool Starter Set ASCTV01
- Premo Sculpey Silk Screen Kit
- Sculpey Circle Metal Cutters
- Sculpey Hollow Bead Maker
- Clay conditioning machine or acrylic roller
- Smooth, non porous surface for cutting such a ceramic tile
- Black craft paint
-
Misc. supplies: Shallow water basin,
Paper towels,
Baby wipes,
Aluminum foil,
Ovenproof baking tray,
Toothpick,
Marker or pen with plastic cap,
Black choker necklace, ready-made necklaces of choice,
Silver tone and gold tone jump rings: 8 and 12mm,
Silver tone bails,
Assorted black and silver beads of choice,
2 pair small needle nose or chain nose pliers
Instructions
-
Follow all manufacturers’ instructions for all products used here. Use baby wipes to clean hands and tools after using clay.
-
Conditioning the clay: Use the clay knife to cut clay block in half. Condition all clay before use by running through clay conditioning machine until pliable. If you are not using a clay conditioning machine then use the acrylic roller to condition the clay. You may also knead the clay with your hands until pliable.
-
Rolling clay sheets: Roll clay on the thickest setting of the clay condition machine or approximately 1/8” by using the acrylic roller. For double layer of clay choose two contrasting colors such as black and white. Roll the top color on the second thickest setting and the bottom color on the second thinnest setting on the clay conditioning machine. Stack the two sheets of clay and roll over lightly with the acrylic roller. Proceed to the silkscreen step. When dry cut through both layers of clay.
-
Silk-screening: Choose a pattern from the silk screen kit. Peel silkscreen sheet off its backing and lay on top of clay sheet, shiny side down. Lightly burnish the silkscreen with your finger to make contact with the clay sheet. Squeeze a line of paint from the paint tube onto the silk screen just above the design. Use the squeegee to pull the paint over the design. Repeat until the entire design is covered with a thin, even layer of paint. Lift and remove the silk screen and immediately put it along with the squeegee in a basin of cool water. Gently clean silkscreen and squeegee thoroughly and let dry on paper towel. When dry, replace the clean and dry silkscreen sheet onto paper backing shiny side down.
-
Cutting the shapes: When paint is dry use the 1.75” circle cutter to cut out the painted areas. Next decide what size opening you will need for your necklace. For a large opening (as in the fuchsia, gold, and green pendants) use the open end of a pen or marker cap to cut the clay. Use the blunt point tool to smooth the inside edges. For a small hole insert the toothpick and gently wiggle it to enlarge the hole slightly. Use the knife’s thinnest edge to gently lift the painted clay circle from the surface. Use light finger pressure to smooth outer edges of clay circle.
-
Baking the clay: Set the Hollow Bead Maker tray out with the convex side up. Lay the pendant onto the largest circle and gently press down with light finger pressure. Set Bead Maker Tray on the ovenproof baking tray and cover with a tent of aluminum foil. Be sure foil does not touch the clay. Bake according to manufacturer’s instructions. Let cool then gently remove baked clay pieces.
-
Opening jump rings: Hold a jump ring with 2 sets of pliers with the opening at 12:00. One set of pliers should be placed at 3:00 and the other at 9:00. Using even pressure, pull one set of pliers toward you and push the other away from you until the ring opens. To close the ring, reverse the procedure.
-
Finishing: Open jump ring and insert into pendant’s hole then insert bale or chain link into jump ring. Close the jump ring. For the choker, unscrew the ball end of choker and set aside. Decide on a bead pattern then place half of the beads onto the choker. Add pendant then add the remaining beads. Replace the ball end of choker. To add a satin cord, fold cord in half. Feed the looped end of the cord through the back of the pendant opening. Feed the tail ends through the looped end and pull snuggly.
Note: Click image for larger version.

Read NextCustomized Pop Socket For Your Phone