Recycled Bedpost Pumpkins
Sure, these Recycled Bedpost Pumpkins may not look like tradition gourds, but that doesn't mean they can't decorate your porch throughout fall. Primitive wood crafts give your space a rustic feel. Use recycled wood to create this showstopping craft.

Materials:
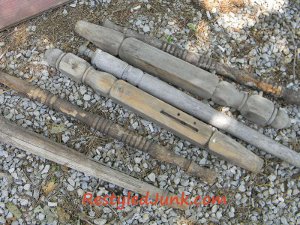
- Old bedposts and spindles
- Chop saw (miter saw)
- Measuring tape
- Sandpaper
- Orange acrylic paint
- Paintbrush
- 3 rusty nails
- Hammer
- Craft glue
- Burlap scrap
- Scissors
- Hot glue gun
- Baling wire
- Wire cutters
- Needle nose pliers
- 3 small fall silk leaves
- Manila folder
- 1/2-inch letter stamps
- Brown ink pad
- Crochet thread
Instructions:
-
Cut a 9, 11, and a 17 inch length from old bedposts and/or spindles. Each post or spindle will be one pumpkin.
-
Lightly sand the posts/spindles to rough up a smooth finish. My posts/spindles were pretty weathered and didn't require this step.
-
Paint each cut spindle using orange acrylic paint to transform them into pumpkins. Allow the paint to dry. Apply a second coat if desired.

-
Lightly sand the surface of each pumpkin to distress.
-
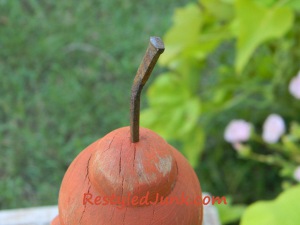
Pound the tip of an old rusty nail in the top of each pumpkin for the stems. If rusty nails are not available, drill a small hole in the tops to insert and glue a small bit of rusty wire or a small stick from your yard.
-
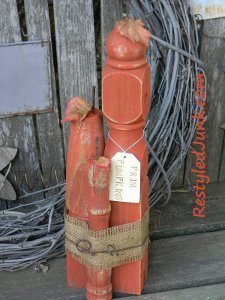
Stand all of the pumpkins and cluster them together. Connect them together using craft glue. Allow the glue to dry.
-
Locate the center of the shortest pumpkin and measure around the circumference of the entire pumpkin cluster. Add 1 inch to this measurement. Cut a burlap strip 2-1/2 inches wide by the circumference measurement. Fray a 1/4 inch fringe on each long edge. Wrap the strip around the pumpkin cluster, overlap the ends and attach using hot glue.
-
Cut a piece of baling wire 12 inches longer than the burlap length using wire cutters. Center the wire over the burlap and wrap it around the pumpkin cluster. Twist the ends together at the front to secure. Grasp one end of the wire with the tip of needle nose pliers. Wrap the end around the tip to curl. Repeat with the other end.
-
Hot glue a small fall silk leaf to the top of each pumpkin.
- Cut a 1-3/4 inch wide by 3 inch long rectangle from an old manila folder. Diagonally trim off the corners on one short end. This is the top of the tag. Punch a hole in the center top of the tag using a paper punch. Stamp "PRIM PUMPKINS" on the tag using 1/2 inch letter stamps and brown ink. Insert crochet thread through the tag's hole and tie the ends around one pumpkin.
Read NextFall Picket Fence Centerpiece
Your Recently Viewed Projects

Thanks for your comment. Don't forget to share!
Mixed Kreations
Aug 18, 2013
Very creative! These are really cute and would look great on my front porch this fall. Thanks for sharing! Pinning!
Report Inappropriate Comment
Are you sure you would like to report this comment? It will be flagged for our moderators to take action.
Thank you for taking the time to improve the content on our site.