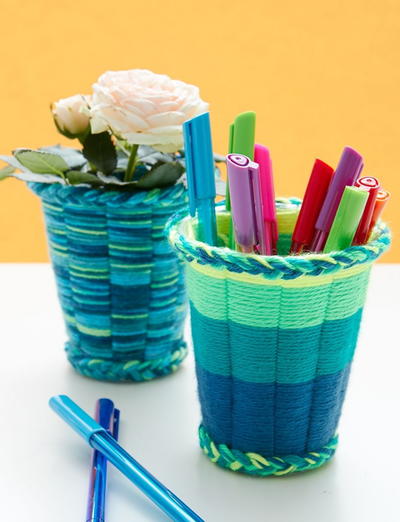
Easy Yarn Crafts for Kids: Cup Weaving Tutorial

Easy crafts with yarn that are not crochet or knit can be hard to come by. I like to find yarn crafts that are creative and functional but also perfect for kids. This tutorial from Yarnspirations fits the bill and we are so excited to share it with you. Organize your desk with these woven cups and show off your love for yarn! These cups are a great way to use up yarn and teach kids a new weaving technique.
MaterialsYarn

Project TypeMake a Project
Materials List
- Version I Caron® Simly Soft®: Paints Peacock Feather – 1 ball
- Version II Caron® Simply Soft®: Ocean – 1 ball, Cool Green – 1 ball, Neon Green – 1 ball, Neon Yellow – 1 ball
- Plastic cup (cup shown is 20 oz/476 ml size).
- Marker.
- Tape.
- Scissors.
- Printed template.
- Glue (hot glue and glue gun is recommended – adult supervision required).
CUP WEAVING INSTRUCTIONS – Both Versions
-
Place cup upside down on printed template, centering the mouth of cup within the circle. (Template Available Here - Scroll to Page 3).
-
Mark cup at each dividing line with maker.
-
Repeat Steps 1 & 2 at base of cup.
-
Cut down sides of cup at each mark from mark at mouth of cup to mark at base of cup leaving approximately ¼” [0.5 cm] uncut at base. You will have 1 1 weaving strips.
-
Tape end of yarn to the inside bottom of the cup.
-
Weave yarn in and out of strips, pushing weaving to bottom of cup as you work.
TO CHANGE COLORS – Version 2
-
Cut first yarn and bring tail to inside (see blue yarn in photo). Place end of new second color inside cup, skipping one weaving strip (see green yarn in photo).
-
Begin weaving with new color, trapping yarn tails between weaving and inside of cup as you go.
-
Repeat Steps 1 and 2 as necessary for desired stripe pattern.
TO FINISH – Both Versions
-
Cut yarn and tuck tail into weaving at inside of cup. Dab with glue and let dry to secure.
-
BRAID: Cut 12 lengths of yarn approximately 36” [91.5 cm] long. Tie strands together close to one end. Divide strands into groups of 4 and braid together, tying a knot to secure end. Glue braid around top edge of cup, cutting to size and securing ends at inside of cup with glue (cut off any knots to avoid bulk). Make a second braid and glue around bottom of cup in the same manner.
What would you use these cups for?
Read NextMix-and-Match Woodland Puzzle