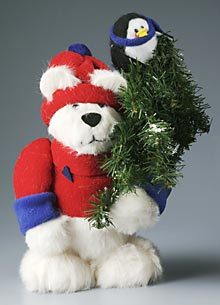
Winter Friends
Don't let the cold and snow get you down! These Winter Friends are best buddies, and they're sure to liven up any holiday table. This cute duo also makes a cute handmade gift idea for kids of all ages. Let this sweet polar bear and penguin duo warm up your winter decor this year!

Materials:
- 1/4 yd. white synthetic fur
- 1/8 yd fleece fabric in blue, 45" wide
- 1/6 yd fleece fabric in red, 45" wide
- 1 (2 1/2") STYROFOAM™ Brand Foam Egg
- 1 (3 3/4") STYROFOAM™ Brand Foam Egg
- 1 (6") STYROFOAM™ Brand Foam Egg
- 2 (2") STYROFOAM™ Brand Foam Balls
- 2 (3") STYROFOAM™ Brand Foam Balls
- Felt: yellow, black scraps; plush, 5" square each: white, black
- Blue pompom, 1"
- Black embroidery floss
- Scissors
- Serrated knife
- Ruler
- Compass
- Extra-long straight pins
- Pencil
- Fine-line red permanent marker
- Needles: sewing; embroidery, 3"-4" long
- Strong, white thread
- Black embroidery floss
- Thick, white craft glue
- Low-temp glue gun and glue sticks
- Artificial mini evergreen tree or garland length, 12"
- Black beads, two each: 12mm; 5mm
- Small heart-shaped button
- Candle stub or paraffin
- Powdered cosmetic blush
- Metal tablespoon (optional)
- Pennies or fishing weights (optional)
- Winter Friends Pattern
Instructions:
-
Wax serrated knife with candle stub or paraffin. Cut small slice from narrow end of 6" foam egg (bear's body). Cut small slice from one 3" foam ball (bear's head). Set aside 2-1/2" foam egg for penguin. Cut remaining foam shapes in half, cutting egg lengthwise. Cut small slice from narrow end of each egg half (arms). With flat side of bear's head at bottom, glue one 2" half-ball to head for muzzle.
- Cut patterns from felt and fur as indicated.
Bear
-
With nap running down, trace the following onto wrong side of fur: head, 8" circle; body, 5-1/2" x 12"; paws, two 4" circles; feet, two 5" circles; soles, two 2" circles. Cut out pieces, cutting through fur backing only. Lightly label wrong side of fur pieces with pencil.
-
Place egg halves (arms) flat side down on red fleece, then trace ovals 1-1/2" beyond foam edge; cut out. In addition, cut the following from red fleece: hat, 6" x 12"; sweater, 5" x 11". Cut two 2-1/2" x 6" cuffs from blue fleece.
-
Sew gathering stitch around 8" fur circle. Center head flat side up on fur. Pull stitches tight; knot and clip thread. With narrow end of body pointing up, glue fur strip cut in Step 3 around lower two-thirds of body. Glue excess fur to bottom of body.
-
Fold and glue 1/2" hem in one long edge of sweater fleece. Beginning at back of body with hemmed edge at bottom, glue sweater around upper half of body, overlapping fur. Roll top down to form turtleneck; spot glue to secure.
-
To cover remaining foam shapes, center shapes rounded side down on corresponding fur or fleece pieces. Bring fur or fleece edges up to flat side of shape. Pin at four opposite points. Adjust excess between pins; glue to secure. Let dry.
-
Remove pins. Note: Do not glue soles to bottom of feet until after assembly.
-
Glue paws to narrow ends of arms. Fold and glue 3/4" hem in both long edges of each cuff. In same way as sweater, glue cuffs around arms, overlapping fur.
-
With gathered "neck" at bottom, use scissors to poke eye holes. Glue larger beads into holes. Glue nose to muzzle as shown.
-
Thread embroidery needle with six strands floss and secure at bottom of head. Refer to diagram to stitch mouth. Insert needle into bottom of head, coming out just below nose (1). Sew 3/4"-long vertical straight stitch, taking needle back through fur at 2. Bring needle up at 3, then down at 4, creating end of “smile.” Bring needle back up at 5, then down at 6, creating 3/4"-long straight stitch. Repeat on opposite side, bringing needle up at 7, down at 8, up at 9, and down through head at 10. Knot and clip thread at bottom of head.
-
Glue head to body. Glue right arm to body. Glue tree to left side of body. Glue left shoulder to body and paw curved into body as shown. Glue feet to front of body so bear stands.
-
With right sides facing, overlap and glue short ends of hat together, forming tube. Hand-gather one end of hat together; tie with thread. Turn hat right side out. Fold up lower edge of hat 1/2", then 1". Glue hat to head. Glue ears and pompom to hat as shown. Glue button to sweater.
- Be sure bear can stand upright. If bear falls over, use tablespoon to slightly hollow out bottom of feet. Glue pennies or other weighted material into bottom of feet, placing slightly more weight in right foot to offset penguin. Glue soles to bottom of feet; let dry.
Penguin
-
With wrong sides facing, glue white and black wings together in pairs.
-
Glue felt front to front of 2-1/2" foam egg (penguin's body). With narrow end of egg at top, center back of egg on black plush circle. Bring black edges around to front, overlapping white; pin to secure, adjusting fullness as needed. Glue felt to foam; let dry. Remove pins. Glue feet to bottom of body.
-
Cut 1" x 12" scarf from blue fleece; fringe ends. Tie scarf around upper third of penguin. With white side toward body and straight edge even with "shoulders," glue wings to body just below scarf. Use "x" on wing pattern as attachment guide.
-
Use scissors to poke eye holes. Glue remaining beads into holes. Glue long edges of upper and lower beak pieces together. Glue beak to face. Use red marker to draw "puffed up" cheek lines (a "c" or reverse "c") on each side of beak; use fingertip to blush cheeks.
- Glue penguin to top of tree.
Read NextHow to Make Easy Paper Snowflakes