Christmas Gnome Wall Decor

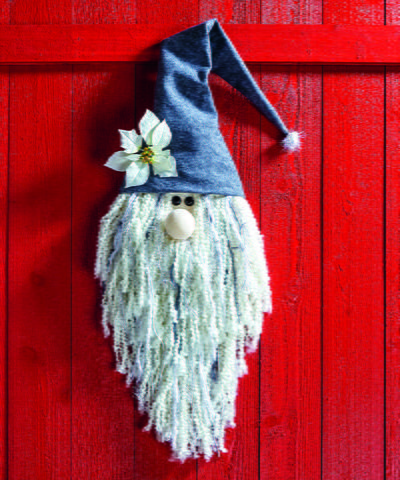
Families and friends are sure to get a kick out of this cute Christmas Gnome Wall Decor. Perfect for hanging on your wall or your front door, this country-style Christmas decoration will help get your home in the spirit of the winter season. This cute winter gnome is crafted with felt and yarn, so it's inexpensive to make and super easy to find everything you need to make this project. In fact, you might have everything you need sitting in your craft stash right now! It's never too late to get a jump-start on your holiday crafting, and this Christmas Gnome Wall Decor is sure to get you in the holiday spirit!
Time to CompleteIn an evening
Primary TechniqueGeneral Crafts

HolidayChristmas
Materials:
- FloraCraft® Make It: Fun® Foam
- Sheet: 1” x 12” x 18”
- Ball: 2.5”
- (1/3 Yard) Felt: Grey
- (2) 8.5” x 11” Felt Sheets: Cream
- Bulky Textured Yarn: Cream, Grey, White and Silver
- Straight Pins
- ¾” Black Half Round Eyes
- White Poinsettia Blossom
- Chenille Stem
- Pompom: Silver
- Cardstock
- Make It: Fun® Foam Cutter or Serrated Knife
- Low-Temp Glue Gun
- Scissors
- Template

Check out this project and other great DIY Christmas crafts in our free eBook 20 Easy DIY Holiday Projects!
Instructions:
- Print template on cardstock and cut out. Pin the template to the foam sheet and cut out with the serrated knife.


- Position a 8.5” x 11” felt sheet to the bottom of the foam sheet as shown. Trim the felt around the bottom of the foam to fit and glue in place. Wrap a 5” circle of felt around the 2.5” ball. Pull and gather the felt to one side of the ball. Trim excess felt away with scissors and glue in place.


- Glue the eyes centered about 1” down from the top of the felt. Glue the nose just below the eyes.

- Cut 20” lengths of the cream yarn. Tie four lengths together at one end creating a long tassel. Pin about 24 cream tassels across the face from cheek to cheek, just under the nose. Cut 20” lengths of the grey, silver and white yarn. Mix yarn and tie four strands together to create more tassels. Pin the tassels evenly spaced among the cream tassels to add texture and contrast to the beard.

- Repeat step 4 to fill in on each side of the eyes and nose.
- Cut a triangle from the grey felt that is 30” tall and 22” wide at the base. Fold and glue a 1” hem in the base of the triangle. Wrap the base of the triangle around the top of the head, concealing the top of the yarn tassels and felt edge. Pin the hat in place at the back. Spot-glue as you go for a secure hold. Fold the edges together along the top of the hat and glue to form the tall, cone-shaped hat. Glue pompom to the tip of the hat.

- Twist the chenille stem into a loop and pin it to the back of the head for the hanger. Glue the pin in place for a more secure hold. Pin the poinsettia to the hat to finish.


Read NextSnowy Day Penguin Craft
Your Recently Viewed Projects
Thanks for your comment. Don't forget to share!
Marilyn B
Nov 15, 2017
Super easy and detailed instructions for this cute project! As an alternative, you could use some fabric remnants and get a bit more creative and whimsical with the hat fabric or even add some cording, ricrac, crossgrain or other trimming around the brim. Also, this pattern could be adapted to become Santa, with a red cap and white beard, or even an elf with a red and green cap. Fun project!
Report Inappropriate Comment
Are you sure you would like to report this comment? It will be flagged for our moderators to take action.
Thank you for taking the time to improve the content on our site.