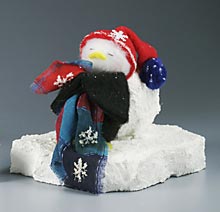
Winter Dreams Penguin Decoration
This little guy is all cuddled up and snug for the night in his fluffy snowball. This Penguin decoration is sure to make winter visitors smile. And it's so easy to make in just a few quick and easy steps, you'll have this cool penguin decoration in no time!
Materials:
- STYROFOAM Brand Foam:
- Balls, one each: 2 1/2"; 1 1/2"
- Block, 12" x 10" x 1 1/4"
- Egg, 2 1/2"
- Textured snow paint
- Felt: yellow, 9" x 12" sheet; plush, 5" x 10" piece each: white, black
- Red fleece fabric, 6" square
- Plaid cotton fabric, 6" square
- Blue pompom, 1"
- Embroidery floss, Black
- Confetti snowflake, one, White
- Iridescent glitter
- Serrated knife
- Paraffin or candle stub
- Fine-line black permanent marker
- Pencil
- Ruler
- Compass
- Scissors
- Needles: sewing; embroidery, 3"to 4" long
- White, Strong thread
- Extra-long straight pins
- Low temperature glue gun and glue sticks
- White, thick craft glue
- Optional: Powdered cosmetic blush
Instructions:
- Wax serrated knife with candle stub or paraffin. Cut 8" square from foam block. Cut jagged pieces from square to create roughly 6"-square iceberg. Glue larger foam ball to one side of block. Cut small slice from remaining foam ball (head). Cut small lengthwise slice from foam egg (body).
- Following manufacturer's instructions, apply snow paint to snowball and iceberg. While still wet, sprinkle paint with glitter; let dry.
- Cut patterns from felt and fleece as indicated. Cut one 4" circle from white plush and one from black plush; cut black circle in half (wings).
- Place body flat side-down on black plush felt, then trace oval 1-1/2" beyond foam edge; cut out.
- To cover foam shapes, center shapes rounded side down on corresponding plush felt pieces. Bring felt edges up to flat side of foam. Pin at four opposite points. Adjust excess between pins; glue to secure. Let dry. Note: Alternate method is to sew gathering stitch around felt shape; pull stitches tight around foam shape, then knot and clip thread. Glue plush felt front to front of penguin's body, overlapping black edges; let dry.
- Thread embroidery needle with two strands floss and secure at bottom of head. Bring needle through ball to front of face. Sew two small straight stitches for eyes, 1/2" apart, in center of face. Take needle back through bottom of head; knot and clip thread.
- Glue long edges of upper and lower beak pieces together. Glue beak to center of face directly under eyes. Use fingertip to blush cheeks, if desired.
- Place hat right side up on work surface. Apply line of glue along straight edge of hat; sprinkle with glitter and let dry. In same way, dot pompom with glue and glitter; let dry. With wrong sides facing, glue curved edges of hat together. Glue pompom to hat tip. Glue hat to head. Glue snowflake to hat front.
- Fold each wing in half, wrong sides facing. Glue folded corner of wings to shoulders, straight edge up. Glue feet and head to body. Glue penguin to snowball at slight upward angle.
- Pull threads from edges of plaid-square to create fringe. Use white glue to draw simple crisscross snowflakes on fabric; sprinkle with glitter and let dry. Glue blanket between wings as shown. Lightly sprinkle penguin with glitter.
®™ Trademark of The Dow Chemical Company ("Dow") or an affiliated company of Dow.
For more project ideas, please see styrofoamstyle.com.
Read NextHow to Make Easy Paper Snowflakes