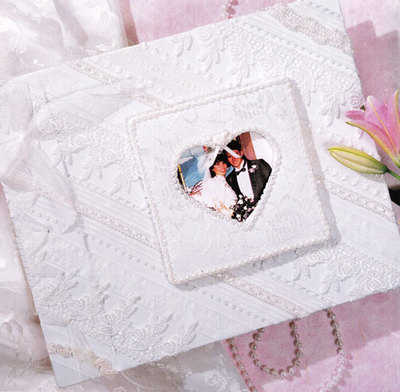
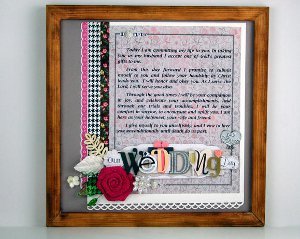
Braided Wedding Album
This lovely keepsake wedding album with lace, trim and braided spine has an endearing vintage look. Make for your own wedding or give as a special wedding present. This great DIY wedding project comes to us from Heidi Borchers of Inspired at Home.

Materials:
- Aleene’s® Super Thick Tacky Glue™
- Iron-on fusible web
- Iron
- White mat board - 2 (10”) squares for cover and 2 (2” x 10”) strips for spine
- ¼” diameter hole punch
- White fabric: 1 (11” x 13”) pieces, 2 (9-3/4” x 11-3/4”) pieces
- Assorted trims: several widths lace edging, 1” wide white ribbon, braided pearl trim
- 9-1/4” x 11-1/2” album filler paper
- 36” length ½” wide white organdy ribbon
- For frame
- 1 (5-1/2”) square each white mat board and batting
- 1 (6-1/2”) square each white fabric and lace
- 32” length white braided trim
- 1 ribbon rose
- Heart Pattern
Instructions for Album:
Using hole punch, center and punch 5 holes in each 2” x 10” mat board piece. Punch first hole 2” from 1 short end. Punch subsequent holes 1-1/2” apart, ending 2” from other short end.
Fuse web to wrong side of white fabric pieces. Center 1 (10”) cover and 1 (2” x 10”) spine side-by-side on wrong side of 1 (11” x 13”) fabric piece, leaving 1/16” between cover and spine.
Fold fabric corners over cover and spine at 45º angle. Using tip of iron, fuse to wrong side of cover and spine. Carefully turn cover over and fuse fabric to right side of cover and spine.
Using iron, press fabric over each edge of cover and spine and fuse excess fabric to wrong side of cover pieces. In same manner, use remaining cover, spine and 11” x 13” white fabric to assemble back cover of album.
Cut lengths of assorted trims to fit diagonally across front of album cover, adding 1” to each length (see photo). Glue trims to cover, gluing ½” at each end of trims to wrong side of cover. Let dry.
For lining, center and fuse 1 (9-3/4” x 11-3/4”) piece of white fabric on wrong side of each cover. While fabric and web are still warm, bend spine backwards to ensure easy opening of finished album.
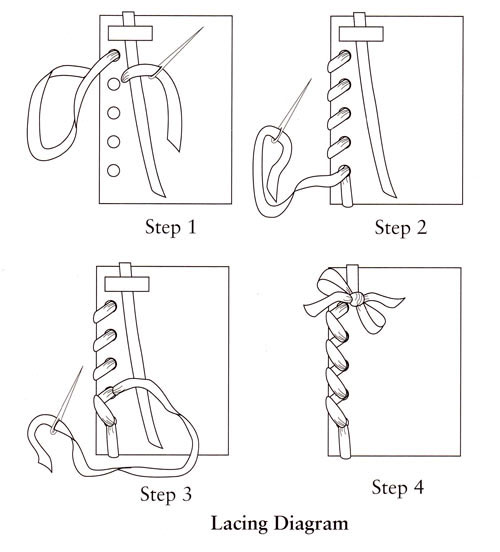
Using tip of scissors, punch holes through fabric to match holes in each spine. With holes aligned, stack album back (right side down), paper, and album front (right side up). Referring to Lacing Diagram, thread sheer ribbon through holes to assemble album. Tie ribbon ends in bow on front of cover.
Instructions for frame:
Center and transfer heart pattern on 5-1/2” mat board and cut out heart. Set heart cutout aside for another use. Using board frame as guide, cut 1 frame from batting. Glue batting to cover 1 side of board frame. Let dry. Using board frame as guide, cut 1 frame each from white fabric and lace, adding ½” all around. Cut out fabric and lace frames. With batting side down, center board frame on wrong side of fabric frame. Fold excess fabric to board and glue, clipping curves as needed. Let dry. Repeat to glue lace frame to right side of fabric-covered frame.
Glue braid around edge of frame and cutout heart (see photo). Glue ribbon rose to top of heart. Let dry. Center and glue frame to front of album, leaving top open to insert picture. Let dry.
Heidi’s Designer Tip: For an aged vintage look, you can tea dye your natural fabrics and lace trims. Fill pan with water. Bring to boil. Add several regular tea bags and infuse for several minutes. Remove tea bags, add trims and let steep until desired antiquing effect is achieved.
Read NextMemory Wedding Frame
Your Recently Viewed Projects
Thanks for your comment. Don't forget to share!
craftinmotorhome
Dec 22, 2012
I think this wedding album is beautiful. Both my chilren are getting married in 2014, so they may both get these albums and I may make one for myself.
Report Inappropriate Comment
Are you sure you would like to report this comment? It will be flagged for our moderators to take action.
Thank you for taking the time to improve the content on our site.


