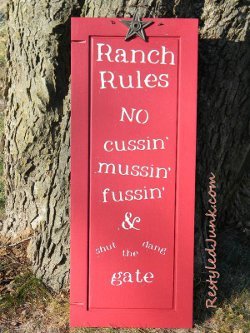
Whimsical Western Wall Hanging
Cowboy crafts and other rustic-themed projects can turn your home into a country escape. Make a Whimsical Western Wall Hanging from Cyndee Kromminga by upcycling a wooden cabinet door or grab some scrap wood for this fun decorative project. Grab your cowboy hat and get to work.

Materials:
- Cupboard door
- Sandpaper
- Flat acrylic paint (sign background)
- Paintbrush
- Cricut Expression
- Doodletype cartridge
- Card stock (lightweight cardboard)
- Masking tape
- Scissors
- White acrylic paint
- Stencil brush
- Wooden skewer
- Toothbrush
- Measuring tape
- Pencil
- Drill and small drill bit
- Baling wire
- Wire cutters
- Needle nose pliers
- Decorative iron stars
- Household cement
Instructions:
-
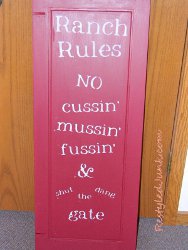
Remove any hardware from the door. Clean and lightly sand the front, back and edges. Determine which side of the door will be the front. My cupboard door measured 16 inches wide by 40 inches long. Adjustments can be made to this tutorial for doors of different sizes. My door also had a border on the front and back, but the back was a smoother surface. I chose to use the back of my door for the front of the sign. The smoother surface made stenciling much easier.
-
Paint the front, back and side edges of the door using flat acrylic paint. In keeping with the western theme of the sign, I used a barn red wall paint. Navy blue, off white or brown would also be great background colors for this sign. Apply as many coats as are necessary to achieve total coverage. Allow the paint to dry.
-
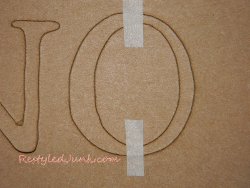
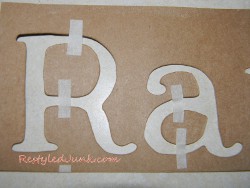
Make your word stencils. Insert the Doodletype cartridge into your Cricut Expression die cutter. Set the blade at 5, the pressure at 5 and the speed at 4. Place card stock on your cutting mat and load the mat into your machine. Note: Lightweight cardboard from recycled cereal boxes (or similar boxes) can be substituted for the card stock.
-
Cut each word individually to create a uniform stencil. The specifics for each word are as follows:
- Ranch, Rules-2 1/2 inches. The first letter of each word is upper case, while the remainder of the words are lower case.
- NO-2 inches. Both letters are upper case.
- cussin, mussin, fussin-2 inches. All letters are lower case & 2 1/2 inches.
- shut the dang-1 1/2 inches. All letters are lower case.
-
Gate-2 inches. All letters are lower case.
-
Before weeding the insides of the letters, and removing the cut stencils from the mat, make bridges on letters that have an inside space. Cut masking tape strips approximately 1/8 inches wide. Lay the strips (bridges) over the inside spaces, across the lines of the letters, to the outside of the letters. This will keep the inside parts in place. Remove the stencils from the mat.
-
Using the photo of the finished sign as a guide, arrange the stencils on the front of the painted cupboard door. I tilted each word slightly to give the sign a carefree look. This technique also saved me from having to measure and perfectly line up the words.
-
Using white acrylic paint and a stencil brush, stencil the inside of each letter. Remove the stencils. Make an apostrophe at the end of "cussin", "mussin" and "fussin". Dip the blunt end of a wooden skewer in the white paint. Dot at the end of the words. Using the pointed end of the skewer, drag the dot down to form the tail of the apostrophe. Allow the paint to dry.
-
Pour a puddle of white acrylic paint on a paper plate. Dip the bristles of an old toothbrush in the paint. While holding the toothbrush over the stenciled sign, scrape your thumbnail over the bristles to splatter the paint. Splatter over the entire front surface. Allow the paint to dry.
-
At the top of your sign, measure to find the center of the width. Using a pencil, make marks an inch below the top edge and 3 inches from each side of the center. Drill through the cupboard door at these marks. Cut a 12 inch length of rusty baling wire using wire cutters. Insert the ends through the holes from the back to the front. Pull the ends 1 inch to the front. Using needle nose pliers, curl the ends to secure. Fold up the arched loop on the back of the door to create the hanger.
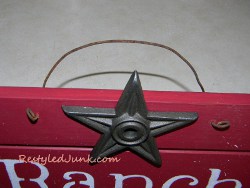
- Apply household cement to the back of a decorative iron star and center on the top border of the sign. Allow the adhesive to dry.
Read NextWindow Frame Seashell Crafts