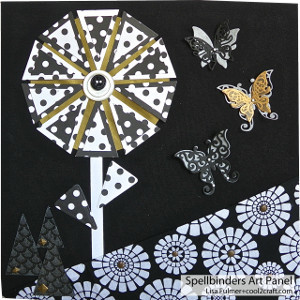
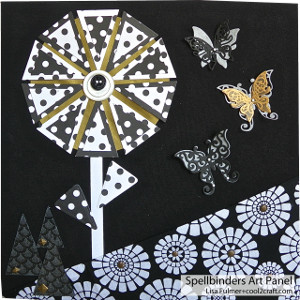
Upcycled T-Shirt Art Panel
Add some pizazz to your home by exploring do-it-yourself wall decor ideas. This Upcycled T-Shirt Art Panel from Lisa Fulmer is a simple but pretty DIY wall decoration. Your efforts towards making this piece will transform your room from plain to playful. Best of all, this is a great recycled craft idea. You'll use old t-shirts that you no longer want as the base for this DIY wall art. Don't hesitate to try your hand at this fabulous craft.
Materials:
- Spellbinders™ Artisan Explorer diecutting machine
- Spellbinders Shapeabilities® "Les Papillions Two" die set
- Spellbinders Media Mixage "Triangles One" die set
- Spellbinders Nestabilities® "Arched Windows One" die set
- 12" x 12" smooth foam panel
- Old black tee shirt
- Black and white patterned fabrics
- Rotary cutter and cutting mat
- Craft glue, fabric glue, clear gel glue, adhesive foam squares
- Black and white polka dot papers
- Black paper and gold metallic paper
- Household parchment paper
- Clear plastic from die packaging
- Black ink pad and pouncer
- Straight pins with black and white heads, thumbtacks
- Scissors and wire cutters
- Black and white buttons
- Iron and ironing pad
Instructions:
-
Cut a 14" square panel from the back of tee shirt and press with iron.
-
Wrap tee shirt around edges of foam panel and adhere to the back with craft glue; miter the corners like wrapping a gift.
-
Cut a large triangle from patterned fabric for the hillside and press a folded edge at the top.
- Position at bottom of panel with folded edge at the top, wrap edges around to the back and adhere with fabric glue.
-
Emboss 5 sets of triangle petals (3 per set - small, medium and large) on polka dot papers and trim out.
-
Stack each set of 3 triangles together to make each petal and adhere with foam squares.
-
Emboss 2 more medium triangles for leaves; trim a piece of white cardstock for a stem.
-
Use craft glue to adhere the flower parts to the panel.
-
Die cut a variety of butterflies, both solid and filigree on to both the black and gold papers; save the parchment paper die-cuts too.
-
Use the smaller die as a stencil to pounce some black ink on to a gold butterfly.
-
Snip the pins with wire cutters so they are the same depth as the foam panel.
-
Layer and pin the butterflies into position into the foam.
-
Cut 3 triangles from a piece of packaging plastic and use clear gel glue to adhere some patterned fabric to the back of each triangle (right side up), then trim the fabric flush to the edges of the triangle.
-
Use craft glue to adhere trees to the panel at the bottom of the hill.
-
Stack 2 buttons together and adhere to center of flower with craft glue, then place pins in the holes down into the foam.
-
Die-cut 2 arches from black and white paper (large and small).
- Tack or glue an 11.5" square of black paper to the back of the panel, then adhere the arches as a label to write the title of your piece and sign your name.
Read NextGiant Button Wall Art