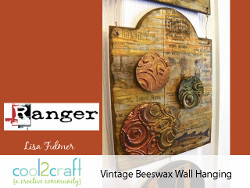
None of Your Beeswax Melt Art
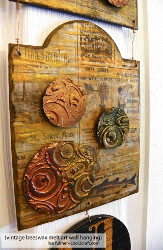
This None of Your Beeswax Melt Art designed by Lisa Fulmer is a cool way to use beeswax and heat to create beautiful DIY works of art. The texture of the wax on the finished product will blow you away. A DIY melting art project is a cool craft to make because it can be used as a wall hanging or a table piece, and it does not require a huge time commitment. Using special supplies from Ranger Ink like UTEE enamel, you can find different uses of beeswax and turn them into a DIY gift idea that will melt anyone's heart.
Materials:
- Ranger Melting Pot
- Melting Pot Project Pan
- Melt Art Beeswax
- Melt Art Ultra-Thick Embossing Enamel (aka UTEE)
- Melt Art Heat It Inks
- Melt Art Texture Tread
- Perfect Pearls™
- Heat It Craft Tool™
- Small wood panels
- Scrapbook paper
- Candle and cookie cutter
- Flat natural-bristle brush
- Silicone angled brush
- Decoupage medium
- Craft glue and craft drill
- Thin-gauge wire
Instructions:
-
Place some beeswax pellets in the project pan to melt for 15-20 minutes (follow package directions for inserting the project pan into the pot).
-
Trim scrapbook paper to fit each wood panel, then carefully burn a random border around the edges with a candle flame.
-
Use decoupage medium to adhere the paper to the top of each panel, allow to dry.
-
Use a natural-bristle brush to quickly coat the panel with a layer of wax.
-
Use the heat tool to re-melt and brush the wax into a random pattern and texture with the silicone angled brush; allow a few minutes to harden.
-
Dust some Perfect Pearls pigment powder across the surface of the wax with your fingers to highlight desired areas.
-
Remove the project pan when cool, then reheat the pot to the UTEE setting and pour UTEE granules in the pot to melt with a few drops of ink for color.
-
Pour a puddle on melted UTEE on a texture tread and press a cookie cutter on top; allow a couple minutes to harden and cool.
-
Flip the tread over and press down to push the cookie cutter all the way through the UTEE, then release your shape.
-
Dust some Perfect Pearls pigment powder across the surface of the UTEE with your fingers to highlight desired areas.
-
Glue the UTEE shapes on to your boards as desired.
-
Drill holes in the corners of each board and connect together with a short length of wire; twist the ends to secure.
-
Drill a hole in the top board and thread a loop of wire for a hanger; twist the ends to secure.
Read NextVintage Design DIY Side Table