Dollar Store DIY Beaded Chandelier
Learn how to make your own chandelier with this easy DIY home decor craft.

Make your own chandelier for only a few bucks using this tutorial from Heather Mann! This dollar chandelier looks like a designer knockoff, but it's really a thrifty DIY project.
All you need to make this dollar store craft is mardi gras beads (fake pearls work too!) from the dollar store, some wire, and a little bit of time. Absolutely perfect for indoors and out, this piece of DIY home decor would look right at home at an outdoor wedding or at a fancy bridal shower. If you want to make this chandelier truly light up the room, you can easily strings some white Christmas lights in within the beads. Looking for some extra flair? Add some colorful beads within the mix.
Estimated Cost$11-$20
Time to CompleteIn an evening

Materials List
- Hanging wire basket
- 6 packages of Mardi Gras-style metallic beads (about 48 necklaces)
- Light gauge wire (floral wire will work)
- Spray paint (white)
- Wire cutters
- Hot glue gun & sticks
- Additional embellishments, as desired
How to Make Your Own Chandelier
Instructions:
-
To prepare the beads: Paint with white spray paint. Allow to dry, and add another coat of paint if necessary. You will be able to touch them up after the whole project is assembled.
-
Prepare the wire basket: spray paint the wire basket and chains. Again, you'll be able to touch up the whole thing again after everything is assembled.
Production note: I didn't spray paint before I assembled, but I think it's a good idea to do so. You won't be able to get the beads uniformly painted if you don't paint before you assemble. -
Work area: I hung the basket above my work surface so I could work on it while it was hanging like it would be when displayed. If you can finagle a way to do this, I recommend it.
-
Wire: cut many pieces of light gauge wire at a length of about 2" or so. You'll need a couple hundred, but you can just cut 10 or so at a time, as needed.
-
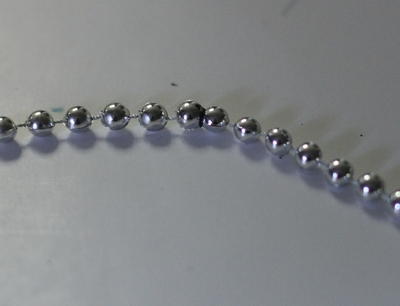
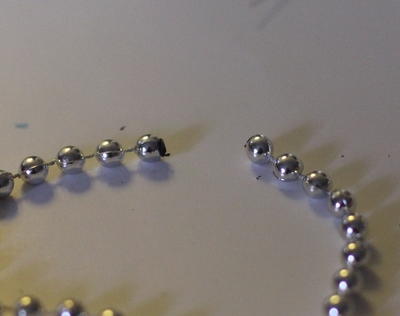
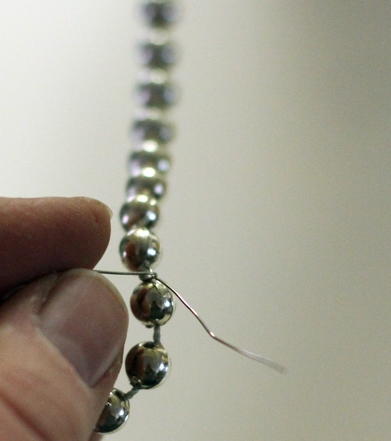
Beads: Find the spot where the two beads are fused together and break them apart. You can just pop them apart with your fingers.
-
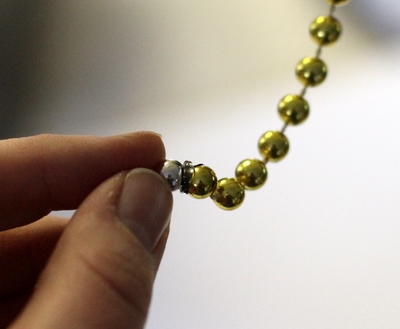
Attaching the bead necklaces together: As you wire your chandelier, you will hot glue one end of the necklace to the end of the next necklace. I recommend doing this as you go to keep everything nice and neat (and untangled). Remember to be careful when handling the hot glue!
-
Wiring the bottom of the chandelier: Take your first necklace, and a piece of wire. Wrap the wire securely around the thread between the first two beads and twist around once or twice to make sure the wire won't come apart from the necklace. Then wire the necklace to the top of the wire basket form. Wrap the wire around the basket securely, and twist at least twice to make sure it's secure. Leave the end of the wire long for now.
-
Hold the necklace up to the bottom of the basket to see where you'll need to add the next wire. At that spot on the necklace, add the wire as shown, and wire to the lower frame of the wire basket.
-
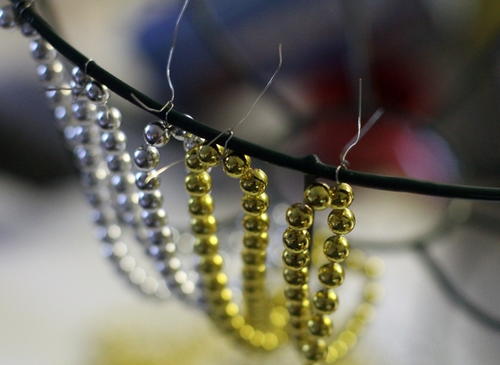
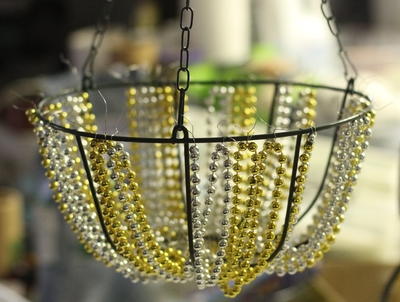
Continue until you reach the end of the necklace, and hot glue the next necklace to the end and continue. Continue this process until the bottom of the basket is filled with beading. I wired about four sections of beads to each segment of the wire basket, and used two packages of beads to cover the whole wire basket.
-
At this point, you can trim the wires in the bottom hole of the basket. Make sure each one is twisted securely, then clip near the twisted area to make it look neater. Leave the tails on the top part of the basket - you will use them in the next section of the project.
-
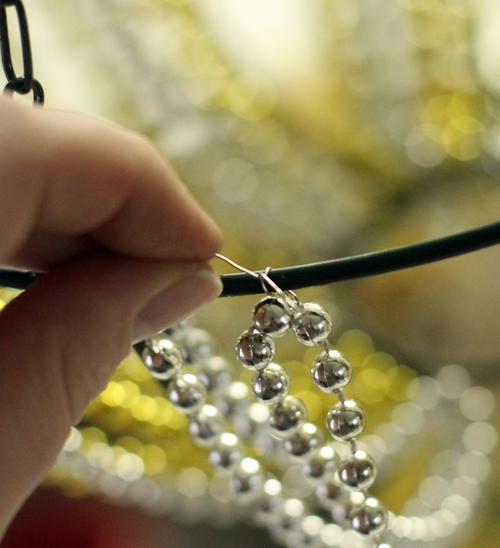
Wiring the top of the chandelier: Start with a new necklace (or hot glue a new necklace to any extra beading left at the end of the bottom section), and wire it to an existing wire. Pull it up to the top of the hanging basket, where the chains meet. Take a longer piece of wire (about 4 to 6" long), and wire the beads to the top link in one of the chains. Pull the bead back down to the basket and wire to an existing section of beading (using the tails that you left in the first part of the project).
Production notes: Again, it is easiest if your basket is hanging while you are assembling. It takes about twice as many necklaces to bead the top of the chandelier. -
Bring the beads back up to the top and wire to the long piece of wire. Continue wiring as instructed, attaching necklaces when needed. After about three or four segments of beads, I brought the wire tail back to the top link to secure the beads to the top.
-
Once you're done wiring the whole thing, you can take it outside and touch up the spray paint in any area that got rubbed off. (I ran out of spray paint before the whole thing was as white as I wanted it to be, but I was too impatient to hold this tutorial any longer, so I went ahead and photographed!)
-
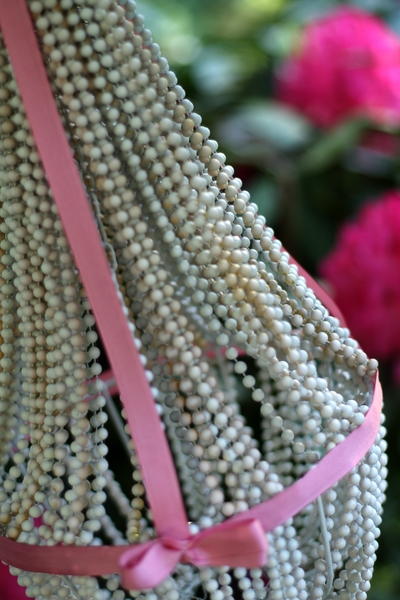
Add additional embellishments like ribbon, butterflies, bows, etc., according to your own taste and decor.
-
Note: You can also turn the basket upside-down to use as the base for a chandelier, but if you decide to bead it the same way, you'll need to add a couple of long wires at key points across the basket to keep the beading laying the right way.
-
Lighting Note: I didn't add any lighting to this chandelier. I think it looks pretty cool as-is, but if I added any light, it would be with either twinkle lights inside, or a pendant light kit from a home improvement store ($10 for the kit). I'd use a halogen compact fluorescent bulb because it's low-heat.


What more like this?
Read NextDollar Store DIY Beaded Chandelier
Your Recently Viewed Projects
Thanks for your comment. Don't forget to share!
paver2
Dec 07, 2018
Oh, no! I just threw away a bunch of beads that came from a broken lampshade that would have been perfect for this. It's really pretty!
Weberme
Sep 16, 2018
I can see this chandelier hanging in my granddaughters room one on each side of her bed with a light fixture or fake lighted candles. I cannot believe this is made from dollar store Mardi Gras beads. Imagine the look on her face when you givethis to her. All her friends will wonder where she got them.
Marilyn B
Mar 02, 2017
WOW, I can't believe that this was made from dollar store items! Could you imagine presenting this to a bride for a shower gift, then telling her you MADE it? I could see adding some satin ribbon streamers flowing from it, and also in small bows here and there for a little girls room, with pink and white little led lights inside! Or how about hanging from a tree or trellis for an outside touch of glam and glow! Love this creative and inspirational idea! Thanks for sharing!
Catsitt
Feb 08, 2017
The only way to describe this is jaw dropping beautiful! And it looks relatively simple as well and it's bits that are simple to source as well! I really want to run to the shops and get the bits for this! I recently got my first home with my partner and have the spare bedroom done shabby chic and I think this would be an amazing addition to this room!
M Altenberg
Aug 26, 2016
We love the look of chandeliers. This could be a fun thing to hang in my daughter's room. Look forward to trying this out.
EditorLP
Jan 11, 2016
This is such a cool idea, I can't wait to make one and hang it above my desk at home for a little extra glam.
KickChick
Jul 08, 2015
I'm so going to make this at Christmas time, but buy the stuff now because it's all on sale....well, I might start early )
somewhereintimelin ens 2173156
May 15, 2015
Wowsa!! just Lovely..will share on My Social Media!!
hamp23 4996057
Jul 15, 2013
I did this but used some beads from Xmas tree decorations. Lots longer, so not as much glueing.
rmdenis53
Jun 19, 2013
Awesome, but if you add some mini lights inside it wouldaddso much more bling
verokim
May 01, 2013
I love chandeliers and this one is super cute! I love it, i will make it and set it in my patio...thank you!
sngsmilesalot
Dec 11, 2012
Very cool project. I've made two: one for my breakfast nook and one over my large soaking tub in the master bath.
rutabaga
Jun 16, 2012
Ingenious and would look great indoors or out. Though I may not be making one (it may be a bit 'young' for me), I admire Heather's imagination and creativity. Very clever!
s46
Mar 31, 2012
This is beautiful. I'm going to make some for my courtyard. Thanks for the affordable idea & directions.
ssandy 54880
Mar 17, 2012
Loved this project so much that I made one and hung it in my office at work! I didn't spray paint the beads since the colors matched my office decor.
hunter10240
Feb 23, 2012
Love this. great for outdoors on the lanai with candles or the twinkle lights. Also hung from one of the shepherds hook plant holders would be great at night close to a pool even if have to put in container to hold.
vikyharry 9877362
Feb 23, 2012
What a cool idea! I'm doin' this one this weekend. Maybe I'll do two! Thank you!
Reefbubbles
Feb 23, 2012
How beautiful, I am so gonna make this for a future photo shoot and then maybe recycle it by using at a party/shower! Great job!
rosegirl77 2079139
Feb 23, 2012
The chandelier is cute and you could do so many variations depending on the beads you use. You'd have to make sure it was done well and all the strands were even. The petal skirt - not so much. I think attaching flower petals to a t-shirt and making a skirt out of it would look pretty tacky. Maybe for a very young child's costume for something.
craftygrandma56
Feb 23, 2012
Love the idea of the chandelier to hang up in my new craft room. Will try it out for sure.
bjhlmrt 0921929
Feb 23, 2012
I ADORE chandeliers and would love to try my hand out at making some diy ones! This one looks like a nice one to try out first! Louella
jillie1
Feb 22, 2012
I choose the chandelier as it can be used so many places and not only is attractive, but can be modified with a light. The skirt is great but not everyone can use that style or is young enough to wear it!
LC
Feb 05, 2012
I too Love this idea... I think with my old Christmas garland, spray paint and a string of Christmas Lights it will be Awesome. I love the idea of using the wire basket frame... A truly Great Crafty Idea... TY
sugarbee418 226609 0
Sep 14, 2011
Why can't you give us an option to e-mail these ideas, for people who have cranky printers? It seems you have every option in the world but e-mail.
suzybelle
Jun 16, 2011
Love this...so cute. What a great idea!! If only I had room to hang one, but as I live in an RV. I will have to make one for a gift!!! Thanks for sharing this unique and charming idea!! Good job.
lorrimorin 2247644
Jun 16, 2011
I got lost on #11 - not really sure how much different it could be from the bottom. Just longer strands. ?
Dyneau 3131
Jun 16, 2011
This is a fabulous idea, now I know what to do with all those Mardi Gras beads and the hanging flower frames I have, YEA!
judyann999
Jun 16, 2011
Just a suggestion...if using hot glue, use the high temp kind...I had the low temp glue fall off from the combined heat of the bulb and the sun! Love this project! I found a lot of the lamp parts and the basket in the free box at a garage sale!
Beejoy50
Jun 07, 2011
I love this! It can be used anywhere. Even for holidays! My daughter makes jewelry with beads like these and this will be a venue she has not experimented with yet.
simonsr 6582289
May 29, 2011
This is so pretty......please tell me how many feet of beads you used as I have some beaded Christmas garland that might work also???? Thanks
teddeegrace 726681 0
May 01, 2011
This looks beautiful, but you lost me at Step 7. I can't determine, either from the written instructions or the photos what you're wiring to what. Teddee
Report Inappropriate Comment
Are you sure you would like to report this comment? It will be flagged for our moderators to take action.
Thank you for taking the time to improve the content on our site.