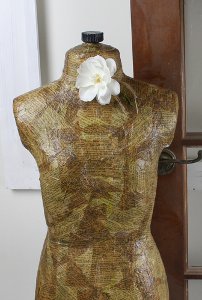
DIY Decoupage Mannequin
Create this DIY Decoupage Mannequin to add a vintage touch to any corner of your house. Take an old sewing mannequin and transform it into a vintage accent piece for your home. Choose tissue paper that matches the rest of your home decor and you're all set. This is a fun piece of DIY home decor that will give that vintage flare you're looking for. This easy craft will help you master the decoupage method which you'll be able to use again and again.

Materials:
- Mannequin (or any other hard surface of your choice – this mannequin started out as a plain grey velour fabric)
- Print tissue paper
- White tissue paper
- Duct Tape
- Aleene’s Decoupage – matte finish
- Sponge brush
Instructions:
-
Apply duct tape over any openings in mannequin.
-
Tear white tissue and brown printed tissue into large pieces (approximately 4″ x 4″.)
-
Working one area at a time, brush decoupage medium onto surface of mannequin slightly larger than torn pieces. Lay white tissue into glue and immediately brush over tissue with glue. Be sure to keep your brush very moist with decoupage medium! Apply several layers of white tissue paper. Let dry. (If desired, use fan to speed up the drying process.)
- Repeat gluing process with brown printed tissue. Let dry.
Read NextUpcycled Flea Market Glass Vases