Vintage Money Box
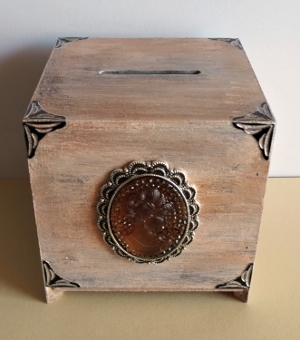
Whether you're saving for a wedding, a trip, or just looking for a place to store your coins, this Vintage Money Box is the perfect way to store your stash. Decorative and simple, this antique-looking money box would make a wonderful gift for a family member or friend. If you love vintage decor, the box will fit right in, and your guests will wonder if grandmas pennies might still be hiding somewhere in the box. Perfect for passing down through the generations, this Vintage Money Box is an artistic and classy way to keep your cash and coins in one place.
Primary TechniquePainting

Materials:
- Wooden money box, available from a craft shop
- 1.4” long bronze colored resin cameo with a matching alloy base setting
- 14 black-and-silver scrapbook photo corner stickers
- Acrylic paint in the following two colors: antique bronze and white
- Dala bronze antique rub
- Kiwi black wax shoe polish
- Heritage Gloss Craft Varnish
- Hot glue gun and glue sticks
- 10/32” paint brush
- Old soft cloth
- Old newspaper to protect the working area
Instructions:
- Remove the bottom lid before painting. Use a dry brush and give the money box an uneven wash with the antique bronze acrylic paint. Paint the whole outside of the box, but do not paint the inside of the box. Also paint both sides of the removable lid. Allow to dry thoroughly.

- Clean the brush on a piece of newspaper.
- Again using a dry brush, give the money box an uneven wash with the white acrylic paint. Do the same with the removable lid and allow to dry thoroughly.
- Use a soft cloth to apply an uneven wash with the antique rub to the box and lid. Allow to dry thoroughly.

- Use the same cloth again and apply shoe polish to certain parts of the box and lid. Focus on the areas where one would expect the box to have a more aged look, such as the corners and areas that would be prone to handling. Allow to dry thoroughly.

- Use the paintbrush to add a layer of varnish to the box and lid. Allow to dry thoroughly.
- Add the scrapbook photo corners all around the top four corners, and add the last two corners to the bottom corners of the front panel.
- Add a second layer of varnish, also painting over the scrapbook photo corners. The varnish will protect the photo corners.
- Hot glue the resin cameo to the alloy base setting. Allow to dry and then hot glue the cameo to the front panel of the money box.

Read NextVintage Plate DIY Cake Stand