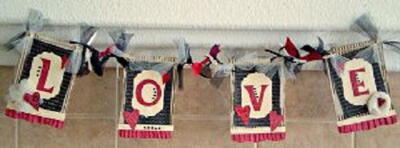
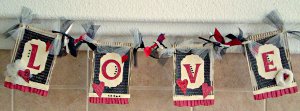
Lovely Valentine's Day Banner
Valentine's Day decorations, like this Lovely Valentine's Day Banner, are great for all your home decor needs! This is also a great way to work through those paper scraps you've been saving! This colorful banner is easy to make and is just as easy to use for an anniversary or birthday. You'll just LOVE this festive paper banner!
Materials:
- Some recycled corrugated cardboard (try the box your project supplies arrive in!)
- Core’dinations Jenni Bowlin Red and Black Collection
- Nestabilities Labels 14, largest die
- Any Cricut font cartridge
- Sweethearts Cricut cartridge
- White pigment ink pad
- Perfect Pearls, Pearl color
- Distress ink pad
- Ink applicator w/foam pad
- Aleene’s Paper Glaze
- Hot Fix Rhinestones, Black
- Black 6″ tulle
- Ivory 6″ tulle
- Black 5/8″ poly ribbon
- Black 5/8″ organza ribbon
- Ivory 1/4″ double-sided poly satin ribbon
- Red 7/8″ grosgrain ribbon
- Twine
- Fabri-Tac adhesive
- Small spray bottle
- Water
- Sanding block
Instructions:
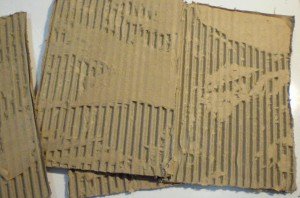
- First, you need to prepare your corrugated cardboard backing pieces. Cut 4 pieces of cardboard, about 5″ x 7″. Then, peel the front off one side, revealing most of the corrugation inside. Take the white ink pad, and rub it directly over the corrugated cardboard, so that the bumps of the corrugations are highlighted with the white ink. Set the cardboard pieces aside to dry.
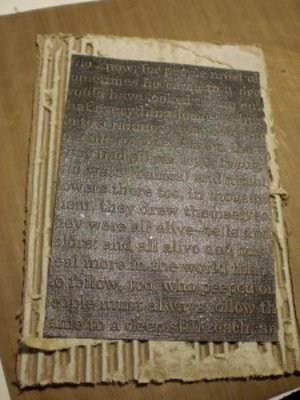
- Next, take a sheet of black text paper from the Core’dinations paper pad, and lightly sand the surface of it using a sanding block, revealing the contrasting color beneath the black. Cut four pieces of paper, 4″ x 6″, and adhere one to each piece of cardboard using Fabri-tac (I like using this glue due to its great grab and ability to use with wet applications). Next, place your pieces in a protective spray box, and spritz each piece with a homemade Perfect Pearl spray.
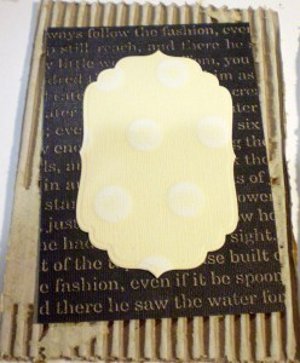
- Now you will cut take a sheet of the ivory-colored large dotted paper from the Core’dinations paper pad, and sand the dots, revealing the lighter color. Then, you will use the largest die from the Nestabilities Labels 4 set to die cut a label shape for each of the four banner pieces. Glue them onto the foundation pieces.
- Using the Cricut font cartridge of your choice, cut the letters to spell “LOVE,” at about 3″ size (depending on their width, you may need to adjust, to fit on the label), out of a sheet of the damask Core’dinations paper in red, sanding it before cutting. Use Distress Ink and an ink blending tool with foam pad to add ink around the edges of the letters, and then glue the letters to the labels.
- Using the Sweethearts cartridge, cut several hearts in 1.25″ and 2″ sizes, also from the red damask paper. These will be used for embellishing.
- Cut four 1.75″ x 12″ strips of the red damask Core’dinations paper and lightly sand them. Take a strip of the paper, and lightly spritz both sides of the paper with water to make it more pliable. Begin folding the paper to make pleats in it. Put a strip of Fabri-tac adhesive down across the very bottom of one of the banner pieces, and lay the pleated red cardstock across it, pushing down and holding for a short time until the glue grabs and holds the pleats in place. Lay another bead of Fabri-tac down on top of the pleated cardstock, at the very top of the pleats, and cover it with a 1/2″ wide strip of the ivory dotted Core’dinations paper. Trim both the red and ivory cardstocks even at the sides of the banner piece, and then use scissors to cut a slight wave pattern in the pleated cardstock at the bottom. Repeat for all of the banner pieces.
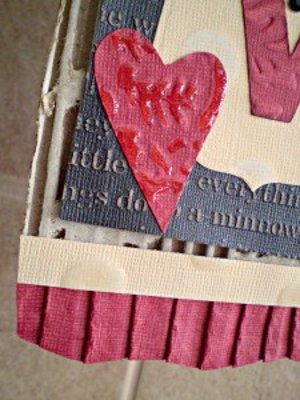
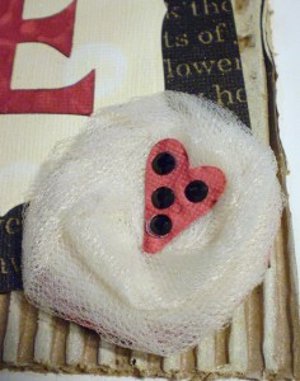
- Begin embellishing the banner pieces with the red hearts, hot-fix rhinestones, and handmade tulle flowers as desired. Use Aleene’s Paper Glaze to add a glossy, dimensional accent to areas of cardstock or entire pieces of cardstock. I used it on embossed (raised) areas of some hearts, or on entire hearts, and on the dots of the strips at the bottoms of the banner pieces.
- You can get creative with Fabri-tac and tulle in making flowers. In the above flower, I covered a piece of cardstock with adhesive, then took a length of tulle and began twisting it and laying it down on the glue, going round and round until I covered the cardstock. Below, I also covered a piece of cardstock in adhesive, but rather than twist the tulle, I simply gathered some between my fingers and pushed it down into the adhesive, then repeated over and over until I had a nice, floofy flower and the cardstock was covered.
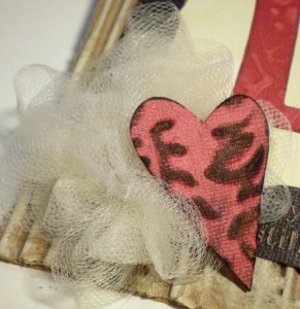
- You can see above that I rubbed a distress ink pad directly over my heart, so the ink hit only the raised, embossed areas. I also inked the edges of the heart.
- Continue to embellish the banner pieces as desired until you are satisfied. Once completed, punch holes in the top corners of each piece, and thread twine through the holes of each piece, leaving about 3-4 inches between each banner piece and about 18 inches at each end for hanging. Cut pieces of tulle and ribbon approximately 5 inches long and tie them around the twine all along the twine, as few or as many as desired, until you reach the look you desire.
Read NextPink and Red Crochet Hearts Pattern