Oly-Fun Owl Craft Idea
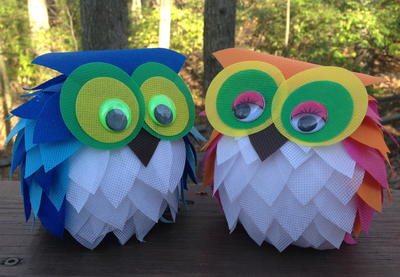
Owl craft ideas never looked cuter than this Oly-fun creation!

Combine the fun and simplicity of using Oly-fun crafts sheets and styrofoam balls and learn how to make owl craft ideas that are as precious as they are easy. The Oly-Fin Own Craft Ideas shows you how to construct a cutie patootie owl out of several craft supplies and just a little bit of time. It would be wise to make one of these unexpected ideas to display in your house. Your guests will have a hoot learning how you made this feathered friend. If you are considering making these owl crafts with kids, make sure it is a supervised endeavor as this craft requires a hot glue gun.
Materials List
- Foam ball – 4 inch
- Oly-fun™ craft sheets – assorted colors
- Two Wiggle eyes – ¾ inch
- Marker or pencil
- Low temp glue gun & glue sticks
- Scissors
Make Oly the Oly-fun Owl
Instructions
Print and then cut out the pattern provided. Use the marker or pencil and trace around the teardrop pattern directly onto an oly-fun™ sheet. Trace an entire row across the width of the oly-fun™ sheet.
-
Layer three pieces of oly-fun™ together and cut out the row of traced designs, cutting out three layers at once. Repeat until you have cut out approximately 30 white and 36 each of two additional colors.
-
Cover the bottom of the foam ball, adding glue to the top and bottom point of each of the teardrop shapes. Refer to the diagrams provided.
-
Glue the first row using 5 white teardrops and then working around the circumference of the ball alternating the two colors without forming a definite pattern. Add glue to the top rounded edge of the teardrop shape only, leaving the points hanging freely.
-
The second row will overlap the first with the points of the teardrops offset from the first row.
-
Continue in the manner until the entire surface of the ball is covered.
-
Cut two 2 inch and two 1 ½ inch circles from oly-fun™ in the color of your choice. Glue the smaller circle on top of the larger circle slightly offset. Glue the wiggle eye on top of the smaller circle. Repeat to create the second eye.
-
Set the two eyes slightly overlapping on top of the teardrop shape cut for the beak and glue all layers together. Note: It is best to place glue behind the eye and/or under multiple layers of oly-fun™ so that the glue does not show through the oly-fun™
-
Cut a 3 inch square of oly-fun™ in the color of your choice (head topper) and glue the point behind the eyes and beak.
-
Glue the eyes, beak and head topper, placing glue behind the eyes and back edge of the head topper only.
Your Recently Viewed Projects
Thanks for your comment. Don't forget to share!
Ask93 7929298
Jun 12, 2016
OMG! These owls are so cute. I love working with Oly Fun fabrics too so this is a definite must do the project for me. Just one little problem I noticed. Where is the actual pattern? It would also be helpful to have some step by step pictures so I could get a better idea of how to assemble all the pieces.
rgkbailey 4360573
Feb 12, 2016
Where is the pattern for the owls?
Kaylee
Feb 15, 2016
The printable pattern for the owl parts is located in our free eBook located here: http://www.favecrafts.com/Decorating-Ideas/13-DIY-Home-Decor-Ideas-Paper-Crafts-and-More-2016-CHA-Sponsor-free-eBook Happy crafting! -Kaylee, Editor of FaveCrafts
Report Inappropriate Comment
Are you sure you would like to report this comment? It will be flagged for our moderators to take action.
Thank you for taking the time to improve the content on our site.