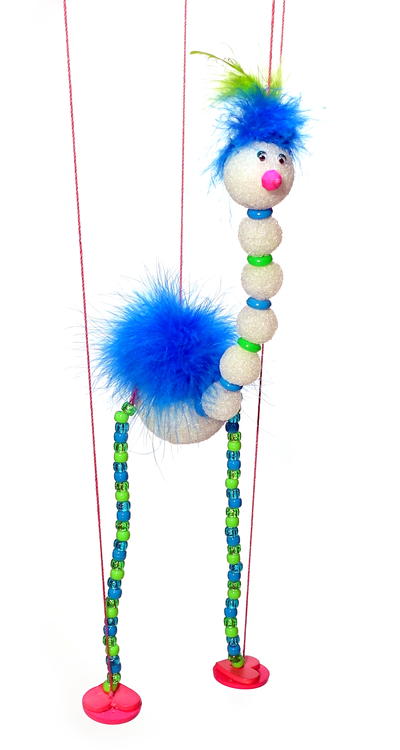
Loonie Bird Marionette
Make a marionette with this quirky, quick, and unique DIY craft project tutorial.

Learn how to make a brand new craft idea when you piece together this quirky and absurdly adorable Loonie Bird Marionette. Skip the usual DIY crafts and learn to make something truly unique and surprising with this DIY marionette. This crafting idea is a beginner craft idea and made primarily out of styrofoam balls, making this bonkers bird a light decoration to hang at your next party or in your kids’ room. You will most definitely have something to tweet about when you make this tall, wobbly new best friend.
Materials List
- FloraCraft® Make It: Fun® Foam: Balls: 2.5”, 1.5”, and (5) 1”
- Small Feathers
- Mini Craft Feather Boa
- (60) Pony Beads
- (6) 14MM Ring Beads
- 12MM Round Bead (nose)
- Round Head Pin (to match round bead)
- Buttons: (2) 1.5”, (2) 1.25”, and (4) ¾”
- 5MM Wiggle Eyes
- Embroidery Thread or String
- (2) Chenille Stems
- Thin Wood Dowels: 14” and 8”
- Low-Temp Glue Gun
- Scissors
- Large Sewing Needle
- Clothespins
How to Make a Marionette
Instructions
-
To make the legs, cut two 12” lengths of string. Thread 30 pony beads onto each string. Thread one end of each string through a ¾” button a couple of times to hold the string in place. The button should be touching the bead. Clip a clothespin to the opposite end of the string to hold the beads from slipping off while you work. Cut a 1.5” length of chenille stem. Wrap the loose end of string at the top of the button around the center of the chenille stem and fold the stem in half to pinch the string to secure. The chenille stem should be snug against the button. Twist the ends of the stem together to hold in place.
-
To make the feet, cut two 24” lengths of string. Tie one end of each string through the center of a 1.25” button. This will be the string that controls his foot. Unclip the clothespin from one of the legs. Thread the string through the center of the 1.25” button that you have the 24” length of string tied to, then thread a 1.5” button onto the end of the string for the bottom of the foot. Thread the string through the bottom button a couple of times. Add a drop of glue between the buttons and pull the string snug so the buttons are touching the bottom of the leg. Cut off any extra string and glue the end to the bottom of the button to secure in place. Repeat for the other foot. Glue a ¾” button to the bottom of each foot to help secure the strings in place.
-
Glue the legs to the sides of the 2.5” ball. Add glue to the ends of the chenille stems and insert them into each side of the body. Glue to secure the buttons to the body.
-
Thread an 8” piece of string onto the needle. Thread the needle through a ring bead and then through a 1” foam ball. Continue alternating bead and ball onto the string to create the neck. You should have a ring bead at each end of the neck. Cut two pieces of 1.5” chenille stem and secure each end of the string to the center of a chenille stem. Fold the stems in half and twist the ends to secure. Add glue to the chenille stem at one end of the neck and insert into the front center of the 2.5” body. Add glue to the chenille stem at the other end and glue it into the 1.5” ball for the head.
-
Assemble the handle by making a cross with the two dowels. The 8” piece should cross at about 6” back from one end of the 14” piece. Use a chenille stem to wrap around the dowels where they intersect to secure in place.
-
Cut two 15” lengths of string. Tie one end of each string to the center of a 1.5” piece of chenille stem. Glue one stem into the top of the head and one into the top of the body. Tie the body support string to the handle where the two dowels intersect. Tie the head support string to the 6” end of the other dowel. Tie the leg support strings to each end of the 8” dowel.
-
Glue a small piece of feather boa to the back of the bird. Glue a tiny piece of boa to the top of the head. Glue an additional small feather to the top of the head.
-
Thread the small round bead onto the round head pin and glue to the face for the beak. Glue the two wiggle eyes just above the beak.