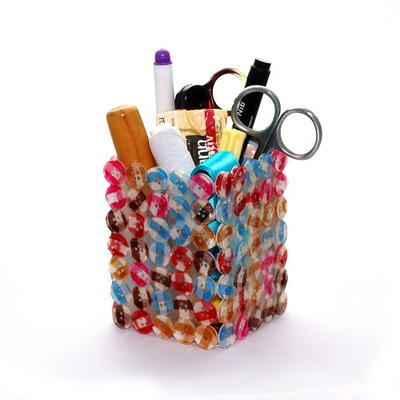
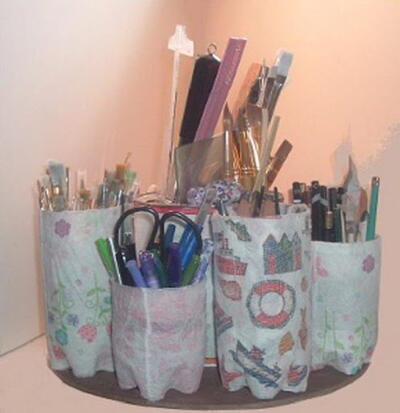
Recycled Water Bottle Supply Organizer

The Recycled Water Bottle Supply Organizer is a great way to do your part to save the earth by crafting with items you may already have at home. This DIY organizer is a unique way to organize all of the supplies in your craft room. If you keep losing pens or other office supplies, this one's for you. Recycled plastic bottle crafts are a fun way to reuse materials you already have and try new kind of projects at the same time. Often, water bottle crafts are appropriate for all ages, so gather up the kids and have them help you finish this project (they can choose the directions for your new lazy susan). Who knows, you might actually want to sit down and get work done when you have your desk all neat and organized.
Time to CompleteIn an evening
MaterialsPlastic, Recycled Materials

Materials List
- Plastic lazy susan – mine was 10” at the diameter
- 13-1/2” disc cut from luan wood
- Large coffee can
- 9 – One liter plastic bottles (I used seltzer bottles)
- 10-3/4” sheet metal screws
- 20-3/4” nuts
- 20-3/4” washers
- Permanent marker
- Ruler
- White craft glue (I used Elmers Glue All, but Tacky Glue would be good as well)
- ½” Flat paint brush
- Glue stick
- Printed tissue paper – I used several patterns that I liked – or scrap booking paper
- Cheese Cloth
- Acrylic fabric paint (I used burnt umber)
- X-acto knife with sharp blade
- Sharp scissors
- Electric Drill
- Screwdriver
Recycled Plastic Bottle Idea: Supply Organizer
Instructions
-
Remove the labels from coffee can and bottles.
-
Wash the can and bottles and allow to dry.
-
Mix some of the paint with enough water to make it the consistency of stain, about 2 parts paint to 3 parts water, and brush onto the best side of the luan wood and allow to dry. Two coats will be good. I used paint to stain the wood only because I don’t like the smell of stain.
-
Decide how tall you would like your bottles to be. I used several heights (6-1/2”, 5”, 4-1/2” and 2-1/2”) that worked well for storing paint brushes, pencils, pens and even a very short one for erasers, rubber bands, etc.
-
Set the bottles on a flat surface and, using a ruler, mark the height that you want each bottle to be. I made several marks, with a permanent marker, around each bottle and ‘connected the dots’ for easy cutting. No alterations will be made to the coffee can.
-
Use the X-acto knife to pierce the bottle and to make a slit above the line you drew, that you can use to start cutting with your scissors.
-
Cut along the line you drew to remove the top of the bottle and throw away the excess plastic.
-
Measure your chosen paper from the very bottom of the bottle to ½” above the cut edge. The extra half inch will be folded over and glued to the inside for a nice finished look. Add an extra ¼” or so to the width so the paper will overlap.
-
When you’ve cut your bottles to the desired size, and measured your paper to fit, coat them, one at a time, with a thick layer of white glue. I used Elmers, but I think Tacky Glue would be as good. Do the same with the coffee can.
-
Lay the paper that you’ve cut face down on a flat surface and position the bottle’s bottom edge at the edge of the paper and roll until the paper completely covers the bottles and can. Add a stripe of glue to the edge and press the extra ¼” of the width down to make a neat seam. Do the same with the coffee can.
-
Press the bottom of the paper into the little indentations around the bottom of the bottle.
-
When all of the bottles and the can are covered, allow them to dry completely.
-
When the bottles and the can are all dry, cut pieces of cheese cloth to fit each bottle, adding ½” to the top and bottom of the height. So the cheese cloth will be 1” longer than the paper that you cut.
-
Again coat the bottles with glue. You don’t need a very heavy coat this time, because cheese cloth won’t absorb the glue. Fold the bottom of the cheese cloth ½” (you may want to use a glue stick to keep the ½” fold in place) and, again, roll the bottle onto the cheese cloth and press in on the indentations at the bottom of each bottle. Glue the inside of the bottle ½” from the top and fold the top ½” of cheese cloth inside the bottle.
-
Cut cheese cloth 1” longer than the area between the top and bottom edges and about ¼” wider than needed for overlap. You won’t have to fold the top ½” over the top edge, but you will want to fold both the top and bottom edges of the cheese cloth to make a neat edge.
-
Allow the bottles and the can to dry completely. Find and mark the exact center of the lazy susan, the coffee can and the wooden disc. Drill through all 3 pieces at the center mark you made on each. Using a ¾” metal screw, and a washer, attach the 3 pieces, turn the project over and using a nut, tighten it down. Make sure the lazy susan still spins freely.
-
Position your bottles close to the outer edge of the wooden disc. Drill a hole through each bottle and another hole through the wooden disc where each bottle will be placed. Put a washer on each screw and insert it through the hole in the bottle and the hole in the disc. Turn the project over and with another washer and a nut, tighten each bottle.
-
When all of the bottles are attached, your supply spinner is ready to use.
Up Next:
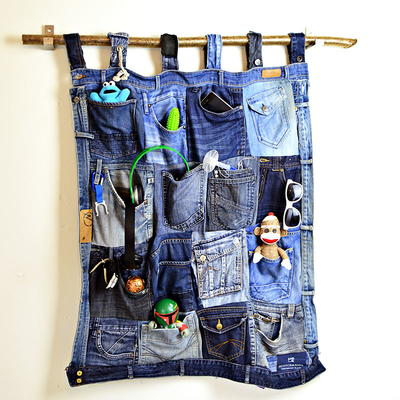
Read NextDenim Pockets DIY Organizer
Your Recently Viewed Projects
Thanks for your comment. Don't forget to share!
mulberrygalprinces s
May 27, 2018
This is a great DIY project. I was gathering up my materials when the idea of what to use it for came to me. I am a crochet nut. So my crochet hooks can go in some of the bottles. I can even write the sizes on the bottles. Plus pins, picks, etc.
elocin1104 2800379
May 27, 2018
I love this upcycled project! It is the perfect thing to get done on this long weekend! There are so many options to choose from for how you want your bottles to look. I first thought of my son and all his pencils and other writing utensils that he has lying around. He would love this, but Im not sure he would keep the items in there!
1grandmacows 96646 58
Jan 05, 2018
Made a table supplies caddy this way. I did add acrylic sealer bas well as drain holes in each bottle so moisture can drain
Marilyn B
Jan 23, 2017
The cheesecloth does give it a nice texture! I could see using fabric to cover these also, and perhaps even a decoupage type product would work well with these. They really look nice and could even be further embellished depending on how busy your pattern is to begin with. Good practical,project!
achumley0003 31706 34
Nov 25, 2016
I love to upcycle things so nuch that i have a cabinet full of glass and plastic containers that I can't stand to part with. This is a simple idea for storage and it would also be great organizer for my daughter's desk. It could help prevent a lot of lost pens and pencils. Thank you for the idea.
Weberme
Apr 01, 2016
I am trying to organize my sewing center and have been searching for something to put my threads in. I put them in sewing table drawer neatly arranged but I cannot see the colors. I have to pick them all up until I get the right one. So I just picked them up and dropped them in because I got so fustrated. I always have plastic bottles and cans handy. What a great idea to cover them and use them. Does anyone know something recycled I could use for my threads so I can see the colors? I do not have a lot of space right now for my area. I will use the bottles for supplies and for grand kids art supplies. Thanks
kajtlh 1573436
Jan 29, 2015
Could someone tell me what the cheesecloth is for?
FaveCrafts Editor JL
Jan 29, 2015
Here is a past comment from the designer -- "Hi Kraftfun, There is no real reason for the cheesecloth. I just liked the texture it gave the bottles. It's a nice look." Hope that helps! - Julia from FaveCrafts
nwfldeaconswife 35 25472
Sep 04, 2012
I hot-glued a plastic coffee can in the middle, and then the water bottle bottoms around it, so there were no holes to let water out, and let my daughter use it for her water-color paints. The can in the middle can be used for clean water between colors, and the bottle bottoms keep the paint from splashing and spotting stuff while the brushes are dipped and swished in them.
cullyann
Oct 19, 2011
Hi Kraftfun, There is no real reason for the cheesecloth. I just liked the texture it gave the bottles. It's a nice look. Thanks, Colleen
balee2010 7367063
Jul 08, 2011
I've been re-purposing soda bottles of all sizes, as well as Folder's coffee containers, for years! I've also re-purposed the gallon size containers that Kraft Mayo & Miracle Whip came in a few years back, into an adorable Canister Set! The smaller quart of so sized Mayo containers the ones that are sort of oval-ish shaped? I use those for organising my "JUNK" bin, as well as using them for my previously mountain sized pile of plastic canvas odds, and embroidery thread, as well as they make lovely containers for all those odd screws & nails, that some of us just can't part with! Oh, and another great use for 2 liter or larger Soda Bottles is to add embellishments, and make then into Piggy Banks for the young'ens too! All you need is IMAGINATION!!
susiecrafts 806767 5
Jun 09, 2011
I am really enjoying my recycle lazy Susan organizers. I added family photos I ran off, then put then around my containers on the lazy Susan. So as I turn it around I can enjoy the photos as I find what I need. Thank you for such a good and useful idea. Susie
Member 15424
Jun 09, 2011
This is way cute, I t would be just perfect for a childs desk, or a home office.
suttlerachelga 107 5467
Jun 09, 2011
I absolutely love this project, i am saving wallpaper scraps and bottles to make my own!
baby girl
Jun 03, 2011
You need to use bolts washers & nuts, not screws. I think it is a very good idea and will start saving bottles, and ask my neighbor for a coffee can.
Bev
Jun 02, 2011
Thank you for a great idea. Not only can I recycle but it is cute and very useful. I am saving my bottles up now and getting other needed supplies in the meantime. This will be the perfect addition to my craft table. At last I will have the right spot for all those craft items.
Member 15166
May 30, 2011
I really like this idea.I am seeing really cute and useful gifts for my famikly and friends. Thanks for another great idea.
Report Inappropriate Comment
Are you sure you would like to report this comment? It will be flagged for our moderators to take action.
Thank you for taking the time to improve the content on our site.