Pottery Barn Wall Organizer

This Pottery Barn Wall Organizer is an easy and fun way to get the look you love for less. A hanging wall organizer like this is great for a kitchen or entryway. You can use it to organize mail, notes, or just have it on display for all to admire!
Estimated Cost$11-$20
Time to CompleteIn an evening

Project TypeMake a Project
Materials List
- Old bulletin board
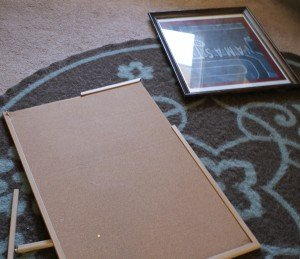
- Picture frame (mine is 18×24 inch)
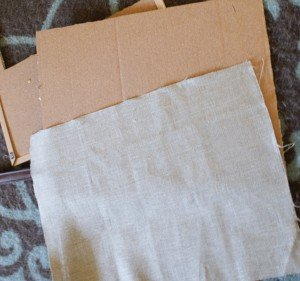
- Burlap cut to fit frame and enough to make pouch
- Super 77 or other mounting adhesive
- Empty carton (Starbucks Via box works well)
- Dowel rods
- Drill
- Chrome or other metallic spray paint
- Stencils (I cut mine with Cricut)
- Black Paint marker or permanent marker like Sharpie
- Rubber stamp with handwriting (optional)
Cork and Chalkboard Message Board
Bonus! If you love this project, you'll love our Cork and Chalkboard Message Board! This beautiful project features a chalkboard base where you can easily write messages and rewrite later. It's a super easy project to make with a related video tutorial! If you're a visual learner, consider checking out this craft.
Pottery Barn Wall Organizer
DIY Wall Organizer Instructions
-
Cut bulletin board to fit frame. I outlined the glass that was in the frame to use as a guide to cut the bulletin board to fit. I cut on the inside of the outline, taking into consideration the thickness of the burlap that I would be folding over the edges of the bulletin board later.
-
Cut burlap to fit with 1/2 inch overlap on all sides.
-
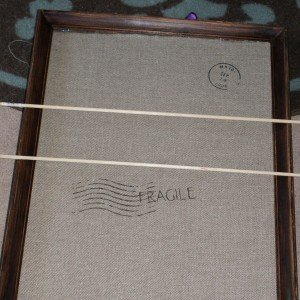
Spray Super 77 onto cork side of bulletin board, covering it completely, and immediately place the burlap on top, smoothing it down with your hand.
-
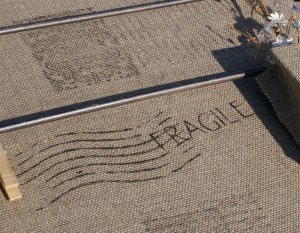
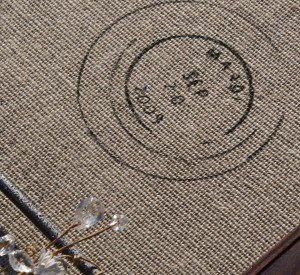
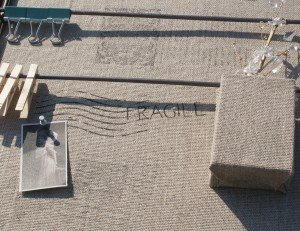
Now place your stencils on the burlap and stencil away. I used vinyl stencils I cut with Cricut, which I love because the vinyl stays in place, even on burlap. I used a paint marker to fill in the stencil openings. I also used a rubber stamp and black ink pad to add old handwriting for the vintage postcard feel.
-
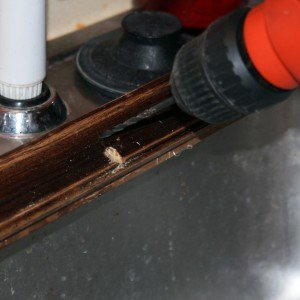
Drill small holed in frame for dowel rods to sit in as shown.
-
Cut your dowel rods to fit using a utility knife. Shave the ends to taper them like a pencil if need be to fit into the holes you drilled. Spray paint them your desired color. I used a chrome effect spray paint that I had on hand.
-
To make the pouch, spray your empty carton with Super 77 and adhere burlap you have cut to fit. For the loop to attach the pouch to the dowel rod, fold over a rectangle scrap of burlap and spray the touching edges, then spray and adhere it to the back of the pouch.
-
Grab some antique images, flowers, clothespins and dress up your new organizer.


Read NextRadiantly Colorful Lazy Susan
Your Recently Viewed Projects


Thanks for your comment. Don't forget to share!
The Designing Peng uin
Oct 06, 2016
Fantastic organizer - style as well as function- will be great in the studio, with the pouch holding shrink wrappers for CDs so I don't have to wander into the storage room for them. thank you.
MochaMolly
Jul 20, 2016
Anything with "organization" in the title calls my name, and this wall organizer would be perfect in my apartment!
mulberrygalprinces s
Jul 12, 2016
Very nice idea. It would certainly come in handy in my kitchen. I could put recipes, coupons, bills, all sorts of things . And it would look so pretty on the wall. Maybe include a small corner area done in chalk paint so you can have a space for writing a note. This has given me so many ideas. Thank you for sharing a great idea and instructions.
evwings
Apr 08, 2016
This will be perfect on the wall next to my desk to keep my writing supplies! Especially having envelopes at hand will be a huge boost for me. I use all kinds and sizes of envelopes and using this would keep them all in one place for me. I have never used a drill before and its high time I learn, so I may have to ask from some help from my Sweetie. How did you learn to use a drill? I wish the school had shop classes for girls when I was in Junior High.
quanahs 5032097
Mar 24, 2016
This would be perfect in my main family entry - the mud room. I think I will develop a pocket for outgoing mail that needs to be dropped, a pocket for papers that need to be returned to teachers and a place for my shopping lists. I will maybe add some hooks for keys and badges. This is great inspiration.
lpalmer59 7490208
Mar 20, 2016
I fell in love with this when I first saw this. I could use this for displaying my cards when I go to craft shows, in my home, or when I do Make It Parties. Just a picture frame, string some twine across it and with some little clothes pins I can pin my cards across the twine. Then the people attending my event can see what cards I have been doing during that month. Thank you for such wonderful ideas!
Kefra
Jan 28, 2013
This is fantastic! I need to find me a frame and some burlap and see what I can do! This would be perfect over my craft area so I could put instructions or pictures of what I am creating! I constantly lose notes concerning projects and those clothespins would be a solution to that...if I can keep the cat from stealing them, lol!! awesome project tho and I thank the people who put the idea here for me to find :) Molly
Report Inappropriate Comment
Are you sure you would like to report this comment? It will be flagged for our moderators to take action.
Thank you for taking the time to improve the content on our site.