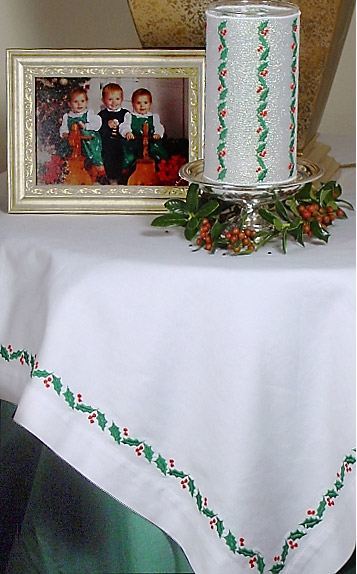
Embroidered Holly Tablecloth
Create special linens embroidered with a holly border with this free Christmas embroidery craft project. With a sewing/embroidery machine and holly design, you can create a set of Christmas linens in no time, perfect for holiday gift-giving.

Materials:
- Brother Innov-•s 4000D sewing/embroidery machine
- 12" x 7" embroidery hoop
- Built in border holly design (#88) or one modified in PE-Design 6
- Brother Aqua Melt Adhesive Backed (SA5906) water soluble stabilizer
- Purchased tablecloth
- Washable pen
- "W" foot
Instructions:
Preparation for Embroidery:
- Measure your tablecloth and decide where you wish the holly row to stitch. The center of the sample design is 2" from the tablecloth edge. Use the washable pen to mark a line all the way around your cloth.
- You can use the built-in design but the sample uses a version of Border design 88 enlarged in PE Design® 6, which also changes the density. See below.*
- Open the design in Embroidery Edit. Touch the Border key.
- Touch the Thread Mark key. That opens a dialog box where you can click the lower two corners and the lower center thread mark. These marks will sew arrows using the final thread in a design so you can line up subsequent sections. Click Edit End and then Sewing. Save design to Memory.
* If you have the Brother software, save design 88 to USB media and import into PE Design® 6. Highlight the design and select Edit/Numerical/Size and check the "Aspect" and "Keep density and fill pattern" boxes. Change size as desired. You can also hold down the Control key as you change the size with the corner handles to keep density and fill pattern. The design used on the sample was about 234 mm long. Save the single design to USB and transfer to your machine. Use legal size paper and you can print the whole design at once to check your spacing. Duplicate the design several times to make a print out to cut up for templates.
Embroidery:
- Hoop the Aqua Melt Adhesive Backed stabilizer. Tear away the protective paper in the center where you will first embroider. Use the plastic template to gauge where to position the first corner. Pin the top edge in place. Place hooped stabilizer/fabric in machine.
- If you want the bobbin to be the same color as the top, wind bobbins and set up to embroider with green.
- Use the Starting Point key (and then the top center point) so the design moves to the top. Use the arrows to move the needle to the top of the line you drew on the fabric. To line up the lower portion of the fabric use the Starting Point key Holly Bordercloth fragile. Don't forget to remove the protective paper as you move the design to the bottom (center). Adjust the fabric if needed so the needle is on the same line at the bottom as the top. Pin tablecloth to the stabilizer at the bottom and around the sides. Use the Trial key to test that the design will go where you plan and not hit pins.
- Embroider the design, which will include thread marks at the bottom of the design. Carefully cut the stabilizer close to the embroidery. Patch the Aqua Melt and move to a side if you used the center the last time. You may get a least three embroideries from one piece of stabilizer before it is too work.
- Select the top (center) Starting Point again and move the needle so it goes back in the point of the center thread mark you embroidered. Adjust your fabric as before and pin in place. Once you get the design started, you are using the Thread Marks, needle and the Starting Point icon/arrows to position the fabric. If your design is not too heavy, this is a fast and easy way to do border work.
- Embroider the design and repeat around the cloth.
- Rinse Aqua Melt from cloth and press. Trim loose bobbin threads.
- Add red beads and crystals as desired.
For other similar sewing ideas, check the FREE eBook, "The Sewn Christmas Gifts Guide" on our sister site, AllFreeSewing.com
Read NextWine Glass Slippers