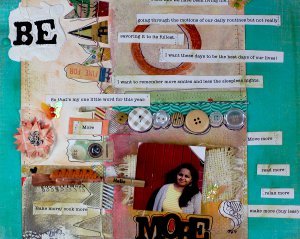
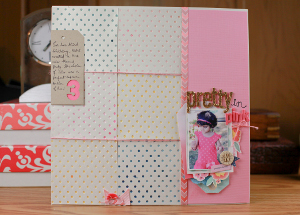
"Be More" Scrapbook Layout
The great thing about this "Be More" Scrapbook Layout is that you can use it for almost any reason or occasion. With several embellishments and crafting techniques used, this colorful and expressive layout is a creative and fun way to work through your craft stash.

Materials:
- Watercolor paper
- Patterned paper
- Gesso
- Brush
- Buttons
- Gelatos
- Tacky glue
- Twine
- Ink pad
- Acrylic paints
- Burlap
- Black Pen
- Doily
- Sewing machine
- Scrapbooking embellishments- brads, alphabet thickers, banners, wooden clip, acrylic butterflies
- LED SureCut™ Folding Rotary Paper Trimmer (12")
- Easy Action™Micro-Tip® Scissors (No. 5)
- Round ’n Round Squeeze Punch (Medium)
- Jenni Bowlin Quilt Star Squeeze Punch (Large)
Instructions:
-
First, trim some watercolor paper to measure 8.5 by 11 inches using the Fiskars SureCut Paper Trimmer. Watercolor paper is thicker than cardstock, and will not warp with all of the water and textures we are going add. I also gathered my supplies, including some gesso, acrylic paints, brushes, gelatos, a copper metal sheet, a doily and burlap. But don’t worry, you can use any supplies available to you!

-
Now chose where you would like to place your photo. I chose the bottom right hand corner. Adhere down a banner, paper strips and some tissue paper. Then add some color with bright red and black gelatos. Gelatos look like oil pastels, but are water-soluble. So after scribbling with the gelatos, I used a wet brush to smooth the color over the paper.

-
Now it’s time to bring in some texture. I used some gesso on a piece of burlap to add texture on the paper.

-
Next, to bring in more texture, I trimmed a thin strip of metal using the Fiskars Micro Tip Scissors No. 5 and adhered it using some tacky glue. I then placed a doily on the bottom left hand corner and used it as stencil to apply some gesso. I also added a row of buttons and adhered the burlap onto the layout to act as a frame for my photograph.

-
To paint a few random circles on the layout, I punched the circles first from regular printer paper and used that as a guide for my brush.

-
Now go ahead and add some embellishments to your layout. Adhere the photo down and add some doodles using a black pen. I also added some machine stitching onto the edge of the paper. Punch some quilt stars using the Fiskars squeeze punch and layer a couple of these quilt stars together. Staple them onto the layout above the tissue paper circle.

-
I chose to adhere this layout onto a 12 by 12 inch patterned paper. To add another dimension, I applied gesso in a thick layer and inserted my title alphabets into the gesso. This needs to dry for at least 12 hours at this stage. To finish my layout, I printed my journaling onto cardstock, trimmed it into thin strips using the Fiskars Micro Tip Scissors No. 5 and adhered onto the layout.

Read Next"Be More" Scrapbook Layout