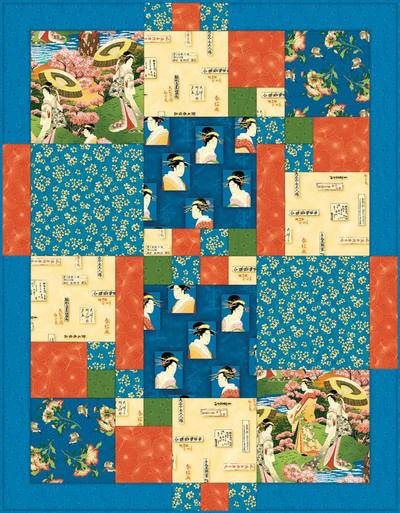
Family Love Quilt
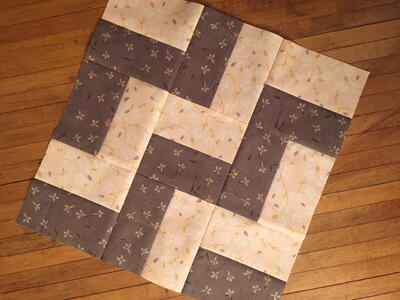
This quilt pattern uses a central panel featuring a touching family scene. A criss-cross quilt pattern makes for a beautiful border around the central image.

Materials:
- 1 Beloved Panel # 2769156 CP23286
- 1 yd Beloved Scenic # 2766533 CP23288
- 2 yds Red Arrow Batik # 2766525 CP23290
- 2 yds Yellow Crackle Stripe # 2766517 CP23289
- 1 5/8 yds Black
- 2 ½ yds Black bias ( trim around large circle)
- 2 ½ yds Backing Fabric
- Batting 46” x 58”
- Basic sewing supplies
-
Sewing machine
Directions:
Cutting:
Beloved Panel cut circle 24 ½”
Beloved Scenic cut piece 28 ½” x 30 ½"
Black
- Cut 4 strips 2 ¾” wide x WOF, then cut into 56 2 ¾” squares, then into 224 triangles = A
- Cut 4 strips 1 ½” wide x WOF = F
- Cut 2 strips 4 ¾” wide x WOF, then cut 10 triangles with a 6 ¼“ base
Red Arrow Batik
- Cut 3 strips 1 5/8” wide x WOF, then cut into 56 1 5/8” squares, then into 112 triangles = B
- Cut 9 strips 1 ½” wide x WOF, from 7 strips cut 56 3 ½” strips = D1
- Also cut 56 1 ½” squares = D2
- Cut 2 strips 2 ¾” wide x WOF, then into 28 2 ¾” squares, then into 112 triangles = E
Yellow Crackle Stripe
- Cut 9 strips1 ½” wide x WOF, then cut 84 3 ½” strips = C1
- Also cut 56 1 ½” squares = C2
- Cut 2 strips 4 3/4” wide x WOF, cut 12 triangles with a 6 ¼“ base
Black
- Cut 6 strips 1 ½” wide x WOF for sashing, cut 4 strips 28 ½” long, cut 2 strips 42 ½” long
- Cut 6 strips 1 ½” wide for borders, piece strips to create 2 horizontal borders 44 ½” long, and 2 vertical borders 55 ½” long
- Cut 5 strips 2” wide for binding piece strips at 45º angle to make binding
SEWING:
-
Center the 24 ½“ circle from the Beloved Panel onto the Beloved Scenic fabric piece 28 ½“ x 30 ½“ and baste in place. Cover the raw edges with bias and secure by stitching the bias edges down.
-
Add black sashing 1 ½“ x 28 ½“ to the top and bottom of the Beloved Scenic fabric piece.
-
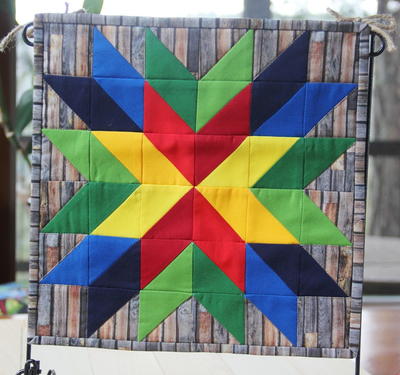
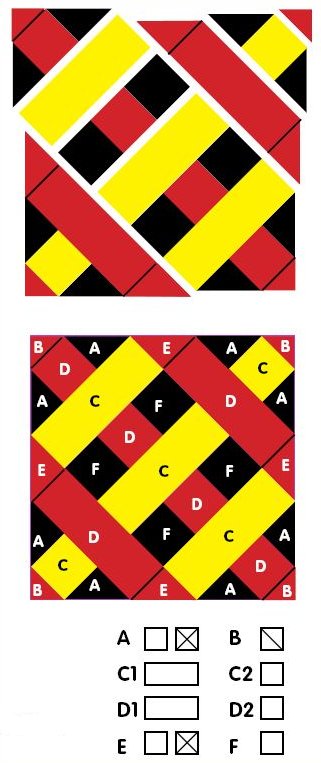
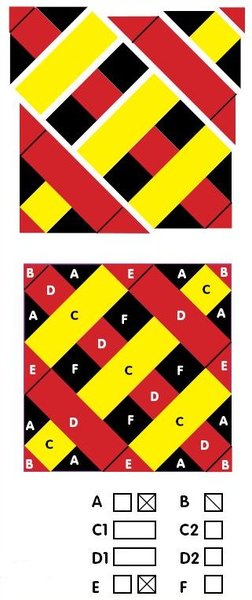
Assemble the triangle border by alternating colors with 6 yellow triangles on the bottom and 5 black ones on the top to create triangle borders. See photo for guide. Center the triangle border onto the top and bottom of the Beloved Scenic piece and sew in place. Trim off any of the extra yellow after it is attached. Add another black sashing 1 ½ “ x 28 ½” to the top and bottom of the triangle borders. Attach a second Black sashing 1 ½ “ x 42 ½” to both sides of this panel to complete the center block. Set aside.
-
Sew a black strip 1 ½” x WOF to each side of a Red Arrow Batik strip 1 ½ “ x WOF. This piece will measure 3 ½“ x WOF. Press seams towards the Black fabric. Cut each sewn strip set into 1 ½” sections, repeat until you have 56 1 ½” sets. This will make segment FDF.
-
Sew 3 C1 to 2 FDF sections for the center of the block make sure to keep stripes all going in the same direction. Alternating C1 FDF C1 FDF C1. Press towards the Yellow Crackle Stripe. Repeat until you have 28 centers. Set aside.
-
Sew 2 A triangles to a Red Arrow Batik D2 Press towards the Black, and then add A B triangle to complete ABD Press towards the triangle. Repeat to complete 56 sets. Attach one to each of the C1 sides of the centers. See diagram. Set aside.
-
Sew 2 E triangles to each end of the Red Arrow Batik D1. This will make segment EDE. Press towards the triangle. Complete 56 EDE sets. Set aside.
-
Sew 2 A triangles to each 1 ½” C2 as shown in the diagram make sure to keep the stripes going in the same direction. Complete 56 sets. Press towards the Black, then add a B triangle to each set. Press towards the triangle and connect to EDE. Use diagram.
-
Sew these sets to the center using the diagram and you have completed the block. You will make 28 6” blocks. Stack all blocks in the same direction this will help you as you put them together.
-
Sew 5 blocks together at side seams matching the patterns and seams as you go to create the top row of blocks. Attach the bottom of this row to the top sashing.
-
Sew 5 blocks together at side seams matching the patterns and the seams as you go to create the bottom row of blocks. Attach the top of this row to the bottom sashing.
-
Sew 9 blocks together matching top to bottom seams and patterns as you go. Repeat. Attach the side rows of blocks matching the patterns and the seams as you go. Press towards the sashing.
-
Sew 2 horizontal borders 1 ½” x 44 ½” to the top and bottom trim and press toward the borders.
-
Sew 2 vertical borders 1 ½” x 56 ½” to the sides and trim and press towards the borders.
-
Layer the quilt top, batting and backing and baste. Machine or hand quilt as you wish and bind your quilt.
Read NextBirch Gnomes Quilt


Thanks for your comment. Don't forget to share!
hastewart 9291171
Jun 28, 2013
I LOVE this........< But havent found it, Where can I find the panels please.
bjm1
Jul 22, 2011
This is just stunningly beautiful. I'll be doing the "search" to find this fabric asap. Well done!
Chayah
Feb 11, 2010
where can i find the fabrics for this project. I see you list it with the item number.
Report Inappropriate Comment
Are you sure you would like to report this comment? It will be flagged for our moderators to take action.
Thank you for taking the time to improve the content on our site.