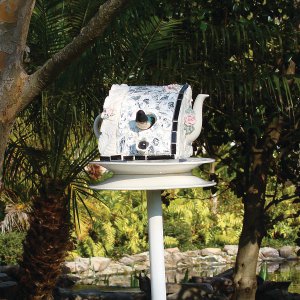
French Cottage Bird House
Create a lovely oasis for birds with this French Cottage Bird House from Diamond Tech. You can create this mosaic bird house to be a haven outdoors, or keep it inside as a sweet country decor piece. Either way, everyone is sure to love this rustic bird house!
Materials:
- 1 Wooden Bird House or a Small Wooden Corner Cabinet
- 3 pkgs. Jennifer’s Mosaics Vintage Black Toile
- Broken Pottery and embellishments as desired
- Tea Pot Spout and Handle
- 2 lbs. Jennifer’s Mosaics White Sanded Grout
- Silicone or Mosaic Adhesive
- Latex Glove
- Safety Glasses
- Mixing Spoon
- Paper
- Scrubby or Soft Cloth
- Disposable or Plastic Bowl
- Fine Sand Paper
- Wheeled Glass Nippers
- Primer
- Paint
- Pencil
- Paper
- OPTIONAL: ¾ diamond core bit
- Drill
- 9” china plates
- one – 2 ½ wood screw
- Four – ¾” wood screws
Instructions:
- Start with a base for your house. If it has been painted, lightly sand it with fine sand paper to rough the surface and remove any gloss or shine. Wipe off all debris with a clean dry cloth and paint with a primer. Allow to dry.
- Because birdhouses or whatever you choose to use as a birdhouse will vary in size and shape, start by creating a paper template of each side.
- Work on one side at a time; place the template on a flat surface. Randomly nip Vintage Mosaics™ Black Toile, broken pottery pieces, and miscellaneous glass tile to completely cover the surface of the template. Leave at least ⅛” between the tile and glass pieces for grout. HINT: Random placement is the key to mosaics; you can either create your own random design or use the image for a suggested tile placement.
- When you are happy with the design, it is time to transfer the tile to the surface of the birdhouse.
- Apply adhesive approximately ⅛” thick. It is also a good idea to spread glue on the back of the larger places for better contact and adhesion. Spread silicone evenly using a plastic disposable knife.
- Move one piece at a time from the template to the surface of the house, press tile gently into the glue. Once all tiles have been applied, allow glue to dry before moving to the next side.
- The charm of this French Country Birdhouse is created by incorporating glass roses which were found on an old garage sale vase. The vase was broken and then nipped to remove the roses.
- If using a spout and handle of an old teapot, make sure that you mark the location on the side templates in which you plan to incorporate these items. This will insure that you will leave this space void of tile.
- Continue to nip and position tile until all sides of the birdhouse have been covered. If you are having a difficult time keeping large pieces in place, use painters tape to hold them into position until the glue has dried.
- Once you are pleased with your design, it is time to grout. Mix one cup of white grout, following the manufacturer’s instructions. Wearing latex glove, spread grout on to the surface of the birdhouse making sure that grout is pressed into all the spaces between the glass pieces. Wait about 15 minutes for grout to set.
- Gently wipe away excess grout using a scrubby, taking care not to pull away grout from between glass pieces. It is very important to remove any grout on tile surfaces before grout is completely dry.
- Use a soft cloth to buff glass to a clean shine. Allow 24 hours for mosaic piece to dry thoroughly.
- OPTIONAL: For additional charm, affix the birdhouse atop two coordinating china plates, we used cream for this project. Fill the center of the plate with water, use a ⅜ diamond core drill bit and drill a whole into the center of each plate. Remove plates from water and dry. Apply glue to the bottom of each plate and place plates so that their bottoms face each other with holes lining up.
- To affix birdhouse to the plates, cut a 3” x 4” piece of wood. Drill a hole in the center of the wood and thread a 2 ½” wood screw completely through until it is flush against the wood. Next, drill four more holes on all four corners ¼” in from the edge of the wood. Center the wooden block at the bottom of the birdhouse so that the treads of the large screw are facing out, towards you. Insert a ¾” wood screw into each of the remaining four holes and fasten them into the birdhouse.
- To install the birdhouse onto a post, drill a hole into the desired post. Place the plates on top of the hole and screw the birdhouse down through the plates and into the post.
Read NextScrap DIY Garden Stakes
Your Recently Viewed Projects


Thanks for your comment. Don't forget to share!
Report Inappropriate Comment
Are you sure you would like to report this comment? It will be flagged for our moderators to take action.
Thank you for taking the time to improve the content on our site.