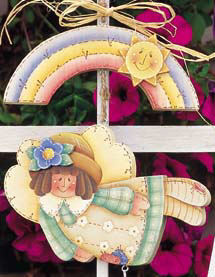
Angel Wind Chime
This cheerful wind chime features a rainbow of colors and a flying angel. This porch feature is sure to make guests smile.

Materials:
- Americana Multi-Purpose Sealer DS17 - Multi-Purpose Sealer
- Americana Spray Sealers DAS13 - Americana Matte Spray
- DecoArt Products Americana Acrylics DA116 - Deep Teal
- DecoArt Products Americana Acrylics DA135 - Ice Blue
- DecoArt Products Americana Acrylics DA137 - Shading Flesh
- DecoArt Products Americana Acrylics DA156 - Antique Rose
- DecoArt Products Americana Acrylics DA163 - Honey Brown
- DecoArt Products Americana Acrylics DA164 - Light Buttermilk
- DecoArt Products Americana Acrylics DA168 - Golden Straw
- DecoArt Products Americana Acrylics DA173 - Khaki Tan
- DecoArt Products Americana Acrylics DA174 - Milk Chocolate
- Brushes by Royal - 150S Golden Taklon 4, 8, 12 Short Shaders; 595 Golden Taklon 0 Short Liner; 395 White Taklon 6 Round Scrubber
- Misc - Palette; Small Screw Eyes; Small Wind Chime (Viking Woodcrafts); Tack Rag; Fine Sandpaper; Jute Twine
- 1/2'" thick wood 8" X 5 1/2" (for angel)
- 1/2" thick wood 8" X 3 1/2" (for rainbow)
- Small pieces 1/4" thick wood (flower, sun)
- Pattern
Instructions:
Preperation:
- Seal wood and let dry. Sand with fine sandpaper and wipe clean with tack rag. Apply basic pattern lines. Another method is to sand the wood lightly, wipe clean with a tack rag and then apply basic pattern lines. Then, using Americana acrylics mixed with equal parts of Multi-Purpose Sealer, do the basecoating.
Painting (both sides):
-
Girl: Basecoat face and hands with Flesh Tone. Shade with a float of Shading Flesh. Dip the Round Scrubber Brush into Antique Rose, and wipe most of the paint off on a paper towel. using a circular motion, apply color to cheek area. Make facial features with Dark Chocolate. Make highlight dots on eyes and cheeks with Light Buttermilk. Make stitch lines on hands with Dark Chocolate.
-
Basecoat wings with Sand. Shade float with Honey Brown. Make stitch lines with Dark Chocolate.
-
Basecoat collar with Light Buttermilk. Shade float with Khaki Tan, then deepen further with a float of Honey Brown. Stitch lines are made with Dark Chocolate.
-
Basecoat hair with Milk Chocolate. Shade float with Dark Chocolate. Highlight float with Honey Brown (two coats).
-
Basecoat hat with Honey Brown. Shade float with Milk Chocolate. Highlight float with Golden Straw. Make cross-hatch highlight lines on crown of hat with Sand.
-
Basecoat apron with Antique White. Basecoat flowers with one coat of Buttermilk. Outline each flower and make center dot with Honey Brown. Make a row of stitch lines between flowers with Antique Rose. Shade apron with a float of Milk Chocolate. Basecoat front patch with Shading Flesh, then shade float with Antique Rose. Make plaid lines with Buttermilk. Basecoat back patch with Williamsburg Blue. Shade float with Uniform Blue. Make plaid lines with Ice Blue. Make stitch lines at neck edge, hem edge and around patches with Dark Chocolate.
-
Basecoat stockings with Antique White. Basecoat patch and make stripes with Antique Rose. Plaid lines on patch are Buttermilk. Shade float stockings with Khaki Tan and then deepen further with a float of Milk Chocolate. Make stitch lines with Dark Chocolate.
-
Basecoat dress with Jade Green. Make wide plaid lines with the 4 Shader Brush and a washy Light Green Mix (2 parts Buttermilk + 1 part Jade Green). Using Deep Teal and the Fine Liner Brush, make fine plaid lines. Make dots with Buttermilk.
-
Flower on Hat: Basecoat flower with Williamsburg Blue. Shade float around center with Uniform Blue. Highlight float outer edge of each petal with Ice Blue. Basecoat center with Golden Straw. Shade float with Honey Brown. Basecoat leaves with Jade Green. Shade float with Deep Teal. Make all stitch lines and cross stitches with Light Buttermilk.
-
Rainbow: Basecoat entire piece with Buttermilk. Let dry and then apply pattern lines. Shade float bottom edge of top section with Williamsburg Blue and then very lightly with Uniform Blue. Shade float bottom edge of middle section with Golden Straw and then very lightly with Honey Brown. Shade float bottom edge of bottom section with Shading Flesh and then very lightly with antique Rose. Make all stitch lines and cross stitches with Dark Chocolate.
- Sunshine: Basecoat with Golden Straw. Let dry and apply pattern lines. Shade float on points next to center with Honey Brown. Highlight float area and outer edge of face circle with Moon Yellow. Make cheeks same as cheeks on girl. Make facial features with Dark Chocolate. Place a highlight dot of Light Buttermilk on cheeks and eyes. Also make stitch lines with Light Buttermilk.
Finishing:
- Glue sunshine on rainbow and flower to hat and let dry thoroughly. Apply two to three light coats of Matte Spray Sealer, drying between each coat. Attach screw eyes as indicated on pattern. Tie pieces together with jute twine. Attach wind chime to bottom screw eye.
Read NextFaux Vintage Planters


