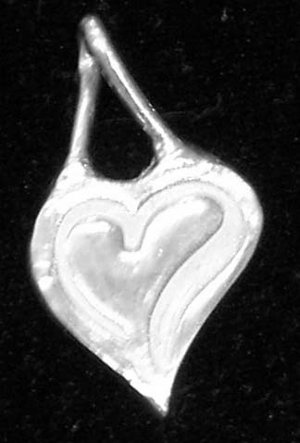
Faux Silver Heart Pendant
Make this sweet Faux Silver Heart Pendant from Delphi Glass for your mom, sister, friend, or just for yourself! This heart shaped pendant is easy to make and everyone is sure to love it! You could also attach it to a key chain and make a cute key fob if you'd like.
Materials:
- Silver Jewelry Clay Starter Kit (Kit includes one each of the following. Included clay makes 3-4 pendants. Additional clay and all materials can also be purchased separately.)
- Fire Brick
- PMC Silver Clay Instruction Book
- Butane Torch
- Tweezers
- Stainless Steel Brush
- Polishing Block
- Half-Round File
- #6 Shader Brush
- PMC+ Clay, 20 gram
- Palette Knife
- Roller
- Cardboard Strip Set
Instructions:
- Refer to Delphi’s Silver Jewelry Clay Instructions for additional information.
- Prepare your work surface, roller and hands with a small amount of bag balm or olive oil to prevent the clay from sticking.
- Separate a piece of silver clay from the package, wrap the remainder and place in an air tight container to prevent clay from drying out. Shape the clay into a coil or ball and place on work surface with the cardboard slats on either side of the clay. Begin rolling clay using the roller (to maintain a round shape begin by rolling lightly in one direction, then rotate the cardboard strips and roll cross-wise, repeating until the clay has reached the desired thickness). You may wish to do this over a texture plate or other textured surface such as textured glass or oiled lace so that the texture will be imprinted in the back of the pendant.
- Form the design on the project. You can imprint a design from a rubber stamp, add bits of clay formed or cut into a shape, or use a craft knife to cut out a design. Cut out the outline of the pendant using the palette knife, hobby knife or clay cutter (available in many shapes and sizes at craft stores). Feel free to experiment with different processes to get new and unique designs. If the project begins to dry too quickly, making it difficult to add design elements, simply use the paint brush to apply a small amount of water to the surface, allow to set for a few seconds and begin again.
- Make sure to create a hanging ring by using a straw, coffee stirrer or other small round item to punch a hole in the pendant, or by moistening the clay and folding it over one of these items, then using paste to join it back to the main part of the pendant. Remember that projects will shrink up to 10% during firing—make sure that the hanging hole is appropriate in size to accommodate shrinkage.
- Set the project aside to dry thoroughly. You may wish to use a warming tray (electric griddle) on the lowest setting to help speed this process along. To test the project for moisture you can place the warm item on a cool tin surface, then lift it. If condensation is present on the tin, return the project to the warming plate to complete the drying process.
- Once the project is dried use the half round file to smooth the edges and reshape areas as needed. Fine grit sandpaper can also be used to provide a smooth surface on the project. Any areas with cracks or blemishes can be repaired using a small amount of clay mixed with water to form a “paste” substance or the premixed paste type clay available.
- Allow pendant to dry again and file any repaired areas as needed. Delphi Tip: Save any filings and pieces of clay that are removed from the project in the process of forming and filing. They can be reconstituted in an air tight container by adding a few drops of water. It is important that you are happy with the project as it is now formed, as it is difficult to alter the project after firing.
- Place the dried project on the fire brick (set the fire brick in a pie tin for added protection to the work table). Fuel the torch from the valve in the bottom (following manufacturer directions) using a can of pressurized butane and allow to set for 2-3 minutes.
- To fire the project we recommend wearing tinted safety glasses. Ignite the torch by turning on the gas supply valve, holding the torch away from yourself and any other people, and pressing the ignition button. Hold it at a 45° angle to the project about 4 inches from the fire brick. After 30 seconds the project will start to discolor and will then produce a small flame (this is the organic “binders” burning off). Continue heating the project until it gives off a slight orange glow (this is most visible with the lights dimmed or off in the room). Once the project has reached this glow move the torch back about 1-2 inches further and continue firing for about 3-5 minutes (depending on the size and thickness of the project) to ensure the project is completely fired. If the project begins to curl upward, glow brightly or look liquid you will want to move the torch back immediately as this will over-fire the project and cause it to lose detail.
- Turn off the torch (making sure that the gas valve is securely closed) and set aside. You may “quench” the project by picking it up with the tweezers and submersing it in cool water as long as there are no stones or glass incorporated in the design.
- Once cooled you will notice that the project has a white residue on the surface. This is normal, and will simply be polished away. Place the fired project on the rubber polishing block. Using the stainless steel brush and a small amount of water brush the surface thoroughly, making sure to get into recessed areas, crevices and around the edges. The white residue will brush off and the surface will become shiny.
- If you wish to produce added shine on parts of the surface you may use the side of the tweezers to “burnish” the surface. Apply pressure to the tweezers and rub it against the surface of the project. You will almost immediately notice the area becoming glossier.
- You can opt to polish projects using a tumbler and stainless steel shot. This allows you to easily and effectively complete the polishing process. Place similar weighted items into the tumbler with stainless steel shot and water (which should come just above the surface of shot). Let tumble for approximately 20-30 minutes, or until the surface is polished and shiny.
Read NextCross Necklace Kids Craft