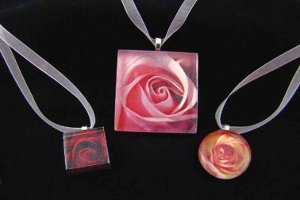
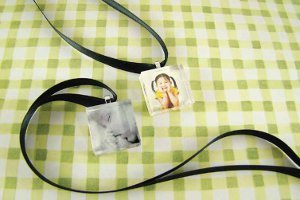
Elegant Glass Charm Necklace
A picture charm necklace is just the gift for mom this year. This Elegant Glass Charm necklace from Diamond Tech is adorned with a beautiful rose flower. Jewelry will soon be Mom's favorite gift again!

Materials:
- 1 each of My Tile Kit Glass (TC111, TC222, TC271)
- Laser Color Printer
- Bowl
- Paper Towels
- Oven
- White Paint
- Large (FW853) and small (FW FW855) silver bails (FW FW855)
- Spool of pink organza ribbon
- Photos
Instructions:
BEFORE YOU BEGIN:
- Use ONLY LASER PRINTERS - Do not use an ink jet printer.
- Test with half sheets of copy paper to ensure images and print settings are properly set before loading Image Art paper.
- Reduce margins to the lowest setting.
- Not recommended for commercial grade printers or copiers. They become too hot and can melt the paper.
- If the machine is CAPABLE of printing in color, choose this option.
- Set printer for photo printing or best quality.
- Set document dimensions to 8.50” x 5.50” (landscape orientation) using any software which allows you to print images. Adjust the desired images to the size of your tile and insert them into the document. For the most economical use, fill the entire page before printing. Warm up the printer by running 5-6 plain sheets of paper through it. Should you desire to place your decal on the back of the tile, make sure you flip the image before printing.
- Remove protective tissue from the Image Art paper. Insert the 8.50” x 5.50” paper into the printer tray. Select plain paper type.
- Follow printer’s instructions and print transfer. After printing allow the paper to set for 10-15 minutes before using. Trim the desired transfer to size and shape using scissors. Clean tile and dry thoroughly. Lightly moisten the front of the tile with water. Place the transfer into a bowl of water for approximately 1 minute.
- Position Image Art transfer above the surface; then slide a ½” of the backing paper away from the top layer of the Image Art transfer.
- Line up the Image Art transfer on the surface. Gently slide the Image Art transfer from the backing paper onto the surface using a finger to smooth the transfer as you peel away the backing. PLEASE NOTE: Transfers are fragile and can tear easily, handle them carefully. Gently pat and smooth out the Image Art transfer with a moist paper towel eliminating air pockets and wrinkles. Allow to dry overnight.
- Preheat oven to 345°F. Place the tile with the decal facing up on an oven safe rack or baking sheet. Bake for 15 minutes. Turn off oven, prop open oven door and allow cooling for 20 minutes. Remove with heat safe oven mitts or pad. Your tiles are ready to be used.
- To make the decal pop, add a backing to the tile either a small piece of felt or color paper. For this project we used white paint. Allow paint to dry before adhering the bails to the back of the pendant. NOTE: Tile has a smooth front and a light textured back. Pebbles have a round, smooth front and a flat back.
Read NextDollar Store Flower Necklace