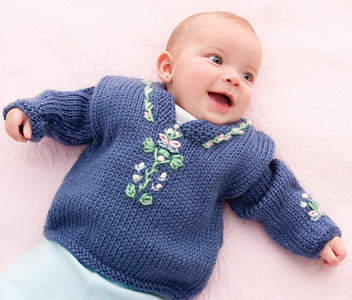
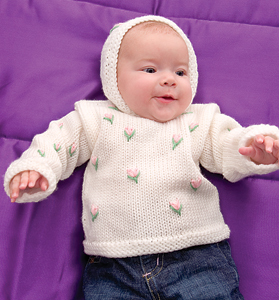
Rosebud Hoodie
This precious Rosebud Hoodie will keep your baby warm while making her look as sweet as can be. The delicate little roses look hard, but the project is rated easy, so your work will look impressive without all the effort.
Materials:
- Caron International's Simply Soft (100% acrylic; 6 oz/170 g, 330 yds/304 m): #9702 Off White (MC), 1 (1, 2) skeins
- For embroidery, small amounts of each color are needed; colors listed are shown on model garment
Caron International's Simply Soft (100% acrylic; 3 oz/86 g, 165 yds/152 m): #9719 Soft Pink; #9705 Sage - Size US 7 and 9 (4.5 and 5.5 mm) straight needles or size to obtain gauge
- Size US 7 (4.5 mm) 16-inch circular needle for finishing
- Split-ring stitch markers or waste yarn
- Stitch holders
- Tapestry needle (tn)
SIZE
Baby's 6-9 (12, 18-24) months
KNITTED MEASUREMENTS
Chest 20 (22, 24) inches
Length 10 (11, 12) inches
Instructions:
GAUGE
In Stockinette stitch, using larger needles, 16 sts and 20 rows = 4"/10 cm
STITCHES USED
Garter stitch (Garter st)
Stockinette stitch (St st)
BACK
Using smaller needles and MC, cast on 40 (44, 48) sts.
(RS) Begin Garter st; work even for 4 rows, ending with a WS row.
(RS) Change to larger needles and St st. Work even until piece measures 10 (11, 12) inches from beg, ending with a WS row.
Shape shoulders and neck: (RS): Bind off 11 (12, 13) sts at beg of next 2 rows for shoulders; place rem 18 (20, 22) sts on holder for neck.
FRONT
Work as for Back until piece measures 7 (8, 9) inches from beg, ending with a WS row; place marker (pm) each side of center 6 sts.
Shape placket: (RS) Work across to marker; join a second ball of yarn and BO center sts, work to end—17 (19, 21) sts each side.
Working both sides at same time, work even until piece measures same as back to shoulders, ending with a WS row.
Shape shoulders: (RS) Left front: Bind off 11 (12, 13) sts, work to end; place rem 6 (7, 8) sts on holder for hood.
Right front: Work 6 (7, 8) sts, place on holder for hood; bind off rem 11 (12, 13) sts.
Sew shoulder seams. Measure down 4 1/2 (5, 5 1/2) inches from shoulder seam on each side, back and front; pm for underarm.
HOOD
With RS facing, using larger needles, beg at right front placket edge, join yarn and knit 6 (7, 8) sts from holder; pick up and knit 3 sts (1 in shoulder seam, 1 each side of seam), knit 18 (20, 22) sts from back neck holder, pick up and knit 3 sts at shoulder seam as before, knit 6 (7, 8) sts from front holder—36 (40, 44) sts.
(WS) Purl across, inc 8 (10, 12) sts evenly across back—44 (50, 56) sts. Cont in St st, work even hood measures 6 (6 1/2, 7) inches from beg. Bind off all stitches; fold hood in half with RS's facing each other and sew top seam.
HOOD TRIM
With RS facing, using circular needle and MC, beg at right front placket edge, pick up and knit 72 (76, 80) sts evenly along neck placket and hood. Do not join.
Working back and forth on circular needle, beg Garter st; work even for 4 rows, ending with a RS row.
Bind off all sts loosely on next (WS) row. Sew ends of trim to lower end of placket.
SLEEVES
With RS facing, using smaller needles and MC, pick up and knit 36 (40, 44) sts from underarm marker, across shoulder, to opposite marker, picking up approx 4 sts for every 5 rows.
Change to larger needles and St st; work even for 1 row.
Cont in St st, work 4 rows even, ending with a WS row.
SHAPE SLEEVE
(RS) Dec 1 st each side this row, then every 8 (7, 7) rows 3 (4, 5) times—28 (30, 32) sts. Work even until sleeve measures 6 1/2 (7, 8 1/2)" from the beginning, end with a RS row.
(WS) Change to Garter st; work even for 4 rows, end RS row. Bind off all sts loosely on next (WS) row.
FINISHING
Sew sleeve and side seams. Using tn, weave in all ends.
EMBROIDERY
Using colors shown (see photo and diagrams), or colors desired, work embroidery.
Work rosebuds as desired on front and sleeves, working 1 or 2 rosebuds on hood, if desired.
Read Next50+ Free Baby Knitting Patterns
Your Recently Viewed Projects
Thanks for your comment. Don't forget to share!
Report Inappropriate Comment
Are you sure you would like to report this comment? It will be flagged for our moderators to take action.
Thank you for taking the time to improve the content on our site.