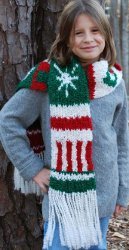
Holiday Knit Scarf
Knit a joyful holiday scarf for yourself or a loved one. Create candy cane patterns or snowflake with checkers for your festive scarf. Be creative with this free knit pattern from Authentic Knitting Board.

Materials:
- Yarn: Lion Brand Holiday Homespun 1 skein each: Berry Red (regular homespun), Winter Green, Snowy White
- Stitch: Stockinette
- Knitting Board (16+ pins or stitches)
- Knit Hook
- Crochet Hook, size 5 or 6
- Scrap of smooth yarn for anchor yarn.
- Large sewing needle and scrap of yarns (black and orange) This is optional for snowman face.
- Pattern
You can plan your scarf using all the sections and graphs, or simply choose the designs you like and make one color sections between them. This way, you can have the scarf as long as you want. If you decide to have large sections of solid color, be sure to purchase an extra skein of that color yarn so that you will have plenty.
Instructions:
Finished width is aprox 6”. Length is 60” before fringe.
Cast On 16 stitches in Stockinette stitch using an anchor yarn of any scrap of smooth
yarn. It will be removed when the scarf ends are finished off. Graph #1 starts with green yarn.
Work 4 rows in green.
Tie on white yarn at 2nd needle.
Work 1 row in white yarn. Do not cut. Pick up green and
work 1 additional row. Cut green and knot. Tie on Red.
You will now work the Candy Cane stripes in red and white
for a total of 12 rows.
Cut red and knot.
Work 4 rows with white yarn.
Tie on red yarn and cut and knot the white.
Work 4 rows in Red.
Tie on the white yarn and cut and knot the red.
Work 4 rows in white yarn.
Tie on the green yarn. Cut and knot the white.
You will now work the snowflake design:
Work 3 rows with green yarn.
Tie on white at center of knitting.
Row 4-Weave needles #8 from front to back,
lay down the white and work the row with green yarn skipping the needle with white yarn.
Continue working each row with the green and white per the graph. Cut and knot the white.
Work last 3 rows in green. Cut and knot the green.
Tie on the white and work 3 rows.
Tie in the green and work 2 rows.
Our next section will be the bold stripes with red and white yarn.
Tie on Red yarn at 2nd needle from left.
Cut the green yarn and knot.
Tie on the White yarn at 5th needles.
The white yarn will be the main yarn and will be worked in stockinette stitch. The red will be worked from front to back on needles 1 thru 4 and needles 9 thru 12.
Work each row with red stitches first.
Lay red down and work the white sections in stockinette skipping the red stitches.
Work these stripes for a total of 18 rows.
Cut and knot the red yarn.
You will now work the wreath section.
Work the white yarn for 2 rows.
Tie on the green at needles #8.
Work the graph with green yarn from
front to back on green stitches.
Work the white yarn in stockinette stitch, always skipping the green as you work each row. You can add in the red yarn per the graph, or the red berries can be added to completed knitting by whip stitch and sewing needle. If doing this, just fill in the design with green stitches. Cut and knot the green yarn. Complete the section with 1 row of white.
The next graph to be worked is the fun Checkerboard.
Working the checkerboard, you are actually
doing vertical and horizontal stripes
together.
Tie on Red yarn. Cut and knot the white.
Work 2 rows in red. Do not cut. Tie on
green.
Work 1 row in green. Do not cut.
Work 1 row in red.
Work 1 row in green.
Work 1 row in red.
Next row is red and green, so use the green weaving
front to back on needles 1 thru 4 and needles 9 thru 12.
Weave the row in stockinette with red.
Next row, tie on white yarn at 2nd needle.
Work each row with the 3 colors per the graph to create
the color sections. Use the white yarn as the main yarn
and work in stockinette stitch after the red and green
sections have been wrapped.
Note: When you have the red and green sections
together with front to back wraps, twist the skeins at the
joint of the 2 colors so that the sections will be connected. Otherwise, you will need to
whip them together with some thread after the scarf is complete. Either method will
work and be seamless.
Work row #20 in red yarn. Cut and knot the red.
Work 1 row in white. Cut and knot the white yarn.
The green yarn will begin our next graph, the Snowman.
A real snowman is never perfect in his roundness, so don’t be too concerned about yours. You can add or subtract stitches as desired to create the shape you like. You can also add some black worsted yarn to the top of head for a hat. You can add details like a carrot nose and a knitted scarf if you would like and this can be done once the scarf is complete.
Note: If you want the snowman to sit upright when the scarf if worn straight down, you’ll want to work the graph part of the snowman upside-down. Then finish the end of the scarf with the red and white section. We will include this version to make this clearer, but be sure to do the red and white section once the snowman is complete so that your scarf ends with the red and white.
Working from head end:
Work 3 rows in green yarn.
Tie in white yarn at needle #7 from left end. Work the snowman with green as the main
yarn in stockinette and the white working front to back on designated needles.
Once you have completed the rows with the snowman design, cut and knot the white
yarn.
Work 2 rows in green yarn. Cut and knot.
Tie in red yarn.
Work 1 row in red. Do not cut.
Tie in white yarn.
Work 1 row in white.
Work 4 rows of red.
Work 1 row in white.
Work 2 rows in red.
Bind off using the crochet hook and lifting 2 loops. Pull one thru one.
Return to the anchor yarn and bind off in same method.
Fringe and finishing:
We have used a single strand of white yarn at each end stitch for the fringe. Since your scarf is 16 stitches wide, you will need to cut 16 strands for each end or a total of 32 strands of white yarn. Each of the pieces should measure aprox 15” long. Fold and pull a strand thru each stitch using the crochet hook. Wrap over and pull thru fringe loop to knot. Once complete, you can trim the ends for a more even finish. The ends of the fringe will slowly unravel and expose the softness of the yarn and the gold threads flowing thru it. This will create a soft and fluffy finish to your Holiday scarf. Return to the wreath and snowman and add any detail that you would like. You may want to add more red berries to the wreath, or an orange carrot nose to your snowman and some little black ‘rock’ eyes. You can add some black to his head for a hat. You can do this using your sewing needle and scrap yarn. See some details in the photo.
Read NextSunset Scarf Knitting Pattern
Your Recently Viewed Projects


Thanks for your comment. Don't forget to share!
Report Inappropriate Comment
Are you sure you would like to report this comment? It will be flagged for our moderators to take action.
Thank you for taking the time to improve the content on our site.