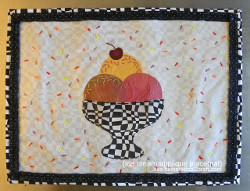
I Scream for Ice Cream Place Mat
Set your table with DIY place mats that will have you hungry for dessert. This I Scream for Ice Cream Place Mat from Lisa Fulmer for Cool2Craft is as good as it looks. Thanks to these craft instructions, you'll engage crafting skills such as sewing and decorating when you try this project. DIY place mats like these are easy to make and will add tons to your tablescape. Serve some eye candy at your table by making these delectable place mats.
Materials:
- Front fabric piece trimmed to 13" x 17.5"
- Lightweight quilt batting piece trimmed to 13" x 17.5"
- Back fabric piece trimmed to 15" x 19.5"
- Thin-gauge clear craft vinyl trimmed to 12" x 16.5"
- Scrap fabrics
- Iron
- Image of bowl and a round circle to trace
- Parchment paper
- Charcoal pencil and bone folder
- Aleene's Fabric Fusion sheets
- Scissors
- Embroidery floss and needle
- Embroidery hoop
- Puffy Paints and pale colored pencil
- Sewing machine, thread, straight pins
- Decorative ribbon and glue (optional)
Instructions:
-
Press all your fabrics. Trace bowl from image on to parchment paper with charcoal pencil, then transfer by rubbing with a bone folder on to back side of a piece of scrap fabric; cut bowl from fabric.
-
Trace 3 circles that are the right size for your bowl onto scrap fabrics (scoops of ice cream), then freehand-cut a small heart-shaped circle (cherry) and trim out.
-
Arrange your fabric pieces in the center of your front fabric, and use a few small squares of Fabric Fusion to tack down each piece into position.
-
Place in embroidery hoop and make a series of random straight stitches by hand in coordinating colors on each scoop, so it looks like candy sprinkles (3-ply floss). Straight-stitch around the edges of the bowl, then straight-stitch a little stem for the cherry.
-
Remove hoop and press out wrinkles from the back.
-
Use a pale colored pencil to mark sprinkles around the appliqué on to the front fabric, then paint over the marks with random colors of Puffy Paint; allow to dry.
-
Layer and align the front fabric and back fabric (wrong side up) with quilt batting in between. Fold excess back fabric on all four sides over to the front and press in place to create a border. Lay the vinyl on top, tuck inside the border, and pin into place, mitering the corners.
-
Machine stitch with zigzag around the border to secure all the layers.
- If desired, you can glue decorative ribbon around the border to cover the stitches.
Read NextMagical Forest Trivet