Sunshine Card Tutorial
Take your cardmaking skills to the next level with Sunshine Card Tutorial from Samantha Star! It's a great way to show you care!

Materials:
- 1 piece of white cardstock
- Stamps of your choice
- Dye ink of your choice
- Krylon paint pen
- Glitter
- Liquid glue
- Clear embossing ink
- Embossing powder
- Glimmer mist in the colors of your choice and cardstock in a coordinating color
Instructions:
- Cut your white cardstock to 8.5″ x 5.5″ and 4.25″ x 5.5″ put aside.

- On a scrap of white spray with a lighter color of mist. Allow to dry (you can use a heat gun to speed it up).
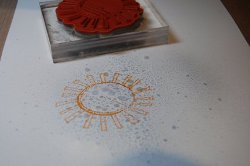
- With dye ink, and the stamp of your choice, stamp your image over the misted area.

- Stamp a sentiment in clear embossing ink, over your image. Sprinkle embossing powder, shake of excess and heat emboss.

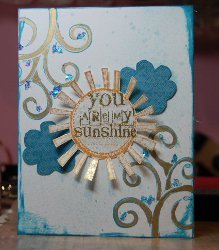
- Stamp another image onto colored cardstock, and cut out.

- Cut out all your shapes.

- On your piece of cardstock that is 4.25″ x 5.5″ stamp the same image twice. Once in the top left corner, once in the bottom right corner. Color the images in with your Krylon paint pen.

- Spray your piece of cardstock with Mist in darker color. Allow to dry.

- Apply liquid glue to the image and sprinkle on glitter. Shake off excess.

- Ink around the edges of your piece. Take your cardstock that is 8.5 x 5.5 and fold. This will be your card base. Glue your stamped panel onto the card. The reason I do the stamping on a separate panel is because the mist tends to cause the cardstock to curl, and by using a separate base you can bed the piece back into shape when gluing it onto the base.
Read NextFoiled Butterfly Notecards
Your Recently Viewed Projects


Thanks for your comment. Don't forget to share!
Report Inappropriate Comment
Are you sure you would like to report this comment? It will be flagged for our moderators to take action.
Thank you for taking the time to improve the content on our site.