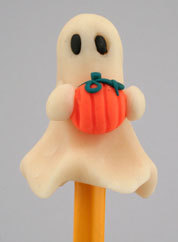
Glowstly Pencil Topper
Create this pencil topper from AMACO using FIMO® Soft Nightglow clay that's fun all year round! After baking, hold under a light to make him glow. The more light you expose it to, the longer it will glow. Great for party projects or favors, this friendly ghost will make any Halloween party a hit. Suitable for all ages 5 and up.

Materials:
- FIMO® Soft Polymer Clay - Glow in the Dark, Black, Mandarin, and Emerald
- Pencil
- Toothpick
- Ruler
- Oven Thermometer
Steps:
- Knead 1/4 block of Nightglow clay until soft and pliable.
- Roll the clay into a log (about 2" long)
- Push the pencil up and into one end of the clay log until almost touching the other end, but don't push the pencil through.
- Take the toothpick and poke two holes for eyes. Twirl the toothpick while pulling it up and down slightly to form oval eye holes.
- Roll two tiny bead size balls of black clay into balls. Roll these balls back and forth to form them into ovals and press them into the eye holes.
- Roll a ball of Mandarin (orange) clay the size of a large pea. Drag vertical lines into the clay with toothpick to form the lines of the pumpkin.
- Roll a tiny pinch of Emerald clay into one or two thin snakes. Press these at the top of the pumpkin and twist and swirl these for the vines of the pumpkin. Cut the excess clay off using the toothpick.
- Roll to large peas sized balls of Nightglow clay into teardrop shapes by rolling along one side the ball with your finger.
- Press the pointed ends of the teardrops on either side of the ghost's body, just below the eye level to secure.
- Insert the pumpkin in between the wide ends ("hands") of the ghost and gently press them together to secure and hold the pumpkin.
- Stand the pencil in a mug or glass and bake in a preheated 230-265ºF oven for 30 minutes. When the ghost and glass are cool, remove and charge under a light for several minutes.
- When it's time to replace your pencil, gently twist your ghost to loosen and remove to add to a new pencil. Tip: a small dot of poster tack added at the top of the eraser can help hold the ghost more securely on the pencil.
Read NextMake Your Own Wand DIY