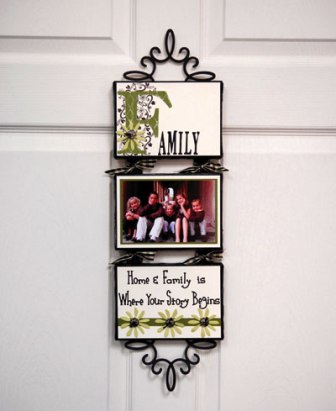
Family Frame Door Hanger
Display a favorite family photo with this beautiful papercraft door hanger from Sizzix. This is a great present for family members living away from home.
Materials
- Sizzix Bigz Die - Decorative Accents #5 - 654905
- Sizzix Clear Stamps - Flowers - 654954
- Sizzix Bigz Die - Flower, Daisies - 654981
- Sizzix Bigz Alphabet Set 7 Dies - Serif Essentials - 655128
- Sizzix Sizzlits Alphabet Set 12 Dies - Bang! Zoom! - 655414
- Plain Paper
- Buttons
- Chipboard
- Hole Punch
- Ink
- Sandpaper
- Tape
- Thread
Instructions
-
Start with three 6" x 6" squares of chipboard covered with cardstock.
-
Cut a mat slightly smaller than the base out of a lighter shade of cardstock. Stamp down the left side of the mat using black ink and one of the stamps from the Flowers stamp set. Attach the mat to the first 6" x 6" square.
-
Die-cut the letter F using the Serif Essentials Alphabet out of chipboard covered with a complementary cardstock. Add texture to the letter using the Diamonds texture plate from Texturz Kit #2. Sand the textured image to enhance. Attach the completed F to the first mat, overlapping the rubber stamped image.
-
Die-cut the rest of the title using the Bang Zoom Alphabet Set out of cardstock. Attach the letters next to the F to spell out the word “Family.”
-
Cut another mat out of the same cardstock as the letter F to fit the second 6" x 6" square. Add texture to the two mats using the Circle Circus texture plate from Texturz Kit #2. Sand the textured images to enhance. Attach the mat to the 6" x 6" square. Mat two photographs and attach them to the second completed 6" x 6" square.
-
Cut two mats for the third 6" x 6" square, one out of a lighter shade of cardstock and one out of the same cardstock as the letter F. Add texture to the smaller mat using the Diamonds texture plate. Sand the textured image to enhance. Layer the two mats onto the third 6" x 6" square.
-
Die-cut the smallest flower from the Flower, Daisies several times. Arrange them onto the different mats. Add decorative buttons in the center of each Daisy.
-
Punch holes at the bottom of the first square, on the top and bottom of the second square and at the top of the third square. Connect the squares together using thread tied in a bow.
- Die-cut Decorative Accents #5 twice out of chipboard covered with cardstock. Attach the Accents at the top and bottom of the connected squares using tape.
Read NextDistressed Painted Frame