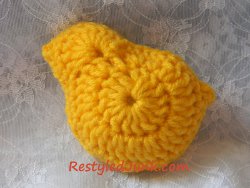
Crochet Chick Toy
Celebrate Easter with simple crochet toy patterns for kids. A Crochet Chick Toy from Cyndee Kromminga is a great addition to a little one's Easter basket and can be created in a flash. Add yarn loops at the top and turn this cute toy into a delightful sprint ornament.
Materials:
- Worsted weight yarn-yellow
- Crochet hook-size G
- Scissors
- Yarn needle
- Stuffing
Abbreviations:
ch = chain
sc = single crochet
dc = double crochet
sl st = slip stitch
st = stitch
sk = skip
Instructions:
Chick Front
Ch 3. Join with a slip stitch to form a ring.
Round 1
Ch 3 (counts as first dc). 15 dc in the ring. Sl st to top of ch 3. (16 dc)
Round 2
Ch 3. Dc in the base of ch 3. 2 dc in each of the next 13 sts. 2 sc in the last 2 sts. Sl st to the top of ch 3. (28 dc, 4 sc)
Head
Ch 3. 9 dc in the base of ch 3. (10dc)
Round 3
(This round shapes the chick.)
Sk next st. Sc in next 19 sts. Ch 2. Sc in 2nd ch from hook. (tail) Sc in next 8 sts. Sk last 2sts. Sl st to the top of ch 3. Note: This ch 3 was the beginning of the head. Sc in next 6 sts. Ch 2. Sc in 2nd ch from hook. (beak) Sc in next 2 sts. Sl st in next st. Finish off and weave in the yarn end.
Chick Back
(This is a mirror image to the chick front.)
Ch 3. Join with a slip stitch to form a ring.
Round 1
Ch 3 (counts as first dc). 15 dc in the ring. Sl st to top of ch 3. (16 dc)
Round 2
***Ch 1. 2 sc in each of the first 2 sts. 2 dc in each of the next 14 sts. Sl st to the top of ch 1.
Head
Ch 3. 9 dc in the base of ch 3. (10 dc)
Round 3
(This round shapes the chick back)
Sk next st. Sc in next 9 sts. Ch 2. Sc in 2nd ch from hook. (tail) Sc in next 19 sts. Sk last 2 sts. Sl st to top of ch 3. Sc in next 2 sts. Ch 2. Sc in 2nd ch from hook. (beak) Sc in next 7 sts. Sl st in next st. Finish off leaving a long tail.
Finishing
Thread the yarn tail on a yarn needle. Place the chick front and back together with the wrong sides facing and the edges aligned. Whip stitch the edges together. Leave a small opening. Fill with stuffing. Continue to whip stitch the opening closed. Finish off the yarn and weave in the end.
Read NextDollar Store Easter Bunny