Easy Cinnamon Christmas Ornaments
Creating Easy Cinnamon Christmas Ornaments with kids is fun and easy when you use any holiday cookie cutters you have on hand. Christmas ornament ideas don't get much more creative than this. Best of all, they smell great so your home will be filled with Christmas cheer. It'll be hard resisting the urge to eat these ornaments, but once you see how great they look on your tree, you'll want to display them instead. DIY Christmas ornaments often become keepsakes, so save this project for next year (and many more years to come).
Materials:
- Tulip® 3D Fashion Paint
- 65000 White
- 65032 Leaf Green
- 65141 Bright Red
- Aleene's® Original Tacky Glue®
- Tulip® Glam-It-Up!™ Iron-On Crystals™
- TR325 Crystal 4mm
- Ribbon, to Hang Ornaments
- Drinking Straw
- Measuring Spoons
- Cinnamon
- Wax Paper
- Applesauce
- Scissors
- Paper Towels
- Measuring Cup
- Cookie Cutters
- Wire Rack
- Bowl
- Cloves
- Plastic Food Wrap
- Nutmeg
- Rolling Pin
Ornament Recipe:
- 1 cup cinnamon
- 1 tablespoon cloves
- 1 tablespoon nutmeg
- 3/4 cup applesauce, drained
- 2 tbsp glue
Instructions:
- Combine cinnamon, cloves and nutmeg. Add applesauce and glue. Mix well with hands until mixture is smooth and well combined.
- Place wax paper down onto work surface.
- Roll one quarter of dough between two pieces of wax paper until about ¼” thick.
- Cut into desired shapes with cookie cutters, etc.
- Cut holes for hanging using straw or similar object.
- Dry on wire rack for several days, turning daily to keep from curling. Option - dry in a 250 degree F oven until hard.
- For stones, squeeze out a dot of Tulip® 3D Fashion Paint slightly smaller than size of stone. Place stone into paint and gently press so paint comes up and around stone.
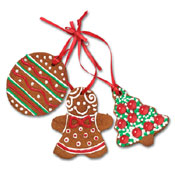
- Refer to photo when decorating ornaments. Start flow of paint on a paper towel, applying an even pressure on bottle for a smooth line. Create polka dots or lines using different colors. Let dry completely.
- Cut ribbon to desired length. Run through hole and knot at end of ribbon.
Read NextLightbulb Ornament Trio
Your Recently Viewed Projects

Thanks for your comment. Don't forget to share!
Marilyn B
Nov 18, 2017
This is a great idea! Has anyone made these using cinnamon oils? I am wondering if that would be too much to make the finished product not set up or bake completely or be oily to the touch. Since the cinnamon frangrance holds up for many years anyway, might not be a needed option, but was just curious if it could be used. You could also glue on fabric scraps or ricrac or ribbon trim as decor in addition to the paint! Fun project idea!
ellaruth
Dec 17, 2012
Made these when my grandson was about 3 years old. He is now 18 and I still hang them on my tree. You can still smell the cinn. but it is starting to fade. Can't believe they still have the cinn. smell after all these years.
buggalcrafts
Oct 02, 2011
Have made these for years and have never thought of using paint on them. I usually add statis or baby's breath and ribbon to decorate mine. I have also used heart shapes and then tied them together with ribbon to mimic the attached candles and wooden ornaments popular in the country phaze in the 90s (I stiil have mine and am not letting them go!).
Report Inappropriate Comment
Are you sure you would like to report this comment? It will be flagged for our moderators to take action.
Thank you for taking the time to improve the content on our site.