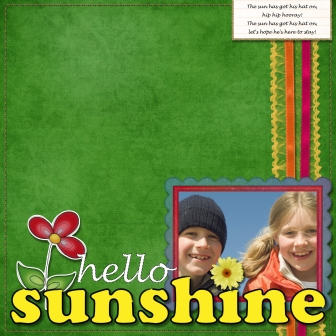
Hello Sunshine Digital Layout
Digital scrapbooking is a fun and easy way to document life’s memories, without any mess to clean up afterwards. Using Serif’s Digital Scrapbook Artist 2 or Digital Scrapbook Artist Compact, beginners and experienced scrappers alike can create this colorful layout, perfect for spring and summer, using digital tools, backgrounds and embellishments.
Materials:
- Digital Scrapbook Artist 2 (available for purchase from Serif) or Digital Scrapbook Artist Compact (available for free download from DaisyTrail)
- Digikits: Summer Sunrise by Paula Phillips and Ladies Night by DaisyTrail
- Optional: Physical embellishments, such as ribbon, buttons and glitter (you can easily create hybrid scrapbook pages by adding physical embellishments to your printed digital pages)
Instructions:
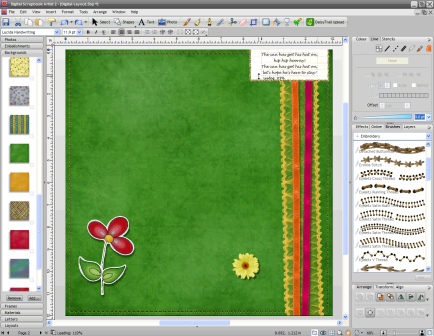
- Open Digital Scrapbook Artist 2 (or DSA Compact) and start with a blank page.
- Set your page up to 12” x 12” (or a smaller square size if you have a desktop printer and wish to print your finished design) using the Page Setup button, located on the toolbar.
- Use the Digikit Browser to add the Summer Sunrise and Ladies Night kits to your workspace (scroll down the kits until you see the kit, click on it and choose ‘Add digikit’. Click ‘Back to all Digikits’ to add the second kit in the same way).

- Drag the green background onto the page and let go. Repeat with the embellishments, using the handles on the sides and at the top to resize and rotate the items.
- Select the ‘Shape’ tool
 and choose the square shape. Drag out a square on your page (Tip: hold down Shift to maintain a square aspect ratio). Click on the ‘Select’ tool to pick up the square, and apply the ‘Eyelets Running Thread’ stitch to the edge. To do this, click on the Line tab and select the ‘stroke’ brush:
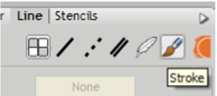
- The default brush will apply, change this by clicking on ‘Brushes’ and scrolling down to the stitch brush. Click on it to apply the brush. You can adjust the width on the Line tab. Move to the back using the Arrange tool.
- If you haven’t already, add a piece of note paper to the top-right corner and apply the Ladies Night gold glitter brush to the edge. To do this, with the paper selected, click on the ‘Stroke’ option from the Line tab and increase the width until you’re happy. Click on the gold glitter from the Brushes tab and it will apply to the edge.
- Select the Text tool,
 click on your page once, and type your text. Choose the ‘Select’ tool to pick up your text box, then change the font and size as desired. With the text still selected, change the colour using the swatches or colour wheel on the right hand side. Position on the notepaper. You can adjust the leading of the text so it sits on the lines of the paper by clicking ‘Edit points’ and dragging the handle on the right up and down as desired (it will say ‘Leading’ when selected).
- Add the photo frame and drag your photograph on top. Reposition using the crop tool (you can move the picture with your mouse by dragging it, and can also zoom in & out and rotate).
- Use the Text tool to type ‘hello’, resize, change the font and colour white. Apply a dashed black line by going to the Line tab, clicking on the dashed line and colouring black with the Colors tab. You can increase the width on the Line tab.
- Repeat this process, but this time type ‘sunshine’, select it, then resize using the handles. With the text box still selected, change the font and color yellow using a swatch from the Colors tab. Next, apply the Ladies Night ‘Eyeliner’ brush to the edge using the ‘Stroke’ option from the Line Tab.
- Now add shadows to your design. You’ll find the Shadow tool
 on the toolbar – just select an item, choose the Shadow tool and drag away from your item to give it a shadow. Let go when you’re happy. If you are using Digital Scrapbook Artist Compact, you’ll find some shadow effects on the ‘Effects’ tab on the right.
- You may want to export your image as a PDF or as an image to get it professionally printed. If you have a 12 x 12 printer, simply click ‘Print.’