Filigree DIY Curtains

Filigree DIY Curtains
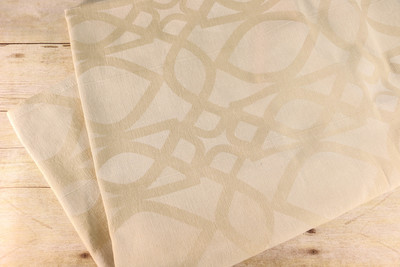
Get fancy with your window treatments by whipping up these Filigree DIY Curtains. As far as DIY home decor goes, this project may seem intricate and too difficult because of the filigree designs, but it's really not. This DIY home decorating craft will show you how to stencil the filigree design for this DIY curtain project. If you're in need of DIY home decor ideas, then this painting craft is definitely worth a try, especially if you want a classy look for your new decorations.
Primary TechniquePainting

For more great home decor craft projects from Stencil Ease®, check out 13 DIY Home Decor Ideas.
Materials:
- Stencil Ease® Chestnut Hill Filigree Wall
- Painting Stencil
- Stencil Ease® Repositionable Adhesive Spray
- IKEA® VIVAN Curtains, 1 pair, beige
- DecoArt® Americana® Acrylic Paint, White Wash
- DecoArt® Americana® Fabric Painting Medium
- Shurtape Technologies LLC Frog Tape®
- Stencil Ease® 5/8” Stencil Brush, White Bristle
- Paper Towels
- Paper or Plastic Plate
- Large piece of cardboard about 2 ft. x 2 ft.
- Spray the back of the Stencil Ease® Chestnut Hill Filigree Wall Painting Stencil as well as the large piece of cardboard very lightly with the Stencil Ease® Repositionable Adhesive Spray and let the adhesive dry.
- Place the cardboard with adhesive facing up on a flat work surface and smooth out the IKEA® VIVAN Curtain over the top of the cardboard (you won’t need to iron the fabric and this will keep it from moving around as you paint it).
- Position the stencil onto the curtain, making sure to align it with the edge of the seams on the fabric so it’s straight.
- Adhere painters tape to the fabric under each triangle registration mark and mark them.
- Mix equal parts DecoArt® Americana® Acrylic Paint, White Wash and DecoArt® Americana® Fabric Painting Medium and pour some of the mixture onto the plate.
- Load your Stencil Ease® 5/8” White Bristle Stencil Brush with White Wash DecoArt® Americana® Acrylic Paint and then swirl the brush onto your paper towel until it seems like all of the paint is removed. This creates a dry brush and leaves the perfect amount of paint on your bristles. Using a dry brush prevents paint from seeping under the cut-outs of the stencil. This part of the process is essential if you would like clean/crisp lines when you lift your stencil.
- Either stipple (lightly tapping over the stencil cut-outs) or swirl the paint onto the fabric.
- You can immediately remove the stencil and line up the registration marks for your next repeat, either vertically or horizontally. The instructions on how to use the registration mark system are included with your stencil.
- Repeat this process until you have completely covered the fabric.
- Allow the curtains to dry completely overnight.