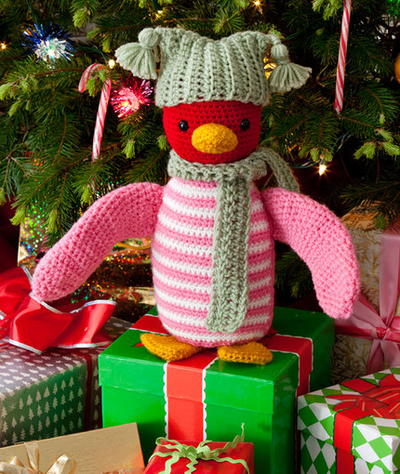
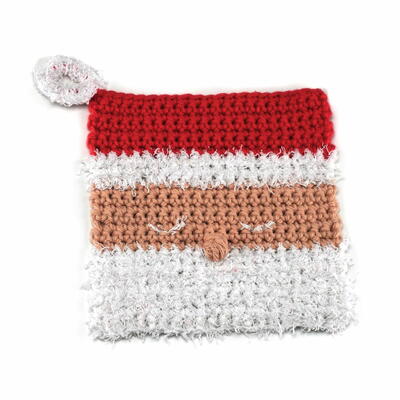
Elf Dishcloth
Get out the hooks and start making some free easy crochet patterns for Christmas. Your kitchen will look festive while you bake up those classic recipes with the Elf Dishcloth. This adorable crocheted kitchen accessory is the perfect way to get your home in the spirit of Christmas. Use it as a dishcloth, a trivet, or an oven mitt. You can also make this cute dishcloth as a stocking stuffer for a friend or fellow baker. Great for crochet fans of all skill levels, this fun and simple project is sure to be a winner this holiday season.

Materials:
- 1 ball Lily® Sugar n’ Cream® (70 g/2.5 oz) in Ecru (MC)
- 1 ball Lily® Sugar n’ Cream® (70 g/2.5 oz) in Yellow (A)
- 1 ball Lily® Sugar n’ Cream® (70 g/2.5 oz) in Sage Green (B)
- 1 ball Lily® Sugar n’ Cream® (70 g/2.5 oz) in Hot Green (C)
- 1 ball Lily® Sugar n’ Cream® (70 g/2.5 oz) in White (D)
- 1 ball Lily® Sugar n’ Cream® (70 g/2.5 oz) in Red (E)
- 1 ball Lily® Sugar n’ Cream® (70 g/2.5 oz) in Hot Pink (F)
- 5 mm (U.S. H or 8) crochet hook or size needed to obtain gauge
- Small amounts of black yarn for embroidery of eyes
Gauge: 13 sc and 14 rows = 4 ins [10 cm].
Instructions:
Stripe Pattern
- With B, work 1 row.
- With C, work 2 rows.
- With D, work 1 row.
- With E, work 1 row.
- With F, work 2 rows.
- With D, work 1 row.
- With MC, ch 2.
- 1st row: (RS). 3 sc in 2nd ch from hook. Turn.
- 2nd row: Ch 1. 2 sc in each sc across. Turn. 6 sc.
- 3rd row: Ch 1. (1 sc in next sc. 2 sc in next sc) 3 times. Turn. 9 sc.
- 4th row: Ch 1. (1 sc in each of next 2 sc. 2 sc in next sc) 3 times. Turn. 12 sc.
- 5th row: Ch 1. (1 sc in each of next 3 sc. 2 sc in next sc) 3 times. Turn. 15 sc.
- 6th row: Ch 1. (1 sc in each of next 4 sc. 2 sc in next sc) 3 times. Turn. 18 sc.
- 7th row: Ch 1. (1 sc in each of next 5 sc. 2 sc in next sc) 3 times. Turn. 21 sc.
- Cont in this manner, inc 3 sts each row until there are 36 sc.
- Next row: Ch 1. 1 sc in each sc across. Do not turn. Working along straight top edge, work 24 sc evenly across. Join A with sl st to first sc.
- Beard: 1st row: With A, ch 2.
- Working in back loops only, 1 hdc in each of next 9 sc. 1 dc in each of next 4 sc. 5 dc in next sc. *Miss next sc. Sl st in next sc. Miss next sc. 5 dc in next sc.
- Rep from * once more. 1 dc in each of next 4 sc. 1 hdc in each of next 10 sc. Break A. Join B.
Hat
- 1st row: With B, ch 1. 1 sc in side of last hdc worked. Working in back loops only, 1 sc in each of next 24 sc along top straight edge. 1 sc in side of next hdc. Join C. Turn.
- 2nd row: With C, ch 1. 1 sc in each sc across. Turn. 26 sc.
- 3rd row: Ch 1. 1 sc in each sc across. Join D. Turn.
- 4th row: With D, as 2nd row. Join E. Turn.
- First 4 rows of Stripe Pat are complete.
- Keeping cont of Stripe Pat, proceed as follows:
Hat Shaping
- 1st row: (RS). Ch 1. Draw up a loop in each of next 2 sc. Yoh and draw through all loops on hook – sc2tog made. 1 sc in each sc to last 2 sc. Sc2tog over last 2 sc. Turn. 2nd to 4th rows: Ch 1. 1 sc in each st across. Turn.
- Keeping cont of Stripe Pat, rep last 4 rows 3 times more. 18 sc at end of last row.
- Next row: Ch 1. 2 sc in first sc. 1 sc in each sc to last 4 sc. (Sc2tog) twice over last 4 sc. Turn.
- Next row: Ch 1. 1 sc in each st across. Turn.
- Rep last 2 rows 3 times more. 14 sc at end of last row.
- Next row: (RS). Ch 1. 1 sc in each sc to last 4 sc. (Sc2tog) twice over last 4 sc. Turn.
- Next row: Ch 1. (Sc2tog) twice over first 4 sts. 1 sc in each sc across. Turn.
- Rep last 2 rows once more. 6 sc. Fasten off.
Edging
- Join B with sl st to bottom right edge of Hat. Ch 1. Work 1 sc around edge of Hat, having 3 sc in top corner.
- Join with sl st to first ch of bottom left Hat edge. Fasten off.
Pom-Pom
- With B, ch 2.
- 1st rnd: 8 sc in 2nd ch from hook. Join with sl st to first sc.
- 2nd rnd: Ch 1. 2 sc in each sc around. Join C with sl st to first sc. 16 sc.
- 3rd rnd: Ch 1. *1 sc in next sc. 2 sc in next sc. Rep from * around. Join with sl st to first sc. 24 sc. Fasten off.
Cheeks (Make 2)
- With E, ch 2.
- 1st rnd: 6 sc in 2nd ch from hook. Join with sl st to first sc.
- 2nd rnd: Ch 1. 2 sc in each sc around.
- Join with sl st to first sc. 12 sc. Fasten off.
Finishing
- With black yarn, embroider eyes. With E, embroider mouth. Attach Cheeks as shown in picture. Attach Pom-pom to top of Hat as shown in picture.
Read NextElf Dishcloth
Your Recently Viewed Projects


Thanks for your comment. Don't forget to share!
Morehouse17
Dec 30, 2017
Guess what everyone will be getting for stocking stuffers for Christmas. I found this dishcloth pattern just in time to make a few to gift. I think I can make at least four. So that the recipients will not fight over them, I plan on making them in different colors.
Delphine Bryant
Nov 30, 2017
Every dish cloth or hot pad project I see in such a pretty design I want to make it. Then, I don't want anybody to use it! After all the work put into it, these are just too adorable to risk harming them.
princess6860504
Oct 31, 2017
First thing I thought of was how cute this guy was, then I wanted to know what the dimensions were. I guess I can get a general idea by referencing the pic of it on the wooden dish rack. Great that it can be used as a hot pad, oven mitt OR the dish cloth. Wanna make a great gifting idea with this? Give it along with a new baking sheet with a cookie (dry) mix inside a Mason jar. A total crafters dream.
SKS4802
Oct 09, 2014
Size of finished product, PLEASE -- this is important!
FaveCrafts Editor JL
Oct 13, 2014
Hi there, It seems that the pattern creator did not indicate the size of the final product. Feel free to contact Lily Sugar n' Cream directly - they may have a better answer to your question. Thanks! - Julia from FaveCrafts
Report Inappropriate Comment
Are you sure you would like to report this comment? It will be flagged for our moderators to take action.
Thank you for taking the time to improve the content on our site.