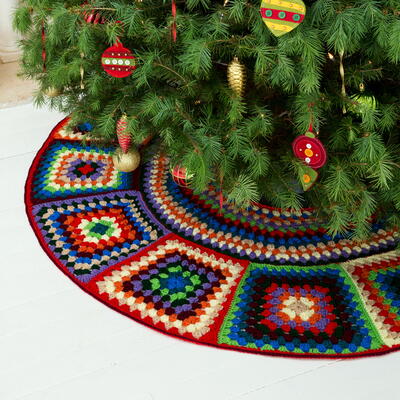
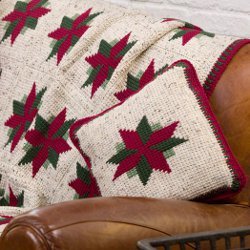
Christmas Throw and Pillow
Easy DIY Christmas crafts will make this Holiday season even more enjoyable. Crochet this Christmas Throw and Pillow to keep you warm and cheerful when you watch those Holiday classics you know and love. From "The Grinch" to "It's a Wonderful Life", you're sure to be snuggled up in winter comfort with this lovely crocheted afghan. This set also makes a wonderful gift for the holiday season. Crochet an afghan and pillow for your mom or grandma for a gift they're sure to love and appreciate for years to come.

Materials:
- 7 skeins Red Heart® “Super Saver®” yarn in Aran Fleck (A)
- 2 skeins Red Heart® “Super Saver®” yarn in Burgandy (B)
- 2 skeins Red Heart® “Super Saver®” yarn in Dark Sage (C)
- 1 skein Red Heart® “Super Saver®” yarn in Light Sage (D)
- 6mm [US J-10] crochet hook
- Yarn needle
- 16” pillow form
- Chart
Gauge: 13 sts = 3”’ 10 rows = 3” in Afghan st.
Instructions:
Throw
Block (Make 20)
- With Afghan hook and A, ch 31.
- Row 1: First Half: Insert hook in 2nd ch from hook, yo,draw yarn through st, *insert hook in next ch, yo, draw yarn through st; repeat from * across – 31 loops on hook;
- Second Half of Row: Yo, draw yarn through first loop on hook, *yo, draw yarn through 2 loops on hook; repeat from * across until 1 loop remains on hook, (counts as first loop of next row).
- Rows 2-29: Beginning with Row 2, follow Chart through Row 29.
- Row 30: Slip st in each vertical st across. Fasten off.
Block Border
- With right side facing and crochet hook, join A in upper right hand corner st.
- Round 1: Ch 3 (counts as dc), dc in corner st, dc in next 2 sts, [skip next st, dc in next 3 sts] across to 3 sts from corner, skip next st, dc in next st, 2 dc in next st, ch 2, turn to work along side edge, 2 dc in edge of first row, dc in edge of each row to last row, 2 dc in last row, ch 2, turn to work along opposite edge of foundation ch, dc in next st, dc in next 2 sts, [skip next st, dc in next 3 sts] across to 3 sts before next corner, skip next st, dc in next st, 2 dc in next st, ch 2, turn to work along side edge, 2 dc in edge of first row, dc in edge of each row to last row, 2 dc in last row, ch 2, slip st in top of beginning ch.
- Fasten off.
Finishing
- Arrange Blocks, 4 Blocks wide by 5 Blocks long, for Throw. Holding wrong sides together, join A in one Block with crochet hook, working through sts of two Blocks, slip st Blocks together. Repeat until all Blocks are joined.
Border
- Round 1: With right side facing and crochet hook, join A in upper right hand corner dc, ch 3 (counts as first dc), dc in each dc and ch-space around, working (2 dc, ch 2, 2 dc) in each corner ch-2 space, join with slip st to top of beginning ch.
- Round 2: Ch 1, sc in each dc around, working (2 sc, ch 2, 2 sc) in each corner ch-2 space, join with slip st to first sc.
- Round 3: Ch 3 (counts as first dc), dc in each sc around, working (2 dc, ch 2, 2 dc) in each corner ch-2 space, join with slip st to top of beginning ch 3.
- Round 4: Ch 1, sc in each dc around, working 4 sc in each corner ch-2 space, join with slip st to first sc.
- Round 5: Ch 3 with B, [dc with D in next sc, dc with B in next sc] around, end with D, join with slip st in top of beginning ch. Cut B.
- Round 6: With D only, ch 3 (counts as first dc), dc in same st, ch 1, skip next dc, [dc in next dc, ch 1, skip next dc] 56 times, [2 dc in next dc, ch 1, skip next dc] 4 times, turn to work along side edge, [dc in next dc, ch 1, skip next dc] 85 times, [2 dc in next dc, ch 1, skip next dc] 4 times, turn to work along next edge, [dc in next dc, ch 1, skip next dc] 57 times, turn to work along side edge, [dc in next dc, ch 1, skip next dc] 85 times, [2 dc in next dc, ch 1, skip next dc] 3 times, join with slip st to top of beginning ch 3. Fasten off.
- Round 7: Join B in top of beginning ch 3, ch 1, sc in same space, *[sc in next dc, dc in next dc 2 rounds below, pulling dc up to current level of work] across to first set of 2 dc of next corner, [sc in next 2 dc, dc in next dc 2 rounds below, pulling dc up to current level of work] 4 times; repeat from * around to last side, [sc in next dc, dc in next dc 2 rounds below, pulling dc up to current level of work] across to first set of 2 dc of next corner, [sc in next 2 dc, dc in next dc 2 rounds below, pulling dc up to current level of work] 3 times, join with slip st to first sc.
- Fasten off.
- Weave in ends.
Pillow
Back
- With Afghan hook and A, ch 51.
- Row 1: First Half: Insert hook in 2nd ch from hook, yo, draw yarn through st, *insert hook in next ch, yo, draw yarn through st; repeat from * across – 51 loops on hook;
- Second Half of Row: Yo, draw yarn through first loop on hook, *yo, draw yarn through 2 loops on hook; repeat from * across until 1 loop remains on hook, (counts as first loop of next row).
- Repeat Row 1 until 41 rows have been worked.
- Last Row: Slip st in each vertical st across.
- Fasten off.
Front
- With Afghan hook and A, ch 51.
- Row 1: First Half: Insert hook in 2nd ch from hook, yo, draw yarn through st, *insert hook in next ch, yo, draw yarn through st; repeat from * across – 51 loops on hook;
- Second Half of Row: Yo, draw yarn through first loop on hook, *yo, draw yarn through 2 loops on hook; repeat from * across until 1 loop remains on hook, (counts as first loop of next row).
- Repeat Row 1 until 8 rows have been worked.
Begin Chart
- Next Row: Work 5 sts, beginning with Row 3, work Chart across 31 sts, work 5 sts. Continue to work Chart as established until 29 rows have been worked.
- Repeat Row 1 for 6 rows.
- Last Row: Slip st in each vertical st across.
- Fasten off.
Block Border
- Round 1: With right side of Front facing, join D in upper right hand corner st, ch 3 (counts as first dc), 2 dc in corner st, ch 1, [skip next st, dc in next st] across to last st, 3 dc in last st, turn to work along side edge, 2 dc in edge of row, [ch 1, skip next row, dc in next row] across to last 2 rows, ch 1, skip next row, 2 dc in last row, turn to work along opposite edge of foundation ch, 3 dc in first st, ch 1, [skip next st, dc in next st] across to last st, 3 dc in last st,turn to work along side edge, 2 dc in edge of row, [ch 1, skip next row, dc in next row] across to last 2 rows, ch 1, skip next row, 2 dc in last row, ch 1, join with slip st to top of beginning ch 3.
- Fasten off.
- Round 2: Join B in top of beginning ch, ch 1, sc in first 3 dc, *[dc in next dc 2 rounds below, pulling dc up to current level of work, sc in next dc] across to first dc of corner 5-dc, sc in next 5 dc; repeat from * around to last side, [dc in next dc 2 rounds below, pulling dc up to current level of work, sc in next dc] across to last 2 dc, sc in next 2 dc, join with slip st in first sc.
- Round 3: Ch 1, sc in first 3 sts, *[skip next st, sc in next 3 sts] 12 times, sc in next 48 sts; repeat from * around to last side, [skip next st, sc in next 3 sts] to last 2 sts, sc in next 2 sc, join with slip st in first sc.
- Repeat Border around Pillow Block.
Finishing
- Round 1: Holding wrong sides together, join B in one Block with crochet hook, working through sts of two Blocks, ch 1, sc in each st around 3 sides, turn to work along last side, sc in each st across on only 1 piece
- Fasten off.
- Insert pillow form.
- Whipstitch opening closed.
- Weave in ends.
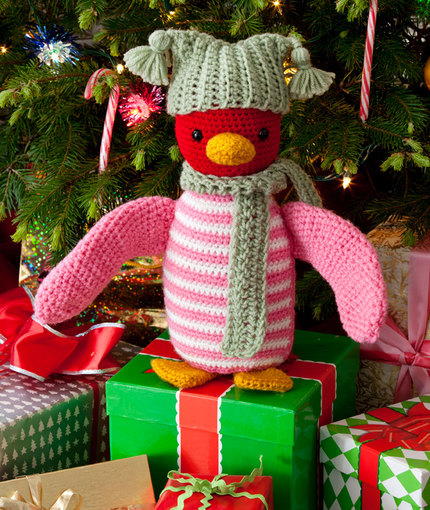
Read NextHuggable Happy Colors Penguin
Thanks for your comment. Don't forget to share!
JessiCAN
Oct 11, 2011
@odellhoward 2069129: You can find a link to the chart in the materials list. Clicking on this link will open the full pattern as a PDF. The chart will be on the third page of the pattern. Hope this helps! -- Editor of FaveCrafts
odellhoward 206912 9
Oct 10, 2011
I am not finding the chart for design. Can you help me locate it? Thank you...
CreativityGoddess
Aug 08, 2011
@Webelev 1940303 - We have just updated this project to include the PDF chart. You can now download the chart by clicking on the link in the materials list. -The editors of FaveCrafts
Webelev 1940303
Aug 08, 2011
I am not finding the chart for design. Can you help me locate it? Thank you.
Report Inappropriate Comment
Are you sure you would like to report this comment? It will be flagged for our moderators to take action.
Thank you for taking the time to improve the content on our site.