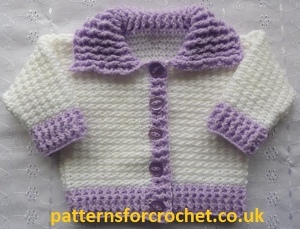
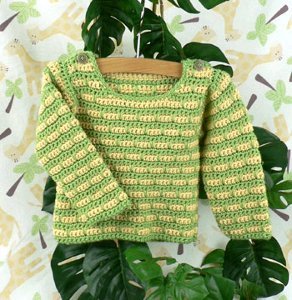
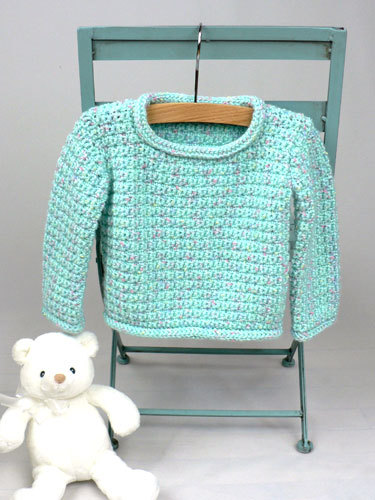
Button Hoodie
This adorable light-weight hoodie from Bernat Yarns is perfect for the springtime with your little one. For the beginning crocheter.

MATERIALS
- Bernat® Baby Coordinates (160 g / 5.6 oz)
- MC: 1 (1-1) ball of #09317 (Lovely Lilac)
- A: 1 (1-1) ball of #01000 (White)
- Crochet Hook: size 4 mm (U.S. G or 6) or size needed to obtain gauge.
- 5 buttons.
SIZES
6 (12-18) mos.
To fit chest measurement: 17 (18-19) ins 43 (45.5-48) cm].
Finished chest: 19 (20-23) ins [48 (51-58.5) cm].
GAUGE
15 hdc and 10 rows = 4 ins [10 cm].
INSTRUCTIONS
The instructions are written for smallest size. If changes are necessary for larger sizes the instructions will be written thus ( ).
Notes:
• Garment is worked in one piece, except for the hood, which is added at the end.
• Ch 2 for turning ch does not count as hdc.
Beg at Back, with MC ch 38 (40-45).
1st row: (RS) 1 hdc in 3rd ch from hook. 1 hdc in each ch across. Turn--36 (38-43) hdc.
2nd row: Ch 2. 1 hdc in each hdc to end of row. Turn.
Rep last row until work from beg measures 6½ (7-8) ins. [16.5 (18-20.5) cm] ending with a WS row.
Shape sleeves: Next 2 rows: Ch 13 (15-17). 1 hdc in 3rd ch from hook. 1 hdc in next 10 (12-14) ch. 1 hdc in each hdc of row. Turn--58 (64-73) hdc at end of 2nd row.
Work 12 (12-14) rows even.
Shape neck and divide fronts: Next row: (RS): Ch 2. 1 hdc in next 20 (23-27) hdc. Turn. Leave rem sts unworked.
Next row: Ch 11 (11-12). 1 hdc in 3rd ch from hook. 1 hdc in next 8 (8-9) ch. 1 hdc in each hdc to end of row. Turn--29 (32-37) hdc.
Work 11 (11-13) rows even on these 29 (32-37) hdc for right front.
Next row: (WS): Ch 2. 1 hdc in next 18 (19-22) hdc. Place a marker on last st. Turn. Leave rem sts unworked.
Cont even on last 18 (19-22) hdc until work from marker measures 6½ (7-8) ins [16.5 (18-20.5) cm], ending with a WS row. Fasten off.
With RS facing, miss 18 (18-19) hdc at center back. Join MC with sl st to next hdc. Ch 11 (11-12). 1 hdc in 3rd ch from hook. 1 hdc in next 8 (8-9) ch. 1 hdc in same sp as first sl st. 1 hdc in each hdc to end of row. 29 (32-37) hdc. Turn.
Work to correspond to right front, reversing all shapings.
FINISHING
Sew side and sleeve seams.
Hood: 1st row: (RS). Join MC with sl st at corner of right front neck edge. Ch 1. Work 38 (38-40) sc evenly across neck edge. Turn.
2nd row: Ch 2. *1 hdc in each of next 2 sc. 2 hdc in next sc. Rep from * to last 2 (2-4) sts. 1 hdc in each of last 2 (2-4) sts. 50 (50-52) hdc.
3rd row: Ch 2. 1 hdc in each st across. Turn. Rep last row until hood measures 7½ (8-8½) ins [19 (20.5-21.5) cm].
Fasten off. Sew top hood seam.
Outer edging: 1st rnd: (RS). Join A with sl st at lower edge of right side seam. Ch 1. Work sc evenly around outer edge of Jacket (including hood), working 3 sc in each corner. Join with sl st to first sc.
2nd rnd: Ch 1. 1 sc in first sc. Ch 3. *Miss next 2 sc. 1 sc in next sc. Ch 3. Rep from * around to last 2 sc. Miss last 2 sc. Join with sl st to first sc. Fasten off.
Sew on buttons evenly spaced using loops worked in final rnd of edging as button loops.
Sleeve edging: 1st rnd: (RS). Join A with sl st at sleeve seam and work sc evenly around sleeve edge. Join with sl st to first sc.
2nd rnd: Ch 1. Working from left to right instead of right to left as usual, work 1 reverse sc in each sc around. Join with sl st to first sc. Fasten off.
Read NextBaby Pullover Sweater
Your Recently Viewed Projects

Thanks for your comment. Don't forget to share!
cmksculptures 2501 775
Apr 25, 2014
well I just finished mine. It was a little confusing with the sleeves, once I figured it out I was able to make the sweater.
princesscloset 226 6019
Aug 28, 2011
I felt the pattern was not even. the shoulders were uneven at the neck and the hood was attached to the front neckline. I did not care for the pattern.
Mary10
Aug 16, 2010
I got through the directions ok, but next time I think I will add ribbing at the wrists, the sleeves seem a little short.
Crafter 8312380
Aug 06, 2010
I was able t figure out the sleeve confusion, but I am concerned that the sleeve will be too short. Is this suppose to be a shot sleeved sweater?
editor Linda
Jul 29, 2010
It looks like this sweater has caused some confusion First one small thing that might be adding to the confusion--in the Notes on the instructions it does mention that the chain for the turning chain doesn't count as an hdc so that could be causing some of the confusion br br As for the construction of the garment here's a brief walkthrough of how it's constructed You start at the bottom edge of the back of the cardigan then add the sleeves to the left and right of the back then work the sleeves for a while then you make one front ending at the bottom edge of that front piece When you complete that front you end the yarn attach to the unfinished stitches on the other half of the sweater and make the second front Then you add the hood and the contrasting trim edging br br Where the…Read More instructions say Shape Sleeves you work the - chain stitches in the first row to add one sleeve and hdc in the rd chain from the hook and the next - chains then in the hdcs across the back Then to start the next row you do the same--working those chain stitches then working back in hdc as before Since you don't count the chain s as hdcs you're making - hdcs on each sleeve and working the - hdcs across the back--that's for the smallest for the medium and for the largest Remember you aren't counting the chain turning chains in the stitch count As you work the sleeves your piece will look like a T When you work the fronts they're worked as two separate pieces though the neck opening will look more like a slit not a round opening br br For lack of a better description of the sweater's shape when the back sleeves and fronts are all complete it will look a bit like a plus sign with the north-pointing piece split vertically The sleeves will be the two side pieces and the back will be the south-pointing piece br br When you get to the finishing step you fold the sweater in half so the sleeves are folded along what would be the shoulders The bottom edges of the front and back will be even and you'll have that t-shape again You'll sew the sleeve seam turn at the armpit and sew down the side seam Do the same on the other sleeve and side seam br br Hope this helps
cheryl56
May 17, 2010
I have been raking my brains trying to figure out how to put all this together the pattern says its worked in one piece i have done everything except the hood for it because it says to sew up the side seams and arms i cant figure out for the life of me how to put this thing together your directions are not clear on how this is put together Need Help!!
Jeanne17
Mar 22, 2010
I am working this sweater too and I am at the same place...are we supposed to add 13 chain on each side for sleeves and then work the pattern? If I add the 13 chain afetr working the first sleeve and then work across the back then the pattern and count is off.
cheryl56
Mar 21, 2010
I tried to do this sweater but the section on the sleeves is unclear are these sleeves suppose to continue on from the back piece? I wasnt sure if I was suppose to end when i finished the back and start from scratch on the sleeves? or are the sleeves suppose to continue on from the back? I'm a bit confused what the 58 is? I am doing the smallest sweater but im not sure what the 58 is suppose to be. Shape sleeves Next 2 rows Ch 13 (15-17). 1 hdc in 3rd ch from hook. 1 hdc in next 10 (12-14) ch. 1 hdc in each hdc of row. Turn. 58 (64-73) hdc at end of 2nd row. Work 12 (12-14) rows even.
Report Inappropriate Comment
Are you sure you would like to report this comment? It will be flagged for our moderators to take action.
Thank you for taking the time to improve the content on our site.