Crochet Newsboy Hat Pattern
This crochet newsboy hat tutorial is easy to make, and so fashionable!

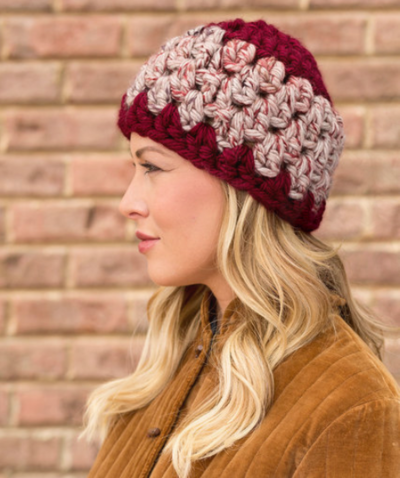
This Crochet Newsboy Hat Pattern from Red Heart Yarn is a great addition to your trendy winter hats collection. A piece of stiffening helps the brim stay stiff and keep its shape. Best of all, it's so easy to crochet! Hats like this are great winter staples. Skip the boring and simple crochet beanie patterns and wear a hat with some attitude this summer. This crochet newsboy cap is easy to make and perfect for a day on the slopes or a walk in the snow. The simple yet small brim on this hat allows you to shade the sun without skipping too much sunshine. Fabulous in a winter white, you could easily work this pattern up in something brighter.
One of the best things about this free hat pattern is that it is warm without being way too hot. The delicate rows allow for just a bit of breathing room, so your head will not get overheated on a long walk or an intense ski. If you are looking for pretty ways to make this pattern a little more feminine, consider creating a delicate flower to perch on the brim of the hat or adding a pom at the top.
Crochet HookH/8 or 5 mm hook
Yarn Weight(4) Medium Weight/Worsted Weight and Aran (16-20 stitches to 4 inches)
Crochet Gauge16 dc = 4”; 9 rows = 4”. CHECK YOUR GAUGE. Use any size hook to obtain the gauge.
Finished SizeCap circumference at bottom edge: 18”
Materials List
- Red Heart® Super Saver® (Art. E300) solid color 7 oz (198 g), 364 yd (333 m); multi color and print 5 oz (141 g), 244 yd (223 m),flecks 5oz (141g), 260 yds (238 m) skeins): 1 skein 313 Aran
- Crochet hook, 5mm [US H-8]
- Heavy-weight interfacing or plastic for brim
- Stitch markers
- Yarn needle
How to Crochet the Newsboy Hat Pattern Instructions
CAP
Ch 4, slip st in first st to form ring.
-
Round 1: Ch 3 (counts as dc here and throughout), work 7 dc in ring, slip st to top of beginning ch to join, place marker for beginning of round – 8 sts.
-
Round 2: Ch 3, 2 dc in same space, 3 dc in each st around, slip st in top of beginning ch – 24 sts.
-
Round 3: Ch 3, [(dc and Fpdc) in next st, dc in next 2 sts] 7 times, (dc and Fpdc) in next st, dc in last st, slip st in top of beginning ch – 32 sts; 8 Fpdc.
-
Round 4: Ch 4 (counts as dc and ch 1 here and throughout), skip next st, [(dc and Fpdc) in next st, ch 1, skip next st, dc in next st, ch 1, skip next st] 7 times, (dc and Fpdc) in next st, ch 1, skip next st, slip st in top of beginning ch – 40 sts.
-
Round 5: Ch 3, dc in ch-1 space, dc in next st, *(dc and Fpdc) in next st, [dc in ch-1 space, dc in next st] twice; repeat from * 6 more times, (dc and Fpdc) in next st, dc in ch-1 space st, slip st in top of beginning ch – 48 sts.
-
Round 6: Ch 4, skip next st, dc in next st, *ch 1, skip next st, (dc and Fpdc) in next st, [ch 1, skip next st, dc in next st] twice; repeat from * 6 more times, ch 1, skip next st, (dc and Fpdc) in next st, ch 1, skip next st, slip st in top of beginning ch – 56 sts.
-
Round 7: Ch 3, *[dc in ch-1 space, dc in next st] twice, (dc and Fpdc) in next st, dc in next ch-1 space, dc in next st, ch 1, skip next stitch; repeat from * 6 more times, [dc in ch-1 space, dc in next st] twice, (dc and Fpdc) in next st, dc in next ch-1 space, slip st in top of beginning ch – 64 sts.
-
Round 8: Ch 4, skip next st, *[dc in next st, ch 1, skip next st] twice, (dc and Fpdc) in next st, ch 1, skip next st, dc in next st, ch 1; repeat from * 6 more times, [dc in next st, ch 1, skip next st] twice, (dc and Fpdc) in next st, ch 1, skip next st, slip st in top of beginning ch – 72 sts.
-
Round 9: Ch 3, *[dc in ch-1 space, dc in next st] 3 times, Fpdc in next Fpdc, dc in next ch-1 space, dc in next st; repeat from * 6 more times, [dc in ch-1 space, dc in next st] twice, Fpdc in next Fpdc, dc in next ch-1 space, slip st in top of beginning ch – 72 sts.
-
Round 10: Ch 4, skip next st, *[dc in next st, ch 1, skip next st] 2 times, dc in next st, Fpdc in next Fpdc, ch 1, skip next st, dc in next st, ch 1, skip next st; repeat from * 6 more times, [dc in next st, ch 1, skip next st] 2 times, dc in next st, Fpdc in next Fpdc, ch 1, skip next st, slip st in top of beginning ch – 72 sts.
-
Rounds 11-15: Repeat Rounds 9-10, end with Round 9.
-
Round 16: Slip st in each st around.
BRIM - Top Side
Mark 22 sts on front of Cap on Round 16 for Brim.
-
Row 1: With right side facing, join yarn in first marked st, working in front loops only, sc in each next 22 sts.
-
Row 2: Ch 1, turn, sc in each st across, sc in back loops in next 4 sts on Cap – 26 sts.
-
Row 3: Ch 1, turn, sc in each st across, sc in front loops in next 4 sts on Cap – 30 sts.
-
Row 4: Ch 1, turn, sc in each st across, sc in back loop in next st on Cap – 31 sts.
-
Row 5: Ch 1, turn, sc in each st across, sc in front loop in next st on Cap – 32 sts.
-
Row 6: Ch 1, turn, sc in each st across, sc in back loop in next st on Cap – 33 sts.
-
Row 7: Ch 1, turn, sc in each st across, sc in front loop in next st on Cap – 34 sts.
-
Fasten off.
Bottom Side
-
Row 1: With wrong side facing, join yarn on wrong side of Row 1 of Brim, sc in back loops of first 22 sts.
-
Row 2: Ch 1, turn, sc in each st across, sc in front loops in next 4 sts on Cap – 26 sts.
-
Row 3: Ch 1, turn, sc in each st across, sc in back loops in next 4 sts on Cap – 30 sts.
-
Row 4: Ch 1, turn, sc in each st across, sc in front loop in next st on Cap – 31 sts.
-
Row 5: Ch 1, turn, sc in each st across, sc in back loop in next st on Cap – 32 sts.
-
Row 6: Ch 1, turn, sc in each st across, sc in front loop in next st on Cap – 33 sts.
-
Row 7: Ch 1, turn, sc in each st across, sc in back loop in next st on Cap – 34 sts.
-
Fasten off.
FINISHING
Using Brim as a template, cut a piece of interfacing or plastic to same dimensions. Slip piece in between layers of Brim and sew Brim closed. Weave in ends.
5 Fun Facts about Crochet Newsboy Hat Patterns
Whether you just love the style of crochet newsboy hat patterns or came looking for this particular pattern because you’re a huge fan of the movie musical Newsies, no one can argue that these adorable little hats have not been around for a long time. Newsboy caps have an interesting history, making them even more exciting to crochet!
-
While newsboy caps were made popular by the newspaper boys (that’s how they got their name!), these caps were not exclusively worn by boys.
-
Newsboy caps became popular in the late 19th and early 20th century and were worn by both boys and young men.
-
Other names for the newsboy cap? The Jay Gatsby, Baker Boy, Bandit Cap, Apple Cap, Applejack Hat, Lundberg Stetson, and the Poor Boy Cap.
-
Newsboy caps were worn by men of all classes in the early 20th century.
-
Newsboy hat patterns were traditionally worn by males, but experience a new life in women’s wear in the 20th century!
More Knit and Crochet Newsboy Hat Patterns


Abbreviations
- Fpdc
- Front post double crochet
What type of hat is your favorite style? Newsboy caps, berets, beanies, or something else?
Read NextCrocheted Hats to Donate
Your Recently Viewed Projects
Thanks for your comment. Don't forget to share!
nglaser2
Apr 18, 2021
This pattern is very difficut to follow. I have ripped out row 7 so much the yarn has broken. It says after the fpdc to dc in sp and next dc and refers yoyu back to the which says dc in ch sp. If you follow the instructions you end up with less stitches
Zeemer
Jun 18, 2018
Nice newsboy hat. Would be nice in a darker solid color. Great as gift for nephews and little boys.
simplewoman77 6213 379
Sep 02, 2013
QUESTION - PETITE BRIMMED CAP - PATTERN STATES A DC AND Fpdc IN SAME STITCH. I HAVE DONE A FPDC ONLY. IS THAT WHAT YOU MEAN. ALSO DO YOU HAVE WRITTEN DIRECTIONS OR A VIDEO TELLING ME HOW TO DO IT LEFT HANDED. i DID A DC AND THEN THE FPDC ON THE SAME STITCH BUT IT DOESN'T WORK ON ROW 6. CAN YOU RESPOND TO ME. THANK YOU. MS. E. G. HEBBLEWAITE
Kaylee
Feb 11, 2016
Hi simplewoman77 6213 379, We unfortunately do not have a video or written instructions beyond these for the pattern. Just make sure to read the directions carefully. The steps were numbered by steps and not rows. We will be updating that shortly. For tips on how to crochet with your left hand check out this easy how-to from our friend at AllFreeCrochet.com: http://www.allfreecrochet.com/Tutorials/How-to-Crochet-Left-Handed Hope that helps! - Kaylee, Editor of FaveCrafts
divastylz 8270785
Sep 12, 2012
So I made one, not very hard at all. However you really need to read. The steps are numbered differently than the rows for the body of the cap. I ripped mine out because based on the way step 12 is written my work was off and not really making much sense. For whatever reason I also ended up with one additonal repeat, but that's ok, I used thin yarn and a bigger hook and came out with a teen to adult size hat. I will be doing this again and modifying it so I can make a similar looke EVEN FASTER. THANKS
nmdannear 2677897
Feb 07, 2012
This hat should have been easy to make but it wasn't because the instructions didn't make sense after round 6. In round 7 I found that the fpdc didn't line up with the previous row. I thought that I was making a mistake so I took it apart, many times. It only took me 2 hours to realize that I was reading the instructions just fine and that the instrustions are wrong. I was so mad...I hate wasting my time! These instructions need to be corrected and reposted. I wish someone would make sure that the patterns they create are correct and simple enough to understand.
divastylz 8270785
Sep 04, 2012
I'm curious if there was an errata. I'd like to make this, it's very cute and campy.
mlwalton13
Dec 12, 2020
Thank you! I knew it wasn't me! The instructions are unclear. Typically, when a pattern calls for a repeat, the stitches are enclosed , repeat from to . These instructions do not have the correct number of stitches between FPDC in the fourth row. I think I am just going to wing in visually.
guillearanda 07657 03
Feb 01, 2012
I would like to make this hat but there is nowhere where you explain how to make a FPDC (Front post Double Crochet).
lrodriguez73 62486 77
Feb 02, 2012
try this web-site http://www.youtube.com/watch?v=yIu4HfUpvsY
editorKS
Feb 02, 2012
@guillearanda 0765703, we have lots of helpful tutorial videos on our YouTube channel, as well as the channel of our sister site AllFreeCrochet! Here is a link to some videos related to this stitch: http://www.youtube.com/user/AllFreeCrochet/search?query=front+post+double+crochet Hope this helps! --Editors of FaveCrafts
nmdannear 2677897
Feb 07, 2012
I learned to make a fpdc on you tube. It was very easy to watch a video about it rather than to read and figure it out.
jgould42 5758745
Jan 29, 2012
I am having a problem with row 10- It starts with "twice" am I missing instructions for some of this row? '
JennyBee1
Dec 23, 2011
@jbea1973 4931135, I'm sorry to hear of your trouble. I have two options for you: 1. You can contact the pattern designer directly for help. The designer is specified in the byline. 2. I might also suggest that you try posting your question to our sites Facebook page. It is monitored by the editor and is a great resource for helpful tips and suggestions from our Facebook friends; perhaps they can offer some guidance! Here is the link: http://www.facebook.com/FaveCrafts --editors of FaveCrafts
jbea1973 4931135
Dec 20, 2011
I'm having trouble with Round 10 of this pattern. Had correct no. of stitches on rd.9, but on this Rd I have about 7-8 to many. I have ripped out about 12 times and still can't find my mistake, Help
editorKS
Dec 08, 2011
Hi, doroth1 6715725. We're happy to hear you enjoy this pattern! The instructions for the brim are below the instructions for the cap. In the "Finishing" instructions it says to use the brim AS a template; there is no brim template. Hope this helps! --Editors of FaveCrafts
doroth1 6715725
Dec 06, 2011
I like this patterns very much and is soo cute! I was looking for the brim template?
Report Inappropriate Comment
Are you sure you would like to report this comment? It will be flagged for our moderators to take action.
Thank you for taking the time to improve the content on our site.