Silk Lace Crochet Bag Pattern
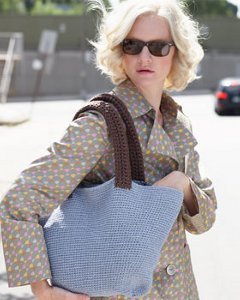
Use a shiny silk thread in light gold for this beautiful heirloom-quality Silk Lace Crochet Bag Pattern. Small beads also compliment the design of this crochet lace pattern. The delicate look and vintage flair make this pattern a standout. Crochet purse patterns are a great way to save money but still look good. You can channel today's fashions without ever leaving home - what could be better than that? Channel your favorite Victorian heroine and show off your most aristocratic side with this free crochet pattern. People will think you stole it from your great grandmother's closet.

Materials:
- Crochet Hook; steel, size 4
- Thread: 100m of Silk Serica — we used color 2013 Light Gold
- small, coil-less safety pin (regular safety pins will snag silk thread)
- optional: 80 beads to match or complement thread color
- fabrics: lining — 12-inch square of matching satin; interlining — 12-inch square of soft lining fabric
- one tapestry needle size 22 or size to fit through beads and thread
Gauge: 8 sc (across top opening of bag) = 1 inch
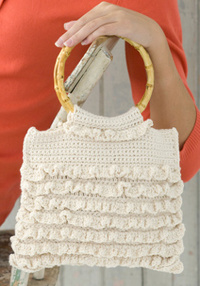
It's time to embrace your girly side! The free crochet patterns featured in 16 Crochet Ruffle Patterns look good on any person, no matter your age. In addition to crochet bag patterns, you'll find kids' patterns, shawls, wraps and more. Best of all, ruffles never go out of season, so you can save your creations and show them off forever.
Instructions:
Ch 12, form into a ring with 1 sl st into first ch.
ROW 1: Ch 3, 35 dc in ring. End with 1 slip st in top of starting ch. Ch 1, turn.
ROW 2: Working in back lp of ea dc, work 1 sc in ea dc around. (36 sc counting starting ch of 1, as 1st sc.) Turn.
ROW 3: Working in back lp only, 1 sc in ea sc. End with 1 sl st in 1st sc. Do NOT turn at end of row.
ROW 4: Ch 3, sk 1st sc, work in both lps of ea sc (1 dc in ea of next 3 sc, ch 3) 9 times, ch 3, 1 sc in ea of next 7 sc, sk last sc.
ROW 5: (Ch 3, 2 dc in center dc of next 3-dc block, ch 2, 2 dc in same st, [dc shell made] 9 times) ch 3, 2 sc in ch-3 sp, 1 sc in ea of next 7 sc, 2 sc in last ch-3 sp. (11 sc in solid block of sc at top of purse + 9 dc shells)
ROW 6: Ch 3, (shell in center of next shell, ch 6.) 9 times, ch 3, 2 sc in next lp, 1 sc in ea of next 11 sc, 2 sc in last lp. (15 sc in solid block + 9 shells).
ROW 7: (Ch 3, 9 dc in center of next shell, ch 3, 1 sc in ch-6 lp) 9 times, ch 3, 2 sc in next lp, 1 sc in ea of next 15 sc, 2 sc in last lp. (19 sc + 9-dc shells.)
ROW 8: (Ch 12, 1 sc in 5th dc of ea 9-dc group,) 9 times, ch 3, 2 sc in next lp, 1 sc in ea of next 19 sc, 2 sc in last lp. (23 sc + 9 ch-12 lps.)
ROW 9: Ch 3, (12 dc in ea lp) 9 times, ch 3, 2 sc in next lp, 1 sc in ea of next 23 sc, 2 sc in last lp. (27 sc + 9, 12-dc groups.)
ROW 10: Ch 3, 1 dc in ea of next 3 dc, (ch 3, 1 dc in ea of next 6 dc) 16 times, ch 3, 1 dc in ea of next 3 dc, ch 3, 2 sc in next lp, 1 sc in ea of next 27 sc, 2 sc in last lp. (31 sc, + 17 groups of 6 dc + 3 dc to start and finish round.)
ROW 11: Ch 3, dc-shell in first sp, (dc-shell in next lp, ch 4) ch 3, 2 sc in last lp, 1 sc in ea sc, 2 sc in last lp. (35 sc + 18 shells.)
ROW 12: Ch 3, (shell in center of next lp, ch 5) 18 times, 2 sc in next lp, 1 sc in ea sc, 2 sc last lp, ch 3. (39 sc + 18 shells.)
ROW 13: (Ch 3, 2 dc in next shell, ch 4, 1 sc in 1st ch of ch-4 ch, [1 picot made] 4 times in same shell, 2 dc in same shell, [1 large picot shell made] ch 3, insert hk under both ch lps of last 2 rounds and work 1 sc) 18 times, 2 sc in next lp, 1 sc in ea sc, 2 sc in last lp. (43 sc + 18 lge picot shells). End off thread.
Repeat rnds 1-13 to make second half of bag identical to the first.
Beads
Thread 76 beads onto a spool of Silk Serica thread. (Reserve 4 rem beads for drawstring handles.) Choose a tapestry needle that will pass through both the bead eye while large enough to thread needle with silk.
Crochet both halves together to include beads as follows:
Hold both halves together, one over the other, wrong sides facing to join. Ch 2, 1 sc in 1st picot of front half of bag, ch 2, 1 sc in 1st picot of back half of bag, ch 2, 1 sc in next picot of front half of bag, bring 1 bead upward on thread holding it firmly against the hk, sl st to hold bead in place, ch 2, 1 sc in next picot of back half of bag. Repeat, around the edges of both halves of bag, placing a bead after completing ea sc on front half of bag. Make sure that you are always joining the picots from one half of the bag to the corresponding picot of the second. You should have 4 beads for each picot in ea large picot shell. Rep until both sides are joined together leaving sc sections separate to form opening at top of bag. Do not cut thread.
Edging
Work around top opening of bag only using the strand of silk thread still in place:
RND 1: Ch 5, (sk 2 dc, 1 dc in next lp) twice, ch 5, 1 dc in sp between next 4-dc group, ch 5, sk next 2 dc, 1 dc in next lp, ch 5 (1 dc in next sc and in ea 3rd sc around bag opening,) end with ch 5, 1 dc in last sp, ch 5, sk 2 dc, 1 dc between last 2 dc, ch 3, sl st in 3rd ch of starting ch. (42 lps)
RND 2: Ch 3, (1 dc, ch 2, 2 dc) in 1st lp, ch 3, 1 sc in next lp, ch 3, dc-shell in next lp. Rep from around. (21 dc-shells.)
RND 3: Sl st to reach next ch 3 sp in center of shell, ch 3, (counts as 1st dc of 1st shell only, complete lge picot shell as in row 13, sk next 2 lps, 1 lge picot shell in ea ch 2-sp of ea shell of prev rnd. End with 1 sl st in 1st st of 1st shell, end off. Weave in all cut ends.
Draw-string handles: make 4
Using same hk and silk thread, crochet a chain 32-inches long.
Turn, ch 1, sc into ea ch to end. Cut thread leaving 5-inch tails.
Starting at side seam of bag, thread strip in and out of the lowest row of shell spaces on one side of bag. Withdraw strip at opposite edge of side seam. Pull strip until even at both sides. Turn purse and repeat for back half of purse.
Staring at side seam of bag, thread 3rd strip in and out of the row of shell spaces just above the first, taking care to alternate the spaces used with the previous strip. End at side seam. Rep for 4th strip.
Pull strips evenly so they extend beyond the sides of the purse evenly.
Close handles
Take cut ends of silk on ea strip and using the needle, thread 1 bead onto the end of the silk. Rep for second strip on same side of bag. Join ends of strips by passing the needle through the eye of both beads 2 or 3 times as space allows in the bead hole. Cut rem thread ends and weave them into the sc portion of each strip. Rep for opposite of bag. Bag closes by pulling each dbl handle on ea side to gather. To open, pull gathers apart. Dry block by pinning purse and handles on blocking board. Be sure to use rust-proof pins to avoid leaving marks on silk. Cover with a damp cloth for an hour or so. Remove cloth and allow bag to dry thoroughly.
Lining and interlining
Choose matching or contrasting color of heavy satin for lining. Cut 2.
Choose a lighter weight in harmonious color for interlining. Cut 2. Do not use heavy satin for both layers or purse will become stiff and may lose its shape.
Cut fabric using blocked purse as a pattern, allowing at least one-inch of seam allowance around the edge of the purse. Baste the two pieces of satin together, right sides facing. Turn right outside and drop lining into purse. Adjust seam allowances as needed to completely fill the purse without wrinkles. Remove satin lining from purse and stitch around by hand or machine to fit purse. Trim excess fabric in seam allowance. Turn right side out and press seams well around. Set aside.
Cut interlining using the same pattern shape as you used for the final shape/size of satin lining. Right sides facing, sew around making seam allowance 1/8” smaller than lining. This allows the weight of the contents of the bag to be borne by the interlining rather than to stretch the lace itself. Do not turn interlining inside out. Instead, drop it into the lining so seam allowances of interlining lie against the wrong side of lining. Use your hand to make sure both layers are even throughout.
Last, turn the seam allowances of both lining and interlining to fit the last row of the sc crocheted portion of the bag. Manipulate so that both seam allowances face each other, leaving neat folds of each fabric layer at top. Pin with long silk pins around the opening of bag. Ease as needed to avoid tucks as lining is just a bit larger than interlining. When both layers are smooth and pinned around the bag’s opening, using matching silk thread and tiny whipped stitches, attach both fabric layers as one around the crochet portion of bag. Make sure not to catch the handle strips into your stitching otherwise the draw-strings will not be able to be pulled together to open or close. They must slide easily through the spaces of the lace.
Up Next:
Read NextCities Circle Crochet Bag
Your Recently Viewed Projects
Thanks for your comment. Don't forget to share!
Delphine Bryant
Nov 04, 2018
This crochet project will wind up also being a piece of artwork. The directions are a little sparse in that it does not indicate the size of the finished bag and not really sure if this project is single or double sided. None the less this photo shows a beautiful bag and if you decide to make it you will end up with a beautiful one of a kind lace crochet bag.
Morehouse17
Oct 31, 2018
This is a beautiful bag and because there is not a skill level indicated on this page I am going to go out on a limb and say this one is for an advanced crocheter. I will still save it and maybe revisit some other day and work up the nerve to actually make this.
AFC Editor Annalis a
Jan 29, 2016
This is one of the most beautiful bags I have seen lately. It seems like the perfect project to occupy your hands during an episode of Downton Abbey. The neutral color also makes this bag extremely versatile.
johannerobichaud 7 498685
Jan 20, 2016
Has anyone completed this bag and can anyone leave any comments or suggestions where the rows get wonky. If you are the person that created this pattern and you please put in corrections! Thanks
Kaylee
Jan 20, 2016
Hi johannerobichaud 7 498685! For pattern questions, I suggest reaching out to the designer (in this case Krenik) for clarification as we did not make this pattern in our studio. You could also check in with our active Facebook community with questions, as well. Hope that helps! - Kaylee, Editor of FaveCrafts
Grantvicki 5625488
Apr 11, 2018
In case you are still interested....I think row 10 should repeat brackets 17 times, not 16 as written.
Grantvicki 5625488
Apr 11, 2018
Also, row 11 should read 'ch 3, dc-shell in first lp (ch 4, dc-shell in nxt lp) 17 times, ch3, 2sc in last lp, 1 sc in ea sc, 2 sc in last lp. (35 sc 18 shells)
Grantvicki 5625488
Apr 11, 2018
And to row 3 ch 1 to start, check you have 36 stitches at end.
Grantvicki 5625488
Apr 11, 2018
And for row 4 at end after final ch 3....skip one stitch then sc in next 7 sc
Grantvicki 5625488
Apr 11, 2018
Row 12 should read ch3, dc-shell in next lp, (ch 5, dc-shell in next lp) 17 times, ch 3, 2 sc in next lp, 1sc in ea sc, 2 sc last lp. (39 sc, 18 shells)
mangs2000 5846529
Jun 03, 2013
I am confused about where to start the top opening of bag row. Could someone help me please?
hazelnolan 2436240
Jan 06, 2015
Hi mangs I was just wondering if you managed to finish this bag as i know this was posted some time ago do you still need help
hazelnolan 2436240
Jan 06, 2015
Hi mangs did you managed to finish bag or do you still need help
nummelin 8515349
May 07, 2013
I think the drawstring row is missing. I have gotten this far, please don't let me down!
hazelnolan 2436240
Jan 21, 2013
I carnt beleave ive finished this bag .I have not been crocheting for long but i stuck at it and it has come out lovely . I didnt use the silk thread i used more like a stringy wool in cream and satan lining . The insructions for the opening of the bag is a little confusing because it makes out your working on the sc at opening of bag but you are working on the loops before the sc .try and stick with it you will be really happy beutifull
mangs2000 5846529
Jun 03, 2013
Hi, could you please help me as to where do I start the top opening of hte bag row?
marybethblus 80622 07
Sep 01, 2012
Oh My Gosh!!! This is Sooo Beautiful!! Thanks for sharing this pattern! I can't wait to make it for my Granddaughters, Daughters and Me!!! Thanks Again and Again Liz! May God Bless U and Yours!
bjkuefner 1496623
Apr 17, 2012
there are several errors in this pattern. It would be nice if the one who made this pattern fixed it before you posted again. I have tried several times and would really like to be able to finish it
dandkpacker 613833 4
Feb 27, 2014
I also have found that there are several errors, which has meant some unpicking, and using a common sense approach from years of experience to sort it out. If you just follow the pattern as is, it is unbalanced. I'm at the end of row 8 and about to unpick this as the same thing has happened again - a 3 chain loop on one side and a 12 chain loop on the other. I'll persevere, but will carefully look at the instructions for each row before commencing to make sure they are correct at each end.
CreativityGoddess
Jul 25, 2011
Hi craftyjeany 1720802 - We would suggest contacting the designer for this pattern directly. They will be best able to assist you with the instructions. Here is where you can find their contact information: http://www.kreinik.com/contact_us.htm Hope this helps! -The editors of FaveCrafts
craftyjeany 172080 2
Jul 25, 2011
Does anyone ever read or answer these posts? I have been waiting for months for an answer to my question.
craftyjeany 172080 2
May 27, 2011
I have problems after I crocheted both pieces together,it says ch5,(sk2 dc ,1dc in next lp)twice.ch5, 1dc in sp between next 4-dc group. There are no dc groups. top edging ended off with all sc. All I have are sc and picot shells..Is there a row missing or am I reading the pattern wrong? I really need this bag done for my wedding. please help.
hazelnolan 2436240
Jan 08, 2013
Yes craftyjeany i have come to the same problem its such a shame ,so im gonna just have to make it up as i go along
hazelnolan 2436240
Jan 14, 2013
after carefully studying pattern i have realised pattern is not wrong you have to go right to edges in the loops before you come to the sc but the was it says on pattern is confusing
mangs2000 5846529
Jun 03, 2013
Hi, Can you tell me how to do the opening of the mouth line please? I have joined both sides and now stuck at the row one of the mouth opening.
dlreid47 3952571
May 19, 2011
I found most of this pattern simple , that is until I got to row 13 ,I am confused as to what i am supposed to do . I did the first large picot but I don't understand what they mean when they say to insert the hk in both ch lps of last 2 rounds . Can anyone help make these instructions a little clearer ?? Please
hazelnolan 2436240
Jan 08, 2013
yes if you insert your needle in both the large loops of the previous rows and make a sc ,so your joining both the loops together with a sc. I know it was a while ago you asked question but i hope it was helpfull
any 4462833
Apr 18, 2011
I am having the same problem that the first person had. to do edging there are no double groups of four to work with. I think there are a couple of rows of the pattern missing.Even looking at the picture it seems to have more to the edging on top than 3 rows. I made it out of Red heart crochet threadsize #5. It takes 3 spools. I want to finish it for my wedding. Can anyone help me finish it? my e-mail is craftyjeany@yahoo.com . please help.
rummage 6432348
Jan 05, 2011
I am confused by the instructions following edging. You say work with silk thread - could not locate the thread you suggested. the silk thread I did buy is only sewing thickness. Don't think it will work. Also, you say to begin round 1 along top, but there are no dcs in the top; only scs.??? I think you may mean to go around the bag; bu
capless
Jun 01, 2010
The only Silk Serica I can find is the wgt of 3-ply sewing thread. I don't think this is what the pattern is calling for especially with a #4 steel hook. Any advice on what thread to use?
erikacruz21
May 01, 2010
I Love this pattern, I just finished it. I made it for my nephews bride for her . I did a couple of changes with the beads. I used pearls instead of the wood ones and I made it white. It came out Beautiful. Thank You
older than dirt
Feb 06, 2010
good, this bag pattern is just beautiful, it would be worth having even if you never used it. Just to look at.
Crafter 9681825
Feb 03, 2010
this looks like something my granddaughter would really like. I havn't crocheted in awhile. Is this something for a more seasoned person or can a relatively new beginner do? My granddaughter is in her mid twenties an likes lacey or dressy type clothing.
Crafter 4266996
Nov 26, 2009
this is a most beautiful bag I have ever seen gonna make for my sister for christman. thank you liz
Report Inappropriate Comment
Are you sure you would like to report this comment? It will be flagged for our moderators to take action.
Thank you for taking the time to improve the content on our site.